How’s the weather? Using a public API with PowerApps (part 1)
Introduction
Okay citizen developers, listen up! This post and its forthcoming second part will teach you how to get PowerApps to connect to an online web service to add an extra dimension of awesomeness to your app. It also covers what I think is the most off-putting aspect of PowerApps work in general – dealing with the horribleness of Swagger/OpenAPI. Hopefully by the end you will find my approach useful to make make it a bit less horrible. If you have not come across OpenAPI. you did not read a previous post of mine when I whined about it. That’s ok because that post is not a prerequisite for this article, BUT another post is required pre-reading.
In a previous post, I created a sample app that demonstrated an inspection scenario where a user would be taking photos, which were then sent to SharePoint via Flow, with nice file names. In this small series of posts we are going to build on this example, so I suggest starting there first and getting to the point where you can save photos to SharePoint via Flow as shown below:


In this post, I will focus on getting PowerApps talking to an external web service…
Now a common inspection scenario would be to capture current weather information each time a photo was taken. A good example would be an park ranger, inspecting sensitive environmental sites, or a plant operator who needs to conduct and document a safety inspection of equipment before it is used. In both scenarios, weather such as rain or wind, might have a material impact on the result of the inspection, so it makes sense to capture location and weather data along with the photo.
Now location data is easy, as PowerApps has the in-built ability to capture GPS data. All we need to do is pass that GPS data to a weather web service to get the local conditions like temperature, humidity and wind speed/direction. At first I thought I could do it all out of the box because Microsoft provides a built-in connection to MSN Weather API as shown below, but unfortunately you can only pass it location data in the form of a city name, not a latitude/longitude.

It did not take long for me to find an alternative. The nice folks at OpenWeatherMap offer an API that does accept geographic co-ordinates as input. Even better, they have a free option, provided you stay within certain limits. To use the service, you need to sign up and generate an API key so they can identify you, which is added to the API call. To access weather data for a location, the URL looks like the following:
http://api.openweathermap.org/data/2.5/weather?lat=[latitude]&lon=[longitude]&appid=[API Key]&units=metric
Of course, the “units” parameter at the end of the URL can be changed in case you live in one of the 3 remaining countries holding out against metric (looking at you USA! ![]() )
)
The data that is returned by this API is in JSON format. For example here is what comes back for my home town of Perth (lat -31.9529 & lon 115.8573)

I have pasted the data in a clearer format below. Note, it pays to get used to the JSON format, as it underpins a lot of modern web applications.
{"coord":{
"lon":115.86,
"lat":-31.95},
"weather":[{
"id":804,
"main":"Clouds",
"description":"overcast clouds",
"icon":"04n"}],
"base":"stations",
"main":{
"temp":5.37,
"pressure":1023,
"humidity":100,
"temp_min":5,
"temp_max":6},
"visibility":7000,
"wind":{
"speed":1.5,
"deg":50},
"clouds":{
"all":90},
"dt":1499297700,
"sys":{
"type":1,
"id":8189,
"message":0.0089,
"country":"AU",
"sunrise":1499296640,
"sunset":1499333125},
"id":2066756,
"name":"Maylands",
"cod":200}
As you can see above this is a bunch of name/value pairs. But now the challenge is to get this API/data into PowerApps so we can use it. Below is an image showing what it looks like when things are wired up into PowerApps. You might be thinking, where did this “OpenWeather.getWeather” function come from? How does it know to ask for latitude, longitude and units of measure?

The answer my friends is OpenAPI/Swagger. Strap yourselves in fellow citizen developers, as we need to go on a fun-filled ride.
Generating an initial OpenAPI file
Basically the OpenAPI specification (formerly known as Swagger) is a way to describe web services. Just as we create columns in document libraries so we have metadata to describe our documents, OpenAPI is basically “metadata for web services”. Unfortunately the comparison ends here because unlike documents in a SharePoint library, describing web services is an entirely different beast. I found the OpenAPI format so ugly and hard to get my head around, it took me an entire day just to use it previously. In short the learning curve is high, and although with persistence you will eventually get there, I found the whole thing to be poorly documented with not enough good examples.
Now it is not my intent to describe the format of OpenAPI. Luckily for us, there are websites that make the process of creating the metadata we need much easier. To this end, we are going to use a service from Apigee called openApiGen that takes 90% of the pain away.
So go ahead and sign up to OpenWeather and get yourself an API key. Confirm that it works in the browser as I showed earlier and then head on over to http://specgen.apistudio.io and follow these simple steps:
Step 1: Run your API
Paste your working API call from earlier into the text box and click the Send button. Check for a successful response and the JSON is in the expected format as shown below: 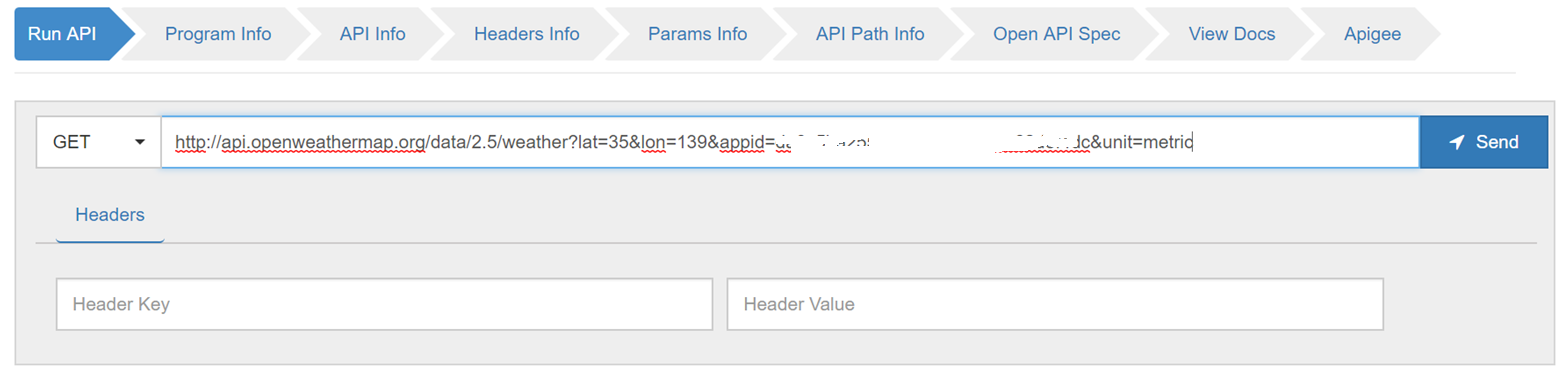

Step 2: Enter API Program Information
This is where you describe your API in general. Note that PowerApps uses this info, so keep the title short and sweet and rename it from the default. I called mine OpenWeather.

Step 3: Update API Call Information
In this step, you have the option to perform more fine-grained tuning of your API, such as the function name that will be called from PowerApps. Like step 2, PowerApps uses this info, so keep your title short and sweet. The main thing is to set the Operation Id, as this corresponds directly to PowerApps as I show below (I called mine getWeather)…

Step 4: Update header info
In this step, you provide information about any API parameters passed in the HTTP headers. In this case the OpenWeather API does not use headers, so there is nothing to verify/edit here…

Step 5: Update Query Parameters
In this step, need to provide additional metadata information the parameters passed to the query in step 1. As you can see below, the 4 parameters we used have been found. Go ahead and add descriptions for the lat, lon and unit parameters, but ignore appid. We actually will not be using appid in the same way as the other three, so no edits need to be made (we will take care of appid later).

Step 6: API Path Info
This step is designed to handle API’s where the URL needs to adjust. (eg /api/{somedynamicvalue}/weather. In our case the URL is static, so there is nothing to do here.

Step 7: Save your goodness!
At this point, you have generated an OpenAPI file! Now that wasn’t too bad was it? Click the bright orange Download button to grab a copy of it.

Tweaking your initial OpenAPI file
At this point you might think that you are done, but not so.. While that site does a great job of generating your file, it is not a 100% guarantee to work, and in fact if we try this in PowerApps now, it will have an issue. For the sake of learning let’s go through the process anyway so you know how to deal with quirks…
So let’s turn our attention to PowerApps. Choose Connections from the left navigation and then click Manage custom connectors”. On the following screen, click Create Custom Connector.


One the next screen, upload your newly minted OpenAPI file. Note the connector name, as it will be based on the API Program Title you specified in step 2 of the previous section.

Scroll down and optionally, add a custom icon. I grabbed the OpenWeather icon from their site and added it here. Click the Continue button at the bottom of the screen.

The next screen is really important to get right. PowerApps needs to know what authentication method should be used when talking to the OpenWeather API. As we learnt earlier, it is an API Key, which is one of the options available. On choosing this option, you will be asked to provide some additional detail. As it states, “users will be required to provide the API Key when creating a connection”. This is a good thing because it allows you to distribute your PowerApp to others without requiring you to hardcode your own API key.

The important thing to get right is Parameter name and Parameter location. You will note that I entered “appid” for Parameter name, which corresponds to identically named parameter in the URL for the web service, I.e.
http://api.openweathermap.org/data/2.5/weather?lat=[latitude]&lon=[longitude]&appid=[API Key]&units=metric
The Parameter location simply tells PowerApps that the API key is in the URL query, and not in the HTTP headers.
The next screen is a busy one, principally because it is where you get to tweak your API definition as from what is specified in the OpenAPI file. First up, on the top half of the screen, in the General section, verify that the Operation ID is correct as per step 3 of the previous section. Note that PowerApps will warn you if the function name does not start with an Upper case letter, so make that change if you are really concerned about it.


The more important bit is further down the screen. Scroll down to the Request section and delete the appid parameter altogether. Since we have already told PowerApps to ask for it when you add a connection to OpenWeather, we should not be asking for it inside the PowerApps function call…

 \
\
Finally, complete the operation by clicking Create connector.

PowerApps will chug away and eventually you will see an error. Unfortunately for us, whatever team designed this part of PowerApps didn’t think things through, because they leave limited space for the error message and the actual meaningful part of the error is truncated. To alleviate this piece of poor design, so move your cursor over the error message to see the full text. Unfortunately the poor design does not stop as this error hover over is fleeting and disappears, requiring you to hover off and back on again to see it.
For the record, it will say:
Your custom connector has been successfully created, but there was an issue converting it to WADL for PowerApps: An error occurred while converting OpenAPI file to WADL file. Error: ‘Required property “type” is not present or not a string at JSON path paths[‘/data/2.5/weather’].get.responses.200.schema.properties.weather.items’

So we are going to have to tweak our OpenAPI file to fix this. If you do not have a text editor that supports JSON, I suggest you download and install Notepad++ to make this easier…
Fixing the OpenAPI file…
Now delving into the guts of the OpenAPI specification is not my idea of fun, nor is teaching you to learn JSON. So let’s just assume you are not familiar with JSON and review the message and see if it helps us:
Error: ‘Required property “type” is not present or not a string at JSON path paths[‘/data/2.5/weather’].get.responses.200.schema.properties.weather.items’
Looking at the OpenAPI file, I see the a pattern. First I can see how it corresponds with the OpenWeather web service API output. For example, the response from calling the API in the browser produces output that starts with a “coord” parameter and then a “weather” parameter.

When I look in the OpenAPI file, I can see those same parameters under the “properties” declaration. Check out the image below… given the property section is below the “Responses” and “200” sections, it is easy to see now that this section of the OpenAPI file is describing the metadata for a successful response from OpenWeather (i.e. HTTP code 200). Hmm… suddenly this ugly file is looking slightly less ugly…

While the image above shows me the section I need to focus on according to the error message. The image below more detailed view of that section with some annotations (and can you tell I just bought a laptop with a pen? ![]() ). I noticed that every property has a type declaration for it (highlighted), except for the property called “items” (marked with red). It seems to be anomalous in that no “type” is designated for “item”.
). I noticed that every property has a type declaration for it (highlighted), except for the property called “items” (marked with red). It seems to be anomalous in that no “type” is designated for “item”.

So the next question is if a type is missing, what type is it? Looking elsewhere in the OpenAPI file, it appeared the missing type was “object” based on the fact that the items property itself was made up of sub properties. So I inserted the “type” : “object” under the declaration of the items property. made the following change:

I saved the file and returned to PowerApps. I deleted the problematic connector and then repeated the steps in PowerApps to create a custom connection. Aha! We have lift-off!!!

Okay, so at this point we have things wired up. I hope this gives you the confidence to wire up other web services to PowerApps.
In the next post, we will make use of this newly connected API in PowerApps!
Until then, thanks for reading
Paul Culmsee
Man, you’re good.
M.
very good and helpful, but one question here: if URL is like something this:
http://api.openweathermap.org/data/2.5/%5Blatitude%5D.
just one parameter, not “lat=” before [latitude], how to set “Params Info”?
Thanks and look forward to your information.
Having read this I thought it was very informative.
I appreciate you spending some time and effort to put this
informative article together. I once again find myself personally spending a significant amount of time both reading and leaving comments.
But so what, it was still worthwhile!
Dude…thank you, Your efforts in elaborating will spawn great things
It is mentioned in the documentation that we can pass the latitude and longitude to the MSN connector and get the current weather:
https://docs.microsoft.com/en-us/connectors/msnweather/#get-current-weather
But, I am not sure how to pass this information to get current weather endpoint.
Is it possible now? or I have to use the alternative way you are suggesting?
As of today’s date we can use latitude and longitude in MSN weather connector like below:
MSNWeather.CurrentWeather(Location.Latitude&”,”&Location.Longitude, “Metric”)
As of today’s date, we can use the latitude and longitude in MSN weather connector like:
MSNWeather.CurrentWeather(Location.Latitude&”,”&Location.Longitude, “Metric”)