A tribute to the humble “leave form” – Part 7
[Note: It appears that SharePoint magazine has bitten the dust and with it went my old series on the “tribute to the humble leave form”. I am still getting requests to a) finish it and b) republish it. So I am reposting it to here on cleverworkarounds. If you have not seen this before, bear in mind it was first published in 2008.]Hi all
Welcome to edition 7 of this seemingly never-ending tribute to the humble annual leave (vacation) form. This is getting to be like the “Friday the 13th” series of movies – they never stop!
First up, I want to categorically state that, as a heterosexual Australian male, I have a few stereotypical personality traits . I enjoy beer, kung-fu movies, Burger Rings, Vegemite and Tim-Tams, love the cricket (especially playing India) and most importantly of all, I do not read instructions. Period. I think that ignoring the RTFM rule is a characteristic of all of humanity but Australians in particular seem to celebrate this trait as something endearing.
Therefore, it pains me greatly to have to inform you that this seventh edition of the series is one of those posts where you have to put on the brakes and explain some really boring conceptual stuff to proceed with the rest of the series. Yeah, I know – theory is boring and sucky and you just wanna get into the nuts and bolts of it all. But, as Homer demonstrates below, sometimes we have to defy our genetic programming and actually read the instructions. The alternative is a SharePoint solution equivalent to that of Homers BBQ.
This post will deal with some of the mechanics of form submission and form publishing.
What has gone before…
The first few posts in this series are starting to get hazy – it seems so long ago now. To sum it all up in a nutshell, we introduced the leave form as a means to introduce a lot of key SharePoint features in an easy to understand and relevant way. We set several requirements that we had to achieve.
- Automatic identification of requestor
- Reduce data entry
- Validation of dates, specifically the automatic calculation of days absent (excluding weekends)
- Mr Burns is not the only approver, we will need the workflow to route the leave approval to the right supervisor
- We have a central leave calendar to update
At the end of part 6 we were working on validation of dates. We added some validation rules to ensure that you could not return to work before you started your leave of absence. But at the end of that post, I showed how a published form did not obey our data validation rule, where the form was set to prohibit incorrect dates, yet I was able to click save and put the form straight into the document library. What the…?Why did this occur?
Saving vs Submitting – form confusion
Like everything else designed by nerdy engineers, InfoPath and Forms Services can be used in a few different ways. This offers flexibility of course, but has the disadvantage that if the flexibility is not well understood (i.e not reading the instructions ![]() ), it is easy to cause user confusion. Homer is a classic case of a person who, when faced with two choices, will always pick the wrong one.
), it is easy to cause user confusion. Homer is a classic case of a person who, when faced with two choices, will always pick the wrong one.
You have to remember that InfoPath started out as a program installed onto your PC, along with other MSOffice applications. Thus, historically, an InfoPath form is just another type of document. In its simplest (and default) scenario, the form is very much like any other MSOffice document in that you create/open the form, edit it and then save it.
But hang on a second! Most of the time, the data collected in the form is part of a larger business process. Also most of the time, business process needs to do “stuff” with the information that the user has entered. In other words, the data usually doesn’t stay in the forms that users fill out.
So the InfoPath designers, wanting to please everybody, designed InfoPath in such a way that saving a form and submitting a form are two different things. Homer Simpson doesn’t care about this nor should he. He just wants to fill out the form so he can go back to dreaming about the land of chocolate.
Here is the key thing you need to know, though. Saving a form is, in effect, performed on the presumption that the form is still a work in progress. Saving the form should be thought about in the same way you would save a word document after performing some edits. Because the form is still a work in progress, data validation should not take place.
But at some point the form stops being a ‘document’ and becomes…well… a form! It is complete and no more edits should be made. This is when you actually submit the form!
Submitting a form triggers the data validation rules that were set up in part 6.
Big deal…When does this get hard, Paul?
Okay, so you may not think that there is really that much of a drama with the whole “save vs submit” thing. But when InfoPath is integrated with SharePoint via Forms Services, it can get complicated. You see, InfoPath allows you to create forms that submit their data to one or more locations. For example, the Springfield Nuclear Power Plant leave form could be set up so that when Homer submits his application, the data is sent to a database, and a copy of each completed form is also sent in an e-mail message to Waylon Smithers and Monty Burns.
For reference, here are the places that InfoPath can submit to;
- A Microsoft Access or Microsoft SQL Server database
- A Web service
- A server running Microsoft Windows SharePoint Services
- In an e-mail message
- An application on a Web server
- A custom application that hosts InfoPath
Now, given that this series of articles is about SharePoint, which option of the above list do you think we are interested in? You guessed it! The third option in the above list is SharePoint.
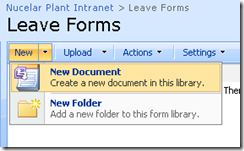
But here is the root cause of the confusion, when you publish an InfoPath form to SharePoint, all forms that you fill in end up being created in a document library. Back in part 4 of this series, we first published the form and as part of that process, created a form library called “Leave Forms”. Consider the screenshot below. We are about to create a new form in this library.
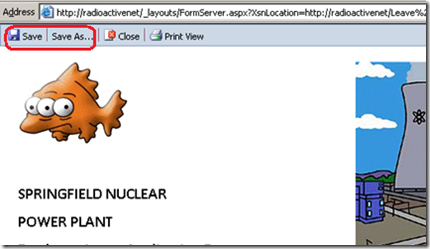
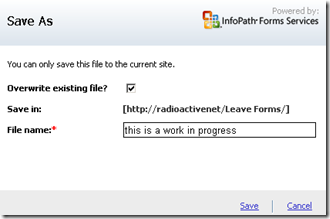
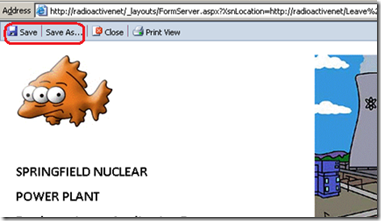
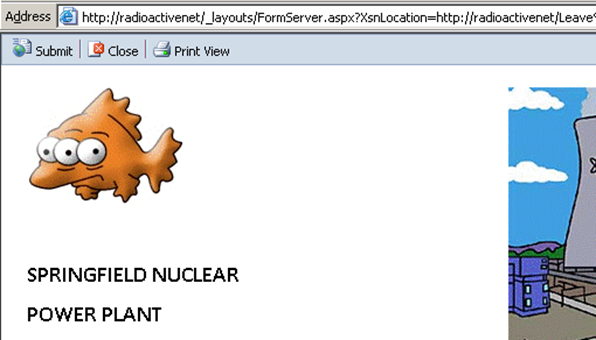
Below is a screenshot of the new form to fill out. Note the toolbar at the top with a “Save” and “Save As” options. If you then click ‘Save” on the form, it will prompt you to save into the above document library.
Therefore, if you use the “Save” option, the “In-progress” copies of the form are stored in the document library and no data validation has taken place. You really have not submitted the form at all.
Does the end user realise this? Some might – but come on! This is Homer J Simpson we are talking about here!
So clearly we need to submit this form because in part 6 we added validation rules that need to be checked. But, what the…? – How the hell do I submit?
Setting up form submission
Real programmer disclaimer: Yes I know there are other ways of doing all of this, but remember – this series of posts is for beginners.
Okay, for now the theory bit is over, and now we get to play with InfoPath again. We are going to add the form submission capability to our existing form so that we can actually submit the form. The thing is, I am also going to *remove* the “Save” and “Save As” options from that toolbar, so that the only action you can make is to submit.
Why would I do this? Several reasons.
- It is a simple form and really, you either fill it in and submit or you don’t. There really isn’t that much of an imperative to save this form, prior to submitting it.
- When you submit a form, and you are submitting to a SharePoint library, the submitted form is saved. Therefore, I don’t need a “work in progress” copy.
- The Homer factor. If you supply a “Submit” and a “Save” button, you know full well that Homer will go and click the “Save” button, when he should be clicking “Submit”. As soon as the save dialog pops up, he won’t know what to do. At this point he will lose interest and fall asleep.
Hiding save buttons
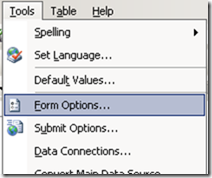
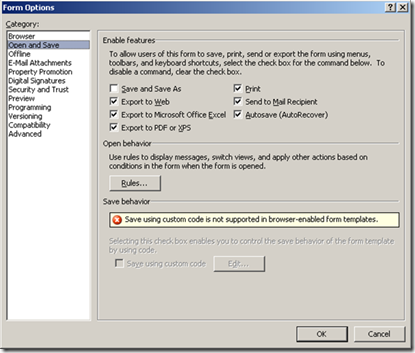
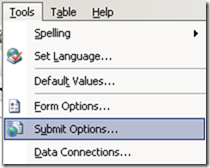
So, start InfoPath, open up the leave form in design mode, and choose “Form options” from the “Tools” menu.
From the list of options, choose “Open and Save” and uncheck the “Save and Save As” checkbox as shown below.
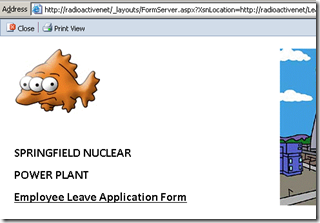
Click “OK” and republish this form to SharePoint using the steps described in part 4. Note the before and after screenshots below ![]()
Spot the difference? The “Save” and “Save As” buttons are missing, and with that I can confidently say that I have now made this form Homer proof because he can’t inadvertently click “Save” and think he has submitted the form. Of course, it is so Homer proof that he now has no way to submit the form, so now we have to enable the “Submit” button.
Enabling the submit button
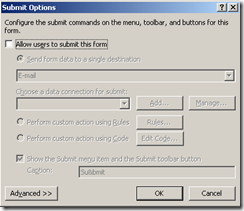
Once again, open the leave form in design mode, and choose “Submit Options” from the “Tools” menu. InfoPath will dutifully display a fairly nondescript dialog box that, at first glance, seems rather simple. There is a checkbox that you need to tick to “enable form submission”. Sweet! How easy is that?
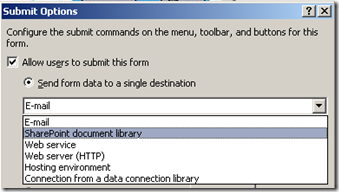
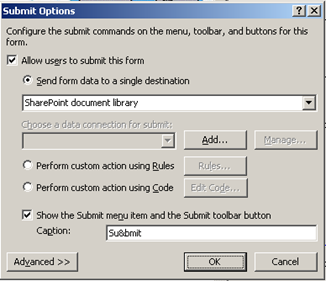
Upon checking that box, you now have to choose where you are going to send form data to. The default option is “Email”, but we want to send it to a SharePoint document library, as shown below. Choose SharePoint and then click OK.
Uh oh! Did I say this was going to be easy? Okay I lied ![]() .
.
So, what is this message telling us? “You must select a data connection for submitting to a SharePoint document library”. Hmmm…I hope that something about that message sounds vaguely familiar to you. That is because this is not the first time we have dealt with data connections.
Data Connections revisited
Way back in part 5, you earned your CCLFD certification by creating a data source that automatically identified Homer by talking to SharePoint web services. If you missed that post, then I suggest reading it, as it is a great example of utilising data connections to *receive* data into InfoPath.
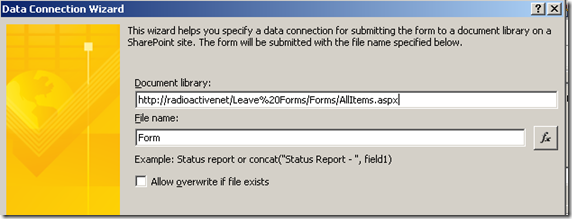
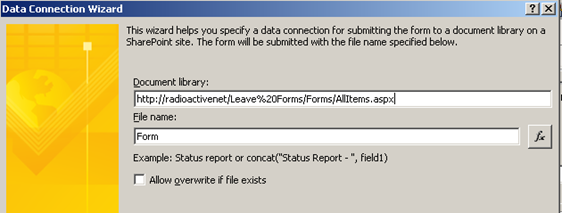
In part 5, we set up a data connection to a webservice by following a wizard. To remind you of how it was done, I have copied the screenshots to this post.
Now, take a look at the second screenshot from the above three. It is asking you to create a connection to receive or submit data and at that time we were receiving data. Guess which one we are doing this time? ![]()
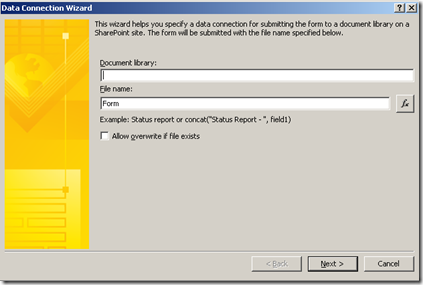
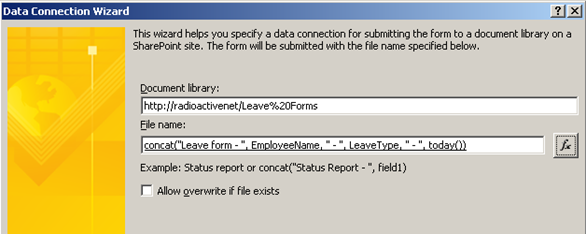
So, back to our “Submit Options” dialog box. We were not able to click “OK”, because we have not created a data connection to submit the data. Let’s now start this process by clicking the “Add” button. Given that you have already told SharePoint that you want to submit to a document library, InfoPath now wants to know the name of that document library and the name of the file that will be created by the submit.
Now, given that the entire staff of the nuclear power plant will be filling out this form, we don’t want to simply call the submitted form “Form” as suggested by default. If we did that, we would end up with a document library containing a single file called “FORM” due to the fact that all previous “FORM” files would have been overwritten and replaced by the current “FORM”.
Luckily the InfoPath team anticipated this and the filename can be dynamically generated using functions. (We looked at functions early in part 5).
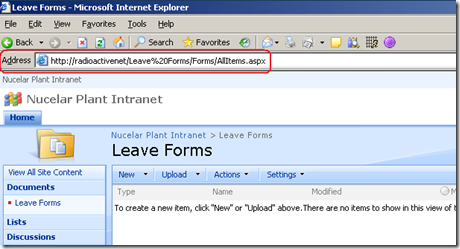
First up though, I will specify the document library to submit completed forms to. It will be in the same document library that we was created when we first published the leave form in part 4,the imaginatively titled “Leave Forms”. Below is the library as it is inside the radiactivenet site. Note the URL is exactly what I entered into the “Document Library” field.
A unique filename
The final step for submission is to create an auto-generated filename that is unique. Although the principle is dead simple, this bit is actually tricky when you do it for the first time.
The file naming convention to be used will be as follows:
“Leave Form – ” + [EmployeeName field] + ” – “, [LeaveType field] + ” – ” + [todays date]
Here are some examples of this convention in action with various staff.
- “Leave Form – Homer Simpson – Sick – 2007-09-18″
- “Leave Form – Lenny Leonard – Annual – 2008-11-22″
- “Leave Form – Carl Carlson – Bereavement – 2008-12-25″
So, how do we achieve this? Let’s get back to the screen where we are prompted to add a file name for a submitted form.
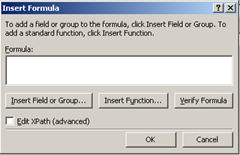
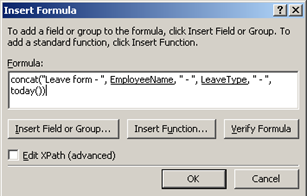
Click the “Fx” button to the right of the “File name” textbox and you will be presented with the (far too small to be user friendly) “Insert Formula” dialog box. We are going to create a formula that constructs the desired file name.
The first thing to note is that we will be using a combination of fixed text, the data entered on the form and built in InfoPath functions. To join all these together in the manner we want is referred to as concatenation. Why do people call it concatenation? I have no idea but it’s obvious that an engineer thought up that name! ![]() .
.
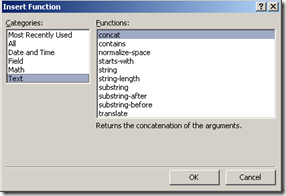
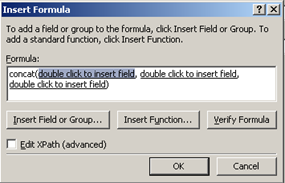
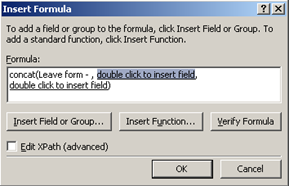
We start by inserting the concatenation function called “concat”. Click “Insert Function” and in the leftmost window choose the “Text” category. The function called “concat” should be the first one listed. Select it and click “OK’ and you will see that a partially completed formula has been created.
The first part of our file name is the text “Leave Form – “. So single click the first occurrence of the “double click to insert field” hyperlink and it will be highlighted. From here, simply type in the string “Leave Form – ” (including the double quotes).
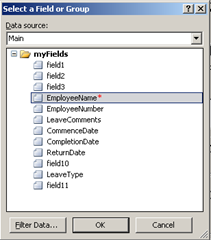
The next part of the file name is the name of the employee. We already have this, because in part 5 we set up a data connection to automagically grab first name and surname and store it in the textbox called “EmployeeName”.
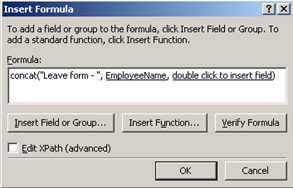
Single click the next occurrence of the “double click to insert field” hyperlink and it will be highlighted. From here, click “Insert Field or Group” and choose “EmployeeName” from the list of fields.
Okay, so we have the “Leave Form – Homer Simpson” part done. Next we want a hyphen ” – ” and then the LeaveType field. By now you should be getting familiar editing the formula in the dialog box. Rather than bore you with even more screenshots, I’ll talk through the next 2 steps.
- Single click the next “double click to insert field” link.
- Type in (note the leading and trailing space) ” – “
- Type in a comma (minus quotes) “,”
- Click “Insert Field or Group” button
- Choose the “LeaveType” field and click OK.
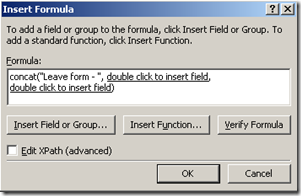
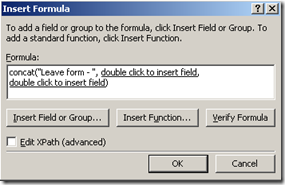
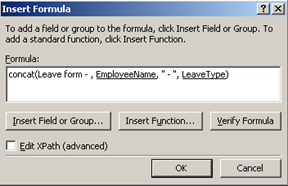
If all has gone to the script, then you will see this in for formula box.
Note that you can use the mouse to place the cursor anywhere in the Formula textbox and modify what is there.
Finally, we need another hyphen and to insert another function. This time the function is called “time” and it returns the current date in a short locale based format.
- Referring to the above screenshot, place your cursor between the last letter of the underlined LeaveType (which is “e” ) and the closing bracket.
- Type in (including the quotes and note the leading and trailing space) ” – “
- Type in a comma (minus quotes) “,”
- Click “Insert Function” button
- Choose “Date and Time” from the Categories List in the “Insert Function” dialog box
- Choose “today” from the list of functions and click “OK”
We are done! The final formula looks like this. Click “OK” and you now should be back at the data connection wizard (the second screenshot below).
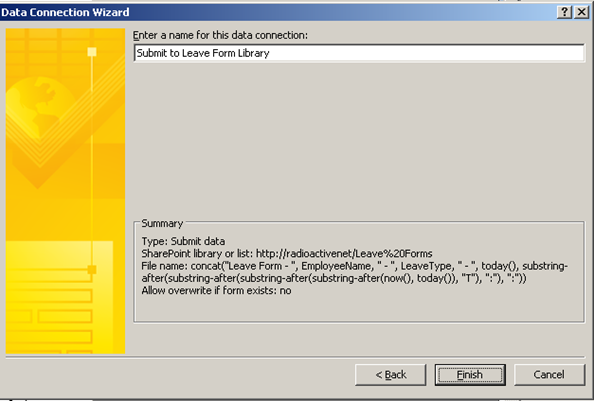
Click “NEXT” on the wizard, and we are prompted to give this data connection a name. Since this data connection has been created to submit leave forms to a document library called “Leave Forms”, I figured that a good name would be “Submit to Leave Form Library”. Click “Finish” and you are done!
To recap on what we have completed in this section, each time a form is submitted, its filename will be automatically specified and the end-user does not have to worry about it.
All rightie, then! Let’s republish this form to SharePoint and take a look at the effect.
Testing it out
Assuming everything worked, the effect of what we have done is immediately noticeable. We now have a “Submit” button on the form where the “Save” and “Save As” used to be. Sweet!
So let’s test the data validation rules that we created in part 6. If you recall, this form should not be submitted if the return date is before the start date. For that to really happen you would have to be Dr Who and use the Tardis to arrive before your departure…
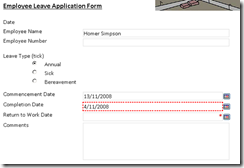
Below is the form with deliberately incorrect data (click to enlarge).
If I now click the newly visible “Submit” button, what happens? Ecccccxcelent! It refuses to submit the form.
I don’t know about you, but this is one of those error messages that some people simply will not read. Homer will no doubt call technical support but the point is, crap data has not gotten past the form in the first place.
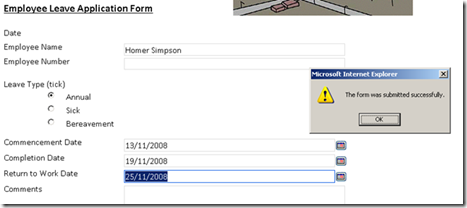
Now, when we correct the fault and resubmit the form, it accepts!
Click “Close” and we now see the newly submitted form in the document library, saved with our file naming convention! Woohoo!
Conclusion (Are we done yet?)
We now have achieved the goal of ensuring that our form is validated before being submitted. From a skills point of view, you now have created data connections to both send and receive data and you have integrated your form with web services, as well as some nice data validation logic.
Waylon Smithers is still pleased with progress thus far, and Homer hasn’t managed to completely derail things just yet.
But unfortunately for all of us, there is still much work to do. The next post will spend some time pimping up this whole validation and submission process, illustrating a pitfall or two along the way.
Thanks for reading
[Note: I never finished this series for various reasons. I hope that these 7 posts helps you nonetheless]
Paul Culmsee



![image_thumb[2] image_thumb[2]](http://www.cleverworkarounds.com/wp-content/uploads/2013/07/image_thumb2_thumb.png)
![image_thumb[23] image_thumb[23]](http://www.cleverworkarounds.com/wp-content/uploads/2013/07/image_thumb23_thumb.png)
![image_thumb[25] image_thumb[25]](http://www.cleverworkarounds.com/wp-content/uploads/2013/07/image_thumb25_thumb.png)
![image_thumb[26] image_thumb[26]](http://www.cleverworkarounds.com/wp-content/uploads/2013/07/image_thumb26_thumb.png)




Funny how to! Good job!
Hi Paul – I’m currently new in InfoPath and really doesn’t have that much experience on this technology. I’m encountering this error message in opening the form after clicking the link of the filename – “There has been an error while loading the form. The following file is not a valid InfoPath form: (https://…..and then weird characters in the filename). Filename was set to the concatenation of the firstname, lastname fields then time – First name field has the letter “ñ” on it, why I’m stating this is because I was assuming that this has cause the error, for the weird characters appearing seem to replace the letter ñ in the Firstname field.
I really appreciate your response on this. Thank you so much. You can also connect with me through the email that I have provided. 🙂
Great write-up. Love the humour.
I have a leave request form similar to yours. The challenge I am having is that some leave is for only a few hours take the afternoon off, etc). A browser enabled form will not support date/time in one field, thus a Calendar view showing who is off when will not be usable as the default time is midnight to midnight and not (let’s say) from 11:00am to 4:00 pm. Hope I am explaining it correctly. Have you found a solution to this issue?
Regards,
Karl
Really useful, thank you
However, is there a way of analysing the data gathered by these forms so that, for example, the number of days taken by an individual over the year can be extracted. I am thinking if the data can be sent to Excel and a Pivot Table used.
Cheers