Back to Cleverworkarounds mainpage
 

Some seriously powerful (and free) PDF functionality in PowerApps and Flow

Hiya

Pretty much every time I run a project kick-off meeting involving tools like SharePoint or PowerApps, I always ask the group the following question:

“If you had <insert goal here>, how would things be different to now”?

(Replace <insert goal here> with any common IT platitude like “improved collaboration”, “knowledge management”, “big data analytics” or “digital transformation”. )

Now inevitably, someone will say something like “I would have information at my fingertips”. While that may sound like a cliche, these days, it is pretty easy to meet this goal. So easy in fact, that I can do it in around 10 minutes using a SharePoint Document Library, a quick PowerApp and a Flow of only 5 steps. I then get to be a smartass, hand them my phone and say “there you go – at your fingertips… That’ll be $250 thanks”.

Now if you want to score $250, I have bad news for you. No client has ever actually paid me when I used that line. But nonetheless, if you have been looking for a demo to show just how powerful these tools have become, then one is pretty good… If you check the image below, you can see I have a PowerApp that is browsing a SharePoint document library and irrespective of whether the document is Word, Excel or PowerPoint, is loading it as a PDF into PowerApps for preview. Better still, this solution is very much in the citizen developer realm…

A common use-case for this sort of solution is a field worker who needs to access schematic data like drawings or equipment documentation. I have also deployed something similar for quality management and safety apps. In all cases, users had a need to be able to retrieve documents quickly and easily…

How to build this app

This app consists of a simple PowerApp, a SharePoint doclib and a 5 step Flow.

Step 1: Create a document library in SharePoint – in my case I called my library “FingertipsBaby”…


image_thumb2_thumb

Step 2: Start PowerApps studio and make a blank tablet app.

Step 3: Connect the document library as a data source using the SharePoint connector. Note, although document libraries are not listed by default, you can definitely connect them. Just scroll to the end of the lists and in the last box, type in the name of your document library…

image_thumb9_thumb

Step 4: On the left side of the screen, add a blank vertical gallery and linked it to the data source.

Step 5: Add a label to the gallery and set its Text property to ThisItem.’{FilenameWithExtension}’. If you check the image below, you can see my three documents listed from my library. Not pretty I know, but this is a 10 minute demo remember?

image_thumb5_thumb

Step 6: Go to the Action menu and click the Flow icon. in the Data panel that opens on the right, click Create a new flow. A new tab will open in your browser and log you into flow. A new flow will be created using a PowerApps trigger as shown above. Take the opportunity to give your flow a name, such as “PDF Viewer”

image_thumb12_thumb

Explanation interlude:

Now at this point I feel some explanation is needed. We are about to use a few recent enhancements to Flow and SharePoint. Kudos needs to go to Brian Edwards who made me aware of a powerful new SharePoint API that among other things, generates thumbnails and PDF’s of documents. Brian already has a blog that explains how to do thumbnails – so consider this article a companion one that does PDF’s.

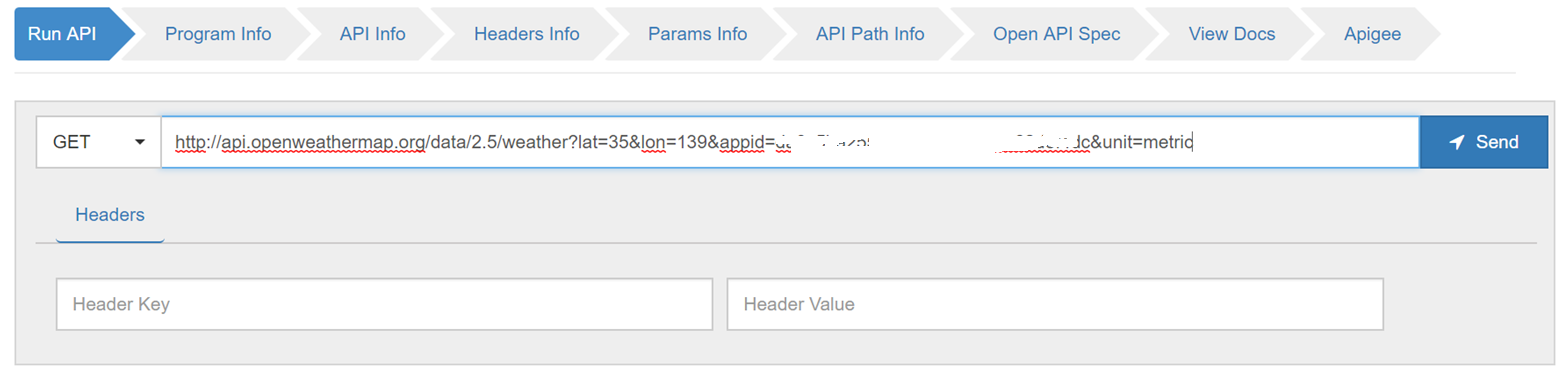
The key to the whole thing is an API called RenderListDataAsStream. This is a very powerful API that has a truckload of goodness, but for now I will keep it simple. I will pass a SharePoint List Item ID of a document to the API and it will give me back a PDF. The API call looks like this:

_api/web/lists/GetbyTitle(‘FingerTipsBaby’)/RenderListDataAsStream?FilterField1=ID&FilterValue1=<List Item ID>

In the body of the request, I need to specify the data I’d like returned. The parameter is called RenderOptions and looks like this:

    “parameters”: {

       “RenderOptions” : 4103

    }

)

What is the deal with the number? Well, the documentation includes a table of different interesting things you can return, which you can do by adding the Values together.


Label Description Value
ContextInfo Return list context information 1
ListData Return list data 2
ListSchema Return list schema 4
EnableMediaTAUrls Enables URLs pointing to Media TA service, such as .thumbnailUrl, .videoManifestUrl, .pdfConversionUrls. 4096

So we are asking this API not just to bring back the data associated with a list item, but also some additional useful stuff. The last entry is particularly interesting as it mentions a mysterious beast known as the Media TA service which I assume means “translation”. Basically what happens is if we total the numbers listed in the above table (4103), we will end up all the data we need to do PDF conversion.

Now at this stage, I don’t want to do an exhaustive examination of the JSON data returned by this API call, but I will call out a couple more things before we get to flow…

First up, you will find this entry…

“.pdfConversionUrl”: “{.mediaBaseUrl}/transform/pdf?provider=spo&inputFormat={.fileType}&cs={.callerStack}&docid={.spItemUrl}&{.driveAccessToken}

This parameter refers to a URL that will convert the list item to a PDF. All you need to do is access this URL. How easy is that eh? Now all of the stuff in curly braces are tokens but they are also returned as part of the API call, so they can be grabbed from elsewhere in the output. For example, {.mediabaseURL} is a few lines up and in my case is:

“.mediaBaseUrl”: “https://australiasoutheast1-mediap.svc.ms”

So if we find each token in the .pdfConversionUrl and replace them, we basically have converted our document to PDF without needing to store a PDF. The document can stay in its native format!

Back to Work…

Okay so let’s deal with this flow.

Step 7: Add an SharePoint action called Send an HTTP Request to SharePoint to the flow. Set the Site Address to the site that contains your document library and set the Method to POST. Set the URI to _api/web/lists/GetbyTitle(<docLib>)/RenderListDataAsStream?FilterField1=ID&FilterValue1=, where <Doclib> is the name you specified for the document library (for example, mine is _api/web/lists/GetbyTitle(‘FingerTipsBaby’)/RenderListDataAsStream?FilterField1=ID&FilterValue1=). On the end of the URI, click Dynamic Content and choose Ask in PowerApps as shown below:

image_thumb[6]_thumb

image_thumb[16]_thumb

Step 8: In the Body section, paste the following configuration (watch the quotes when pasting from this article):

    “parameters”: {

       “RenderOptions” : 4103

    }

}

image_thumb[19]_thumb\

Step 9: Click the Save and then Test icon in the top right. Choose the option I’ll perform the trigger action and click the Save and Test button. Click the continue button and on the next screen, type in the ID number of one of the documents in your library and click the Run Flow button. Your flow will start and you can click Done. Assuming it worked, you will see a green tick of happiness.

image_thumb[21]_thumbimage_thumb[23]_thumb

Step 10: Click on the Send an HTTP Request to SharePoint action to expand it. We need to grab the output from the API call for the next action. Find the OUTPUTS section and copy the entire contents to the clipboard….

image_thumb[28]_thumb

Step 11: Go back to edit mode and add a Data Operations action called Parse JSON to your flow. This action will allow us to make use of the output of the API call in the subsequent flow step.

Click the Use sample payload to generate schema link and paste your clipboard contents into the window and click the Done button. In the Content field, go to Dynamic content popout and choose Body from the Send an HTTP Request to SharePoint action.

image_thumb[31]_thumb   image_thumb[33]_thumb

Step 12: Add an Initialize Variable action to your flow. Name the variable PDFURL (or something similar) and set it to a string. Now we come to the most complex bit of the flow where we have to substitute the token we examined in the interlude earlier. Be careful here… this is the most likely place to make an error…

image_thumb[35]_thumb

In the Value textbox, click the dynamic content flyout and find .mediaBaseUrl from the Parse JSON action…

image_thumb[38]_thumb

Next, add the following text to the Value textbox, taking care not to delete what you just added in the previous step. <edit>Please note the image has a quote that is not meant to be there, so ignore it!</edit>

/transform/pdf?provider=spo&inputFormat=

image_thumb[41]_thumb

Now we come to a slightly tricky bit. The next bit of content we need is the file type of the document we are dealing with. Now this is formatted as a single value array, so despite there being only a single value, we need to create an expression to handle it. Click the Expression tab and type in the following:

first(body(‘Parse_JSON’)?[‘ListData’]?[‘Row’])?[‘File_x0020_Type’]

For the uninitiated, this is known as Workflow Definition Language and is well worth learning…

image_thumb[43]_thumb

Next, add the following text to the Value textbox, taking care not to delete what you just added in the previous step.

&cs=

Also be super careful here because at the time of writing, the cursor in this textbox can randomly move and wipe out your edits…

image_thumb[45]_thumb

Now in the Value textbox, click the dynamic content flyout and find .callerStack from the Parse JSON action…

image_thumb[47]_thumb

Next, add the following text to the Value textbox, taking care not to delete what you just added in the previous step.

&docid=

image_thumb[50]_thumb

Now we come to another array that needs to be handled. This is the URL of the document we are dealing with. Click the Expression tab and type in the following:

first(body(‘Parse_JSON’)?[‘ListData’]?[‘Row’])?[‘.spItemUrl’]

image_thumb[52]_thumb

Okay we are almost done… Add an ampersand ( & ) to the Value textbox, and then click the dynamic content flyout and find .driveAccessToken from the Parse JSON action…

image_thumb[55]_thumb

Step 13: Add a the PowerApps – Respond to PowerApps action to the flow. Click the Add an output icon and choose Text from the list of output types. Name the output PDFURL and set the value to the variable you created in step 12 (PDFURL).

image_thumb[57]_thumb

image_thumb[59]_thumb

Ok we completed the flow. Save it and give it a quick review. It should look something like this…

image_thumb[64]_thumb

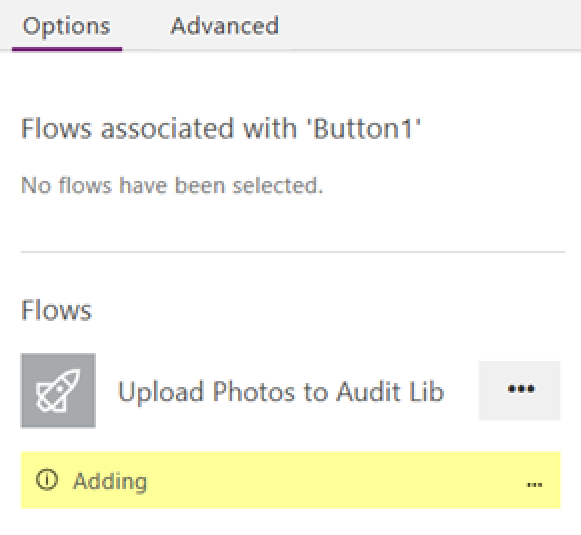
Step 14: Back in your PowerApp, now, select the label gallery you created in step 5. From the Action menu, choose Flow and you should see your newly created flow listed. Click on it to add it to your PowerApp. Once added, the label will partially fill in the OnSelect property to run your flow.

image_thumb[66]_thumb   image_thumb[68]_thumb

Step 15: Complete the flow invocation by adding a reference to the ID of the document from the gallery by using the following function:

Set(PDF,PDFViewer.Run(ThisItem.ID))

image_thumb[70]_thumb

This function will set a variable called PDF to the output from our newly minted flow. When you click on a file in the gallery, the flow will get called. In fact you can try this out before we move on. Press the play icon to test your app and click one of the files. Then go back into edit mode and click the Variables icon from the View menu. You should see a global variable called PDF that has a data type of record.  Clicking the variable will bring up further details and if you click on the record icon, you will see the output returned from flow.

image_thumb[72]_thumb   image_thumb[76]_thumb

If you get this far, that’s great because you are almost home….

Step 16: From the Insert menu, Add a PDF Viewer from the Controls menu. Place it to the right of the gallery and set the Document property to PDF.pdfurl. (if you look closely at the above image you can see that PowerApps has decided that the output of the API is a record with a column name of pdfurl).

Now click on some of the documents… if you did it correctly, you will be seeing PDF’s!  Wohoo! Smile

image_thumb[78]_thumb

Conclusion

Not bad eh? A 5 step flow has enabled a very powerful use-case and once again showcases how well PowerApps and Flow work together. I should note that there are three recent innovations that have enabled this scenario, namely the recent Send an HTTP request to SharePoint action, the RenderListDataAsStream API and the Respond to PowerApps action.

I need to also give credit to my daughter Ashlee, who actually figured a lot of this out earlier in the week. We will record a video on this fairly soon to accompany this post.

If you got value out of this post please let me know. I’d love to hear of other use-cases of variants on this approach


Thanks for reading…


Paul Culmsee


How to make a PowerApps activity feed via SharePoint search–Part 3

Background

Hi and welcome to the third article that describes how to make a PowerApps-based activity feed based on SharePoint search results. If Google’s search algorithm has landed you here for the first time, then I suggest going back to parts 1 and 2 for background and context. What we are building can be seen in the picture below highlighted red..

image_thumb48

Now there are 5 parts to this solution and in this third post, we are in the home stretch because we have done the first three steps and we are halfway through part 4.

  1. Setting up SharePoint search
  2. Querying the search index via a PnP PowerShell script
  3. Creating the Azure function
  4. Creating the custom connector
  5. Testing in PowerApps

I covered parts 1 and 2 in the first post where we created a Result Source in SharePoint and and tested a PowerShell script that uses it to bring back the latest 20 search results. In the second post, we created and tested an azure function, and just deployed our custom connector as shown below:

image

Before we rush off to PowerApps to bask in our awesomeness, let’s test our custom connector first. Click the pencil button to edit your freshly minted connector. Using the breadcrumb, navigate to the Test menu.

image

You will be presented with a Test operation screen and (very likely) a prompt to create a connection. While newbies might find it weird to ask for a connection just after we just made one, it is worth paying close attention to the terminology used. We actually created a custom connector, not a connection. The PowerApps team describe it like this:

Data is stored in a data source, and you bring that data into your app by creating a connection. The connection uses a specific connector to talk to the data source

Therefore, it stands to reason that to test a connector, one has to create a connection. So let’s do that right now by clicking the + New connection button. On the resulting confirmation dialog box, click Create.

image  image

Now you will be redirected to the connections screen. This is somewhat counter-intuitive given at first, since we actually wont do anything with the connection from this screen, but if it makes you feel good, feel free to look for a new connection with the same name as your connector as shown below. This means all went to plan…

image

Using the left side navigation, head back to the custom connections screen. Edit your connector once again, and navigate back to the Test screen. This time the Test Operation screen will show your new connection listed…

image

Scroll down and you will see an Operations section. The code query string parameter that we worked with in part 2 is listed.

image

Note: It should be greyed out and not editable. If it is editable, you have likely forgotten to change the visibility parameter when we created the custom connector in part 2.

image

Click the Test operation button to give it a whirl. After a few seconds, you should see a successful response. Looking in the body of the response, you can see the Json search results produced by your Azure function. Yay!!

image

Part 5 – Testing in PowerApps

Now that we have created a connection and used it to test our custom connector, it is time to move to PowerApps. To keep things simple, lets build an app from scratch to show this working. In PowerApps studio, create a blank phone app and then follow the steps:

1. From the View menu, choose Data sources and click the Add data source from the Data panel. From the list of connections, find the connection we created moments ago to test the connector. Click it and it will be added to the app.

image

image   image

Note the name of your connector matches the Postman collection we created in part 2 of this series. Make a note of this because we will need it momentarily…

2. From the Insert menu, choose Icons and choose the Reload icon.

image

Select the refresh icon you just created and choose the OnSelect property. Type in “ClearCollect(Feed,” and then enter the name of the data source you just added (mine is called “CATalogue”). The intellisense in PowerApps will also present the name of your function that you specified back in part 2 when creating the postman collection. In my example it was called “GetMewsFeed”.

image  image

image

Note: If you are presented to provide a code as a parameter to your data connection as shown below, you missed an important step in the custom connector setup. Recall in part 2 I mentioned that the code parameter in the custom connector had to be changed from none to internal. For now, you can add the same code that was generated as part of the Azure function URL, otherwise update the custom connector.

image

3. Click the new icon to trigger a data refresh and then navigate to Collections from the File menu. You should see a collection called Feed with some of the data returned. If you see a table of data then congratulations! You have successfully queried SharePoint search and returned the data to PowerApps via an Azure function.

image

The columns that are of interest to us for the purposes of this post are:

  • Title
  • ListID
  • ModifiedBy
  • LastModifiedTime
  • OriginalPath

So now that we have gotten some data, let’s now show how we can display it in the form of a data feed.

4. From the Insert menu, choose Gallery and pick a Blank flexible height gallery. In the data panel, choose the Feed collection from the Data source dropdown.

image image

5. Ensure your Gallery is still selected via the left side navigation. Click the pencil icon inside the gallery and then from the Insert menu, choose Label. This label will bind to a column in your data source and you should see something like the second screen below, where data is repeated down the page. If the label control is still selected, the Text property will be set to something like ThisItem.Author.

image

image

Modify the Text property of the label to “Updated by ” & ThisItem.ModifiedBy & ” on ” & ThisItem.LastModifiedTime. The result is a line that shows who modified the item in the feed and when they modified it. While you are here, rename this label control and call it something more meaningful. In PowerApps I use Hungarian notation as it makes it easier to understand complex formulas later. Thus I called this one lbWhoWhen. Finally, resize the gallery to fit the screen and drop the font size of the label so everything fits on one line…

image

image

image

6. Add another label to the gallery (remember to use the pencil icon to ensure the new label control is added to the gallery and not the screen). Place it below the label you created in step 5 and set it’s text property to ThisItem.Title. Adjust the font size and position it appropriately. Rename this label to something meaningful (I used lbTitle ).

image

7. Add an icon to the screen and choose Rectangle from the Shapes section. Resize it so that it looks like a horizontal line (Set the Height property to 1) and change its colour to grey either via the toolbar or via setting the Fill property to “LightGray”. Also rename it to something like Separator.

image   image

Preview the app and the feed should start to take shape…

image

Hopefully you can see by now that we are more or less done, as we are now moving into aesthetics in terms of how our feed is to look. So I will round out this post by showing you a couple of tricks that I think make this feed more interesting…

6a. Pimping your feed (easy)

If you look closely at the sample data I used to build this feed, it includes images as well as list item content. In fact, to remind you of where we started, I mentioned that my daughter wrote an app called CAT-alogue which used three SharePoint lists/libs: There was a list called Cat Directory, a list called CatImageRegister and a library called CatImages.

So let’s make the following enhancements:

  1. If the search results contain a Description field, use that instead of the Title field (the Cat Directory list utilises the built-in SharePoint site column called Description, which happens to be a managed property in SharePoint search)
  2. If the search result is the image library, display the image rather than the file name.

Handling description requires a couple of changes to our Title label. First, we need to set Auto height to On because the description field is multi-line. This is easiest done by toggling it to On via the right-side properties panel when selecting the label as shown below:

image

Next, change the Text property in the label to If(IsBlank(ThisItem.Description),ThisItem.Title,ThisItem.Description). This tells PowerApps to display the Title field if no description has been crawled. The effect should be immediate…

image

But this is a flexible height gallery, so let’s take advantage of this. We will now set the position of our separator rectangle to be based on the height of the Title/Description label. Remember this label is now set to auto-height… To do this you will need to take note of the name of your Title/Description label. Mine is called lbTitle.

Set the Y property of your rectangle to: lbTitle.Y + lbTitle.Height + 20. Previewing this change should result in a change to your screen for the better…

image

6b. Pimping your feed (less easy)

Right! So what we can do about displaying images in the feed? Turns out this is one of those examples that might seem easy, but is actually quite tricky and also not particularly bandwidth efficient either. It also has a lot to do with how you set up your data in SharePoint, so some refresher is needed before we start.

First up, Ashlee’s CAT-alogue app is structured with 3 lists. There is a list called Cat Directory, a list called CatImageRegister and a library called CatImages. The second list is the one that matters here, as each time a photo is taken, the metadata is stored in this list rather than the CatImages library. It then links to the actual photo in CatImages as shown below. Note that the title field for CatImageRegister is the name given to the photo in CatImages.

image   image

Why set it up this way you ask? Well for a start, PowerApps cannot connect to libraries yet, and these days, PowerApps is smart enough to be able to retrieve images from a list like this. So let’s take advantage of this…

Also some more useful nuggets of context: another thing we can take advantage of is the built-in SharePoint search property called ListID. Way back in Part 2 when we did the PowerShell script, I included a line that specified some search managed properties to be returned that are not by default. The line was:

$returnproperties = @(“ContentType”,”ListID”,”ModifiedBy”, “ListItemId”)

Specifically, the property of ListID is what matters here. This property returns the unique ID of each list. Can you see where I am going with this yet?

From the Insert menu, choose Media from the toolbar and insert an Image control into the gallery. Rename it to CatPhoto and resize it and place it under the first label.

image  image

Set the Visible property to only display if the list ID of the feed item is the CatImageRegister list. It will be something like: If(ThisItem.ListID=”11d474d0-5725-4ec5-b273-8bb09a3e097e”,true,false). Of course the ID you need to specify depends on our setup. This should now hide the image control when the ListID does not match my CatImageRegister list.

image

Next, let’s get the image control to display the photo itself. To do this, we will connect to SharePoint using the native PowerApps connector. From the View menu, choose Data Sources and add a SharePoint data source. Choose the SharePoint list that holds a link to your photos (in my case, CatImageRegister).  

image

Now set the Image property of the Image control to something like this: LookUp(CatImageRegister,Title=ThisItem.Title).CatImage. Although things look ugly, you should see the photos…

image

So what we did here was utilise the PowerApps Lookup function which returns first record in a data source that satisfies a formula. In my case I wanted to bring back the record where the Title field in CatImageRegister matched the Title field for each row in the feed gallery. From here, I specified that I specifically wanted the CatImage property and voila!

Next, we make the feed look less sucky by making the position of the Title/Description label more dynamic. If an image is displayed, we will reposition the Title/Description label to the right of the image. To do this, set the X property of the Title/Description label to: If(CatPhoto.Visible,CatPhoto.X + CatPhoto.Width + 10,0). This tells PowerApps to shift the label to the right of the image control when it is visible and sets the X position to 0 when its not.

image

Now let’s set the Y position. In this case, if the image control is visible, let’s vertically align the label to the middle of the image control. But if the image control is hidden, let’s set the label to positioned relative to the top label. To do this, set the Y property of the Title/Description label to: If(CatPhoto.Visible,(CatPhoto.Y + CatPhoto.Height) / 2,lbWhoWhen.Y + lbWhoWhen.Height + 10).

Nice… the feed is looking a lot tidier…

image

Now let’s fix the separator rectangle we created earlier. Here, if the image control is visible, the Y position of the separator should be offset from it, however if the image control is hidden, then it should be based on the Title/Description label. To do this, set the Y property of the separator to: If(CatPhoto.Visible,CatPhoto.Y + CatPhoto.Height + 20, lbTitle.Y + lbTitle.Height + 20).

Preview the app and you should have yourself a nice feed!

image

Conclusion

At this point, I think we have covered enough to give you a really good feel for how PowerApps an play nicely with SharePoint search and Azure functions. While I fully accept this is an advanced scenario for the typical citizen developer, it is still a very low-code scenario and working knowledge of Azure functions and PowerApps/Flow custom connectors is very handy indeed.

I think it also shows that these platforms are highly flexible. This activity-feed scenario was one of those tricky scenarios that in the past, might have been added to the “too-hard” basket or resulted in custom development work.

Finally, I have recorded a series of videos to accompany these posts. I split the videos up into easy to consume chunks. The first one can be found below:


Thanks for reading


Paul Culmsee


How to make a PowerApps activity feed via SharePoint search–Part 2

Background

Hi and welcome to the second article that describes how to make a PowerApps-based activity feed based on SharePoint search results. Although I did this as part of a large real-world client project, because of confidentiality considerations I am utilising one of my daughters PowerApps to illustrate the idea. Her CATalogue app which is shown below, has a feature she called the “Mewsfeed” which displays a list of cat-related activity on a SharePoint site collection, in order of recency…

image

As a reminder, the solution approach is to have PowerApps call an Azure function via a custom connector. The Azure functions runs PnP PowerShell to execute a search against a SharePoint Result Source. You can read the first post if you want to know more about why I utilised this method.

Snapshot

There are 5 parts to this solution.

  1. Setting up SharePoint search
  2. Querying the search index via a PnP PowerShell script
  3. Creating the Azure function
  4. Creating the custom connector
  5. Testing in PowerApps

I covered parts 1 and 2 in the first post where we created a Result Source in SharePoint and and tested a PowerShell script that uses it to bring back the latest 20 search results. Now it is time to do steps 3 and 4. That is, create an Azure function and custom connector so PowerApps can run the script…

3. Creating the Azure function

For the uninitiated, Azure Functions allow you to take your dodgy scripts and turn them into web services. In other words, I can set up PowerApps up to run the search script from part 1 and retrieve the results for display. For this to work, we need a user account to connect to SharePoint. Thus, if you do not have a service account to use, go ahead and create one now, making sure you grant it access to your SharePoint site.

Also, I expect that making an Azure function might be new to some readers. For the sake of brevity, I am not going to exhaustively cover this end-to-end. I will assume you have an Azure subscription, and have created an Azure Function App. The type of function you need is a HTTP trigger running PowerShell as shown below. So give your function an appropriate name and click Create.

imageimage

In a short time, your function will be provisioned with some skeleton PowerShell code. Take a quick look at this default code because it is useful to understand for the future. Line 2 shows that all of the data posted to this webservice is stored in a variable called $req which is assumed to be Json format. The Get-Content cmdlet reads the content of $req and converts it from Json into a PowerShell object called $requestbody. This is handy knowledge, (despite the fact that for our needs PowerApps will not be sending anything to this function) because it means you can create functions that behave in different ways based on what data you to it send when calling it from PowerApps.

image

Now that we have seen the default code in a freshly minted function, we have an additional task to complete before we start modifying it. We have to upload the PnP PowerShell cmdlets that among other things, contain the Submit-PnPSearchQuery command that we learnt about in part 1. The easiest way to do this, is to install the PnP PowerShell module to your PC, and then copy the entire installation folder up to your Azure function app. To install PnP PowerShell to your PC or update to the latest build, follow the documented instructions (which usually amounts to typing in “Install-Module SharePointPnPPowerShellOnline” in a PowerShell admin session).

Once PnP PowerShell module are installed to your PC, we need to upload it to the Azure Function App. To do this, I use the Kudu tool that comes built-in to Azure functions. You can find it by clicking on your Azure function app and choosing the Platform Features menu. From here you will find Kudu hiding under the Development Tools section.

image 

When the Kudu tab loads, click the Debug console menu and create a CMD or PowerShell console (it doesn’t matter which). We are going to use this console to copy up the PnP PowerShell components we just installed locally. Focusing on the top half of the screen, click on site and then wwwroot folders. This is the folder where all of your azure functions are stored (you will see a folder matching the name of the function we just made). What we will do is install the PnP modules here, so it can be used for other PowerShell-based functions that you are sure to develop Smile.

  image

Click the + icon to create a folder here and call it “Modules”. From here, drag and drop the PnP PowerShell install location from your PC to this folder. In my case PnP was installed into C:\Program Files\WindowsPowerShell\Modules\SharePointPnPPowerShellOnline\2.19.1710.1 on my PC. Thus, I copied the 2.19.1710.1 folder and all of its content here.

image

Once the copy is done, click the folder to confirm the PnP modules are there…

image

Now let’s turn our attention to the script itself which actually looks like this…

1. Import-Module "D:\home\site\wwwroot\modules\2.19.1710.1\SharePointPnPPowerShellOnline.psd1" -Global
2. $username = mewsfeed@culmsee.onmicrosoft.com
3. $password = $env:PW;
4. $siteUrl = https://culmsee.sharepoint.com
5. $secpasswd = ConvertTo-SecureString $password -AsPlainText –Force
6. $creds = New-Object System.Management.Automation.PSCredential ($username, $secpasswd)
7. Connect-PnPOnline -url $siteUrl -Credentials $creds
8. $returnproperties = @("ContentType","ListID","ModifiedBy", "ListItemId")
9. $result = Submit-PnPSearchQuery -Query "*" -MaxResults 20 -SourceId "81359f0f-8e1d-4b51-8251-1c4f2006e909" -RelevantResults -SortList @{"LastModifiedTime" = "Descending"} -SelectProperties $returnproperties
10. $output = $result | ConvertTo-Json
11. Out-File -Encoding Ascii -FilePath $res -inputObject $output

Notes to the script:

  • Line 1, via the Import-Module cmdlet, enables us to use the PnP PowerShell cmdlets we just uploaded.
  • Lines 2-7 are about setting up the credential to log into SharePoint online. This uses the service account I mentioned earlier
  • Lines 8 and 9 set up and execute the query against the SharePoint Search Result Source created in part 1. Line 8 specifies the fields we want to return in an array which is then specified in line 9 via the “–SelectProperties $returnproperties” parameter. After all, no point wasting bandwidth sending back data to PowerApps that we are not going to use…
  • Line 10 and 11 format the results into Json, ready to send back to PowerApps.

Handling passwords

An important consideration here is addressing the issue of passwords. This is where the $env:PW comes in on line 3 of my code. You see, when you set up Azure Functions application, you can create your own settings that can drive the behaviour of your functions. In this case, we have made an environment variable called PW which we will store the password to access this site collection. This hides clear text passwords from code, but unfortunately it is a security by obscurity scenario, since anyone with access to the Azure function can review the environment variable and retrieve it. Therefore a better (but not foolproof) solution is to use Azure Key Vault via this method described by Darren Robinson, but this will take us too far afield from an already long article.

In any event, you will find the ability to specify an environment variable under the Applications Settings link in the Platform Features tab. Scroll down until you find the “App Settings” section and add your password in as shown in the second image below. Calling the new setting PW is optional – just make sure you update line 3 of the PowerShell code to whatever name you choose.

image image

Right so it’s now time to test our function. Simply click the Save and run button, and if all goes to plan, you will see a “function completed” message in the logs and a status of 200 OK in the Outputs section of the screen, along with a heap of Json. Don’t proceed further until you are seeing this output. If it does not work here, it certainly will not work in PowerApps!

image

4. Creating the custom connector

Now we come to the area that is most scary-looking and error-prone, which is to create a file that describes the Azure function in a way that PowerApps can use. In a nutshell, PowerApps needs to be told the type and format of data to expect from our new Azure function.

There are two supported ways to do this. Either generate an OpenAPI file or a Postman Collection. In previous blog posts I have taken the OpenAPI route and used the Open API Spec Generator (specgen) to create the custom connector. This time, for the sake of illustrating the alternative, I will use the Postman method to do it instead. For the uninitiated reading this, Postman is a powerful and versatile tool that helps developers make and debug HTTP requests. Like Fiddler, I recommend anybody that has to work with or debug webservices to keep it handy.

So lets get down to business.. here are the steps to make the collection we need.

1. In your Azure function, find the Get function URL link, click it and copy the URL to clipboard. This is your web service endpoint that PowerApps will talk to.

image

Note: The structure of an Azure functions URL is important to understand. Take close note of the code parameter as you will need it later when troubleshooting…

https://[appurl].azurewebsites.net/api/[function name]?code=[ a string of characters ]

2. Start Postman, and on the Builder tab, select POST for the HTTP method, enter the request copied URL for the function and set Authorization to No Auth. Click the Send button and wait for the reply…

image

The response field contains the full response from the API. If all goes to plan, you will see the same Json from your successful test of the PowerShell script earlier. If you get an error, go back to the Azure function and check the log screen to see what happened.

image

3. Save the request to a collection by clicking Save. On the next screen, give the request a name and description. Take care with this name and description, as the custom connector uses these values for the API operation summary and description which will be used in PowerApps (more on that later). In my example I saved the request as “GetMewsFeed”.

image

image

4. Further down the dialog box, click + Create Collection and provide a collection name. Note, also be careful here because the custom connector uses whatever you type here when you call the API. In the example below, I called it “CATalogue”. Click the tickbox and then click the “Save to CATalogue” button (the name of the button obviously depends on your collection name).

image  image

5. Unfortunately we have only saved the HTTP request made to our Azure function so far. This is insufficient, because we need the response with the Json search results so that we can create the custom connector that PowerApps needs. To add the response to the collection, find the Save Response button to the right. Click it, give your response a name and save it (I called mine “GetMewsFeedResponse”).

image

image

6. Next we clear all headers from the collection. Microsoft states that:

“before you export the collection, remove [any] content type and security headers – these were required to make API requests, but they are handled differently in the custom connector.”

Who am I to argue eh? So to to this, find your way back to the API call, rather than the example we just saved. If you are still in the example screen, you will find your API in the navigation above the example name as shown below. Click it to get back to your API call.

image

In the Headers tab, hover over each header, and choose the X next to the header to remove it. Choose Save to save the collection again.

image

7. Now we are ready to export the collection for PowerApps. Choose the ellipsis (. . .) next to the collection, then choose Export. Choose the Collection v1 export format and save the file.

image

8. Now it is time to import our newly minted Json file into PowerApps to create a custom connector. Sign into PowerApps, navigate to Custom Connectors and click + Create Custom Connector and then choose Import a Postman collection. Choose the file we saved in the previous step, give it an appropriate name and click Continue.

image

image  image

Here you will see the first implication of naming decisions you made in previous steps. You will be presented with a General Information screen, which as can be seen below, shows a description based on the name of the collection that you specified in step 4…

image  image

Click the Continue button and you will be taken to the Security tab. We have nothing to modify here, so click Continue to move to the Definition tab, which is where the important stuff is. What you should notice about this screen is the Summary, Description and Operation ID settings matche what you typed in when exporting from Postman in step 3. You have an opportunity here to modify this if you wish…

image

There is a super-important step here! Note how the above image shows a code parameter in the Query section. This has been inferred from the Azure function URL which we examined in step 1. We need to make a change to this configuration, as well as double check things. In my testing, Postman collections do not always capture the code correctly, so click the ellipsis (…) and choose Edit so we can make sure it is right.

image

Comparing the Default value for code in the custom connector to the URL from the Azure function portal below, we can see a discrepancy. The former seems to have stripped off a couple of characters, so make sure that the code parameter in the custom connector matches the azure function URL exactly.

image  image

Additionally, change the Visibility section from none to internal. If you do not do this, PowerApps will ask users to add the code when they use this data source. In some enterprise scenarios this is a desirable behaviour, but not in this case…

image

Now that you have made your edits to code, click the Back button. Let’s now verify that we are sending useful data to PowerApps. Find the Response section as shown below and click on the box that containing the number 200.

image

You will now see what has been done with the Postman collection. All of the Json from the search result has been used to create a payload. Each and every piece of search data that is returned by the PowerShell script is shown. Clicking on the ellipsis for any of them allows you to review the settings and change data type if necessary (eg from a integer to a string).

image  image image

In my case, we are not going to modify the schema that PowerApps has detected. However, there is a possibility that in your case, you might have to if the data types for the parameters have been incorrectly inferred. So let’s go ahead and create our connector by clicking the Create Connector link.

image

Assuming all goes to plan, you have a Shiny new connector!

image

Right! If you have gotten through all that then well done! While all of this might seem a bit foreign and intimidating, rest assured that after doing 1 or 2 of these, the whole process is quite straightforward in terms of building a connector. Most of the hard work is figuring out how to call webservices properly, rather than creating the connector itself.

Phew! I think that is enough for now. In the next and final post, we will test this connector to make sure it works and then add it to a sample PowerApp. Until then, thanks for reading…


Paul Culmsee


PowerApps, Flow and Managed Metadata fields–part 4

Hi and welcome to the final post in this series of articles that examined how we can work around an unsupported function in PowerApps and Flow. Along the journey we have learnt about app principals, the SharePoint REST API and written some crazy JSON.

In this final post, we will tie up a few loose ends. Currently the flow hard-codes the term ID from managed metadata when in fact, we want it to be sent from PowerApps. I will also also give you some insight into handling more complex situations, like multiple managed metadata fields as opposed to a single one.

But first, the (giant) weak spot…

As I write this I if any of you, as you read the first 3 posts, realised the weakness to this method. A strong hint was given in the last post. Recall that the JSON to update a managed metadata field required a term GUID…

{
   "__metadata": { "type": "SP.Data.Coffee_x0020_Shop_x0020_RatingsListItem" },
   "Bean":
   { "__metadata": {"type":"SP.Taxonomy.TaxonomyFieldValue"},
     "TermGuid":"0937fbc2-0dfe-439e-a24f-ba6d13897abd",
     "WssId":"-1"
   }
}

Now right now in PowerApps, there is no managed metadata control. This means you cannot browse a term store like you can in SharePoint. Among other things, one likely reason for this is that there is no REST API support for managed metadata. This has been a constant source of frustration for many as you can see in the 761 votes (as I type this) in uservoice.

What’s the implication of this limitation? For a start, there is no way we can build a REST call that will return us all of the terms in a term set. We have to either hard-code the term GUID’s in our application (ugh) or find another way to get the list of terms (ugh again). One thing that should be noted is that sometimes, hard coding terms and GUID’s isn’t as bad as it sounds. For example, you might have a term set for your corporate offices in certain countries. Since those terms are unlikely to change quickly, one can embed their GUID’s into PowerApps without too much concern.

For the first part of this article, we will use this approach and hard-code our term set of coffee beans into our Powerapp. Then we will modify our flow to expect this parameter from PowerApps.

Back to PowerApps…

If you go back to the PowerApp we built way back in part 1 and also the term set of coffee beans, they looked like this:

image  image

To hardcode our terms into PowerApps, I am going to use the ClearCollect function to create a collection called BeanDetails. I have grabbed the term label and GUID from managed metadata and constructed this function:

ClearCollect(BeanDetails,
{
   Name:  "Fiori",
   Id:  "96a085d2-ed7d-4a75-8d63-c6ca56d0b358"
},
{
   Name:  "Jungle Coffee",
   Id:  "eb04988d-acc4-4bde-9861-506e90de94c5"
},
{
   Name:  "Alfredo",
   Id:  "38db966f-3b0c-4872-a7d3-982ecd8528dd"
},
{
   Name:  "Death Wish Coffee",
   Id:  "e33c65f9-4202-40d7-89f2-aa1a1016ad9f"
})

Next, I use the OnStart property of the screen and paste the ClearCollect function as shown below.

image

Now you will need to save, close and reopen the app for this to take effect. Alternatively add a temporary button and use the above code on the OnSelect property. Either way, you should be able to see your terms and GUID’s when going to Collections from the File menu…

image

Now that we have our term set stored in PowerApps, let’s add a dropdown list to the screen that lists our coffee beans. Choose Insert > Drop Down and set its Items property to BeanDetails.

image

image

Now you should be able to see the choice of beans in the dropdown as shown below:

image

Next, we have to go back to Flow and modify it to accept a term GUID as a parameter (if you recall in part 3 the term is currently hard-coded).

Tweaking Flow…

If you have followed our Flow adventure so far, you should have a flow action called Set Test Term GUID that looks something like this:

image

First, rename this flow step to Get Term GUID and then delete the GUID that we previously had in the Value field. From the Dynamic Content pane, choose Ask in PowerApps.

image

image

Update your flow and before returning to PowerApps, click the Run Now button. Ensure you are now prompted for three parameters, rather than the original two.

image

image

Back to PowerApps…

Now in PowerApps, we have to delete and flow and re-add it so it finds the new parameter we just added.

Select the Submit button and review the OnSelect property. It should show the function below…

image

Now go to View > Data Sources and remove the NewCoffeePlace data source. You should see an error appear on the Submit button. It will say “Invocation of unknown or unsupported function”. Makes sense right? After all, we just took away its connection to flow.

image   image

Once again make sure your Submit button is selected, and select Action > Flows. Choose the flow called New Coffee Place. In a few moments, it will ask you to complete the parameters in the formula bar. If you did this correctly, you should see a prompt for a third parameter – the term GUID.  

image  image

image

The third parameter will be the GUID that matches the term in the dropdown list. The formula for this is:

image

Now to explain Dropdown1.Selected.Id, remember that we set the Items property of the dropdown to BeanDetails collection, which has two columns, ID and Name. Essentially, by specifying Dropdown1.Selected.Id, whichever bean name is the currently selected one in the dropdown, the GUID will be sent to Flow…

image

Test this by putting the Powerapp into preview and adding a new café. If all things go to plan, you will see your new entry along with the managed metadata term. Yay!!

image  image

Hard-coding sucks – surely there a better way?

At this point you might still be hating the fact we had to hard-code the term ID’s into our app. I can sympathise, as it irritates me too. So is there a way to dynamically load the term set into PowerApps? Turns out there is, provided you use an Azure function along with PnP PowerShell.

I won’t cover this in detail here, unless there is sufficient demand, but I will explain the high level overview.

  1. Set up an Azure function using PowerShell
  2. Load PnP PowerShell modules
  3. Write a PowerShell script to connect to your tenant and pull the terms from the term set.
  4. Convert the terms to JSON output
  5. Create a custom connector for PowerApps to consume it.
  6. Add the custom connector to your app, and pull down the latest term set on startup.

Now I wrote another blog post where I went through another example of using Azure functions with PowerApps, and that covers a lot of detail on steps 1, 2, 5 and 6.

In relation to step 3 and 4, here is some PowerShell code sample to do this that you can use as a starting point. Be warned though… you will need to have some understanding of PnP PowerShell to make sense of it!


Import-Module "D:\home\site\wwwroot\modules\2.19.1710.1\SharePointPnPPowerShellOnline.psd1" -Global
$requestBody = Get-Content $req -Raw | ConvertFrom-Json
$name = $requestBody.name
$username = "paul@culmsee.onmicrosoft.com"
$password = $env:PW;
$siteUrl = "https://culmsee.sharepoint.com"
$secpasswd = ConvertTo-SecureString $password -AsPlainText -Force
$creds = New-Object System.Management.Automation.PSCredential ($username, $secpasswd)
Connect-PnPOnline -url $siteUrl -Credentials $creds
$tg = Get-PnPTermGroup -Identity 2830778b-dbfa-4441-bb45-0cbb97b582e7
$ts = Get-PnPTermSet -TermGroup $tg -Identity "Coffee"
$tl = Get-PnPTerm -TermSet $ts -TermGroup $tg -Includes Terms
foreach ($term in $tl) {
   $terms+=$term.terms
}
$output = $terms | Select Name, Id | ConvertTo-Json
Out-File -Encoding Ascii -FilePath $res -inputObject $output

Like I said, if you are interested in knowing more about this, let me know and if there is sufficient demand, I will make a dedicated blog post about it…

Handling multiple managed metadata columns…

I will end this series by showing you how to handle updating multiple managed metadata columns. This is an advanced topic, but is a good test for developing JSON manipulation skills in Flow. Like the previous section I will cover it in a high level only and leave it to you to figure it out for your environment…

So far we have updated a single column, but my real-world project that led to this series actually had 3 columns that were managed metadata. What made this interesting and tricky was that these columns were entirely optional. The complexity is easy to illustrate by looking at what a JSON payload looks like when updating multiple columns. In the example below, I am updating 3 columns called ProjectType, ProjectPhase and ProjectElement respectively…

{
   "__metadata": {
     "type": "SP.Data.ProjectListItem"
     },
   "ProjectType": {
     "__metadata": {
     "type": "SP.Taxonomy.TaxonomyFieldValue"
     },
     "TermGuid": "d4e4494f-34a4-4278-b0ee-7eba372a3f80",
     "WssId": "-1"
   },
   "ProjectPhase": {
     "__metadata": {
     "type": "SP.Taxonomy.TaxonomyFieldValue"
     },
     "TermGuid": "78d647c7-8b92-4ee0-a29d-22346b1af560",
     "WssId": "-1"
   },
   "ProjectElement": {
     "__metadata": {
     "type": "SP.Taxonomy.TaxonomyFieldValue"
   },
     "TermGuid": "6f9f653f-09ec-4771-9063-676d16734b37",
     "WssId": "-1"
   }
}

Contrast the above example with the one below where only one is updated…

{
   "__metadata": {
     "type": "SP.Data.ProjectListItem"
   },
   "ProjectElement": {
     "__metadata": {
     "type": "SP.Taxonomy.TaxonomyFieldValue"
     },
     "TermGuid": "6f9f653f-09ec-4771-9063-676d16734b37",
     "WssId": "-1"
   }
}

So the trick is to build a flexible enough flow that could generate the JSON needed to update 1, 2 or 3 columns. Without knowing whether the column would have a supplied value, meant we have to find a way to handle any combination. The pattern I ended up using was to build the JSON for each of the columns individually before joining them together. Here’s how…

First, I used an Initialize Variable flow action to create the base JSON for each column. The key was to make this conditional, so if the column value was empty, I added an empty string. E.g.

image

The expression used for the value of this variable was this crazy looking Workflow Definition Language Expression:

if(not(empty(triggerBody()['GetProjectTypeTermID_Value'])), concat('"ProjectType":{"__metadata":{"type":"SP.Taxonomy.TaxonomyFieldValue"},"TermGuid":"',triggerBody()['GetProjectTypeTermID_Value'],'","WssId":"-1"}'),'')

Basically this grabs the term ID for a column (in the above example the columns is called ProjectType). I test if the column value is supplied – which is what the “if(not(empty” bit does. I then then construct the necessary JSON to update that managed metadata column. (Note if you need a refresher on the JSON in this function, review part 3)

I repeat this action for the other columns, and then perform the following steps in Flow to construct the complete JSON…

First I initialize an array variable that I call JsonPayloadArray.

image

Next I add the outer JSON for a managed metadata update to the array using the Variables – Append to array variable workflow task…

image

image

Here I am using the concat() function because I need to use the ListItemEntity variable. Note, if you have forgotten about ListItemEntryFullName property,  re-read part 3.

concat('{ "__metadata": { "type": "',variables('ListItemEntity'),'" }')

Next, I add the JSON for each column to the array, provided it is not null. I do this by adding a condition for each column.

The first image below shows the three conditions and the second image shows an expanded view of one of them. You can see in the example below, if a ProjectType was supplied, I add the variable initialized in the above steps to the JsonPayloadArray variable….

image

image

Finally, I use the Join() function to take this array and turn it back into a single string, delimited by commas. This elegantly handles the situation in JSON where the last name/value pair does not have a comma separator.  I do this by initializing a new variable called JsonPayload as a string as follows…

image

concat(join(variables('JsonPayLoadArray'),','),' } ')

Conclusion

This is one of those series that I know only a few people will get some use out of. Hopefully this whole issue of managed metadata will be gone by year-end and these approaches are not necessary. In any event the techniques outlined in these four posts apply to various other scenarios, so learning about JSON manipulation using Flow, or talking to SharePoint via REST/App principals might come in handy for you in other situations.

As for me, this is probably the geekiest series I have written in a long time! I think I better get back to management consulting now!!


Thanks for reading

Paul Culmsee

www.hereticsguidebooks.com


Incredible! Download a PowerApp that determines your IQ from a selfie…

Hiya

Some of you might have seen my post where I explained how how my daughter, Ashlee (18), won a competition from Microsoft to develop a fidget spinner app. Well if you think that was impressive, check this out…

image

Inspired by the positive feedback from the community, Ashlee decided to up her game and investigated some of the various online services that PowerApps and Flow can connect to. The net result is an app which has capabilities that are quite extroadinary. By connecting to Microsoft Cognitive Services in Azure, Ashlee has created an app that will determine your IQ from your facial structure. In other words, you download this app, take a selfie, and via cloud-based machine learning that has processed millions of photos, you can find out your IQ without doing a traditional IQ test!

Even better, Ashlee has kindly donated it to the community as a learning tool, so you can not only learn about these ground-breaking techniques, but you can download/share it with your colleagues too.

So far this app has been used in various global organisations including Microsoft. It has also been demonstrated to rapturous applause at the recent Digital Workplace Conference in Sydney.


So DO NOT MISS OUT on this, especially when using this app is a simple set of easy-to-follow steps!


Ready… Steady…


Wait… I forgot to mention, this app is optimised for phones, and utilises Microsoft speech recognition, so be sure to turn up the volume so you can hear the instructions…


Right are you ready?


Oh… don’t forget… you need an Office365 subscription for this so make sure PowerApps is enabled on your tenant…


Okay, so do the following right now!


1. Download and install PowerApps studio onto your PC.

2. Download Ashlee’s Guess your IQ MSAPP (rename the file extension from .zip to .msapp) and open it in PowerApps Studio

3. In PowerApps studio, save a copy of the App to your tenant (“the cloud”) via the File menu

image

4. Now install PowerApps on your IOS or Android Phone (you will find it in the app store and its free)

5. Run PowerApps on your phone and sign in with the same user account you used in step 3

6. Select the app called Guess Your IQ. It might take a little while to load, but don’t worry – there is a lot of awesome functionality.

7. Enter your name when prompted…

image

8. Now use your phone camera to take a selfie…

image

9. Click the “Find my IQ” button and watch the magic of machine learning…

image  image

10. Seriously, you WILL NOT BELEIVE what happens next!… but you have to try for yourself!


Make sure you let me know what your IQ is! Smile


Paul Culmsee

www.hereticsguidebooks.com


How’s the weather? Using a public API with PowerApps (part 1)

Introduction

Okay citizen developers, listen up! This post and its forthcoming second part will teach you how to get PowerApps to connect to an online web service to add an extra dimension of awesomeness to your app. It also covers what I think is the most off-putting aspect of PowerApps work in general – dealing with the horribleness of Swagger/OpenAPI. Hopefully by the end you will find my approach useful to make make it a bit less horrible. If you have not come across OpenAPI. you did not read a previous post of mine when I whined about it. That’s ok because that post is not a prerequisite for this article, BUT another post is required pre-reading.

In a previous post, I created a sample app that demonstrated an inspection scenario where a user would be taking photos, which were then sent to SharePoint via Flow, with nice file names. In this small series of posts we are going to build on this example, so I suggest starting there first and getting to the point where you can save photos to SharePoint via Flow as shown below:

image  image

In this post, I will focus on getting PowerApps talking to an external web service…

Now a common inspection scenario would be to capture current weather information each time a photo was taken. A good example would be an park ranger, inspecting sensitive environmental sites, or a plant operator who needs to conduct and document a safety inspection of equipment before it is used. In both scenarios, weather such as rain or wind, might have a material impact on the result of the inspection, so it makes sense to capture location and weather data along with the photo.

Now location data is easy, as PowerApps has the in-built ability to capture GPS data. All we need to do is pass that GPS data to a weather web service to get the local conditions like temperature, humidity and wind speed/direction. At first I thought I could do it all out of the box because Microsoft provides a built-in connection to MSN Weather API as shown below, but unfortunately you can only pass it location data in the form of a city name, not a latitude/longitude.

image

It did not take long for me to find an alternative. The nice folks at OpenWeatherMap offer an API that does accept geographic co-ordinates as input. Even better, they have a free option, provided you stay within certain limits. To use the service, you need to sign up and generate an API key so they can identify you, which is added to the API call. To access weather data for a location, the URL looks like the following:

http://api.openweathermap.org/data/2.5/weather?lat=[latitude]&lon=[longitude]&appid=[API Key]&units=metric

Of course, the “units” parameter at the end of the URL can be changed in case you live in one of the 3 remaining countries holding out against metric (looking at you USA! Smile)

The data that is returned by this API is in JSON format. For example here is what comes back for my home town of Perth (lat -31.9529 & lon 115.8573)

image

I have pasted the data in a clearer format below. Note, it pays to get used to the JSON format, as it underpins a lot of modern web applications.


{"coord":{
   "lon":115.86,
   "lat":-31.95},
 "weather":[{
   "id":804,
   "main":"Clouds",
   "description":"overcast clouds",
   "icon":"04n"}],
 "base":"stations",
 "main":{
   "temp":5.37,
   "pressure":1023,
   "humidity":100,
   "temp_min":5,
   "temp_max":6},
 "visibility":7000,
 "wind":{
   "speed":1.5,
   "deg":50},
 "clouds":{
   "all":90},
 "dt":1499297700,
 "sys":{
   "type":1,
   "id":8189,
   "message":0.0089,
   "country":"AU",
   "sunrise":1499296640,
   "sunset":1499333125},
"id":2066756,
"name":"Maylands",
"cod":200}

As you can see above this is a bunch of name/value pairs. But now the challenge is to get this API/data into PowerApps so we can use it. Below is an image showing what it looks like when things are wired up into PowerApps. You might be thinking, where did this “OpenWeather.getWeather” function come from? How does it know to ask for latitude, longitude and units of measure?

image

The answer my friends is OpenAPI/Swagger. Strap yourselves in fellow citizen developers, as we need to go on a fun-filled ride.

Generating an initial OpenAPI file

Basically the OpenAPI specification (formerly known as Swagger) is a way to describe web services. Just as we create columns in document libraries so we have metadata to describe our documents, OpenAPI is basically “metadata for web services”. Unfortunately the comparison ends here because unlike documents in a SharePoint library, describing web services is an entirely different beast. I found the OpenAPI format so ugly and hard to get my head around, it took me an entire day just to use it previously. In short the learning curve is high, and although with persistence you will eventually get there, I found the whole thing to be poorly documented with not enough good examples.

Now it is not my intent to describe the format of OpenAPI. Luckily for us, there are websites that make the process of creating the metadata we need much easier. To this end, we are going to use a service from Apigee called openApiGen that takes 90% of the pain away.

So go ahead and sign up to OpenWeather and get yourself an API key. Confirm that it works in the browser as I showed earlier and then head on over to http://specgen.apistudio.io and follow these simple steps:

Step 1: Run your API

Paste your working API call from earlier into the text box and click the Send button. Check for a successful response and the JSON is in the expected format as shown below: 

image

Step 2: Enter API Program Information

This is where you describe your API in general. Note that PowerApps uses this info, so keep the title short and sweet and rename it from the default. I called mine OpenWeather.

image

Step 3: Update API Call Information

In this step, you have the option to perform more fine-grained tuning of your API, such as the function name that will be called from PowerApps. Like step 2, PowerApps uses this info, so keep your title short and sweet. The main thing is to set the Operation Id, as this corresponds directly to PowerApps as I show below (I called mine getWeather)

image

Step 4: Update header info

In this step, you provide information about any API parameters passed in the HTTP headers. In this case the OpenWeather API does not use headers, so there is nothing to verify/edit here…

image

Step 5: Update Query Parameters

In this step, need to provide additional metadata information the parameters passed to the query in step 1. As you can see below, the 4 parameters we used have been found. Go ahead and add descriptions for the lat, lon and unit parameters, but ignore appid. We actually will not be using appid in the same way as the other three, so no edits need to be made (we will take care of appid later).

image

Step 6: API Path Info

This step is designed to handle API’s where the URL needs to adjust. (eg /api/{somedynamicvalue}/weather. In our case the URL is static, so there is nothing to do here.

image

Step 7: Save your goodness!

At this point, you have generated an OpenAPI file! Now that wasn’t too bad was it? Click the bright orange Download button to grab a copy of it.

image

Tweaking your initial OpenAPI file

At this point you might think that you are done, but not so..  While that site does a great job of generating your file, it is not a 100% guarantee to work, and in fact if we try this in PowerApps now, it will have an issue. For the sake of learning let’s go through the process anyway so you know how to deal with quirks…

So let’s turn our attention to PowerApps. Choose Connections from the left navigation and then click Manage custom connectors”. On the following screen, click Create Custom Connector.

image  image

One the next screen, upload your newly minted OpenAPI file. Note the connector name, as it will be based on the API Program Title you specified in step 2 of the previous section.

image

Scroll down and optionally, add a custom icon. I grabbed the OpenWeather icon from their site and added it here. Click the Continue button at the bottom of the screen.

image

The next screen is really important to get right. PowerApps needs to know what authentication method should be used when talking to the OpenWeather API. As we learnt earlier, it is an API Key, which is one of the options available. On choosing this option, you will be asked to provide some additional detail. As it states, “users will be required to provide the API Key when creating a connection”. This is a good thing because it allows you to distribute your PowerApp to others without requiring you to hardcode your own API key.

image

The important thing to get right is Parameter name and Parameter location. You will note that I entered “appid” for Parameter name, which corresponds to identically named parameter in the URL for the web service, I.e.

http://api.openweathermap.org/data/2.5/weather?lat=[latitude]&lon=[longitude]&appid=[API Key]&units=metric

The Parameter location simply tells PowerApps that the API key is in the URL query, and not in the HTTP headers.

The next screen is a busy one, principally because it is where you get to tweak your API definition as from what is specified in the OpenAPI file. First up, on the top half of the screen, in the General section, verify that the Operation ID is correct as per step 3 of the previous section. Note that PowerApps will warn you if the function name does not start with an Upper case letter, so make that change if you are really concerned about it.

image  image

The more important bit is further down the screen. Scroll down to the Request section and delete the appid parameter altogether. Since we have already told PowerApps to ask for it when you add a connection to OpenWeather, we should not be asking for it inside the PowerApps function call…

image  image\

Finally, complete the operation by clicking Create connector.

image

PowerApps will chug away and eventually you will see an error. Unfortunately for us, whatever team designed this part of PowerApps didn’t think things through, because they leave limited space for the error message and the actual meaningful part of the error is truncated. To alleviate this piece of poor design, so move your cursor over the error message to see the full text. Unfortunately the poor design does not stop as this error hover over is fleeting and disappears, requiring you to hover off and back on again to see it.

For the record, it will say:

Your custom connector has been successfully created, but there was an issue converting it to WADL for PowerApps: An error occurred while converting OpenAPI file to WADL file. Error: ‘Required property “type” is not present or not a string at JSON path paths[‘/data/2.5/weather’].get.responses.200.schema.properties.weather.items’

image

So we are going to have to tweak our OpenAPI file to fix this. If you do not have a text editor that supports JSON, I suggest you download and install Notepad++ to make this easier…

Fixing the OpenAPI file…

Now delving into the guts of the OpenAPI specification is not my idea of fun, nor is teaching you to learn JSON. So let’s just assume you are not familiar with JSON and  review the message and see if it helps us:

Error: ‘Required property “type” is not present or not a string at JSON path paths[‘/data/2.5/weather’].get.responses.200.schema.properties.weather.items’

Looking at the OpenAPI file, I see the a pattern. First I can see how it corresponds with the OpenWeather web service API output. For example, the response from calling the API in the browser produces output that starts with a “coord” parameter and then a “weather” parameter.

image

When I look in the OpenAPI file, I can see those same parameters under the “properties” declaration. Check out the image below… given the property section is below the “Responses” and “200” sections, it is easy to see now that this section of the OpenAPI file is describing the metadata for a successful response from OpenWeather (i.e. HTTP code 200). Hmm… suddenly this ugly file is looking slightly less ugly…

image

While the image above shows me the section I need to focus on according to the error message. The image below more detailed view of that section with some annotations (and can you tell I just bought a laptop with a pen? Smile). I noticed that every property has a type declaration for it (highlighted), except for the property called “items” (marked with red).  It seems to be anomalous in that no “type” is designated for “item”.

image

So the next question is if a type is missing, what type is it? Looking elsewhere in the OpenAPI file, it appeared the missing type was “object” based on the fact that the items property itself was made up of sub properties. So I inserted the “type” : “object” under the declaration of the items property. made the following change:

image

I saved the file and returned to PowerApps. I deleted the problematic connector and then repeated the steps in PowerApps to create a custom connection. Aha! We have lift-off!!!

image

Okay, so at this point we have things wired up. I hope this gives you the confidence to wire up other web services to PowerApps.

In the next post, we will make use of this newly connected API in PowerApps!


Until then, thanks for reading


Paul Culmsee

www.hereticsguidebooks.com


A Filename Generation Example for PowerApps with Flow

Hiya

A client recently asked to make a PowerApps proof of concept audit app for safety inspections. The gist was that a user would enter an audit number into the App, take a bunch of photos and make some notes. The photos needed to be named using the convention: <Audit Number>-<Date>-<Sequence Number>. Eg

  • 114A3-13:04:17-3.jpg is Audit number 114A3, photo taken on 13th of April and it was the 3rd photo taken.
  • 114A6-14:04:17-7.jpg is Audit number 114A3, photo taken on 14th of April and it was the 7th photo taken.

As I type these lines, it is still not possible to save pictures directly into SharePoint from PowerApps, so we are going to build on the method that Mikael Svenson documented. But first let’s look at this file name requirement above. While it seems straightforward enough, if you are new to PowerApps this might take a while to figure out. So let’s quickly build a proof of concept app and show how this all can be achieved.

In this post I will build the app and then we will use Microsoft Flow to post the images to a SharePoint document library. I’ll spend a bit of time on the flow side of things because there are a few quirks to be aware of.

First up create a blank app and then add a text box, camera, gallery and two buttons to the form… Rename the text box control to “Auditnumber” and arrange them similar to what I have done below…

image

First up, let’s disable the submit button until an audit number is entered… Without an audit number we cannot generate a filename. To do this, set the Disabled property of the button labelled “Submit” to AuditNumber.Text=””. This means that while the audit number text box is blank, this formula will return “true” and disable the button.

image

image  image

Now let’s set things up so that when a photo is taken, we save the photo into a Collection. A collection is essentially an in-memory data table and I find that once you get your head around collections, then it opens up various approaches to creating effective apps.

On the camera control (assuming it is named Camera1), set the OnSelect property to “Collect(PictureList,{ Photo: Camera1.Photo, ID: CountRows(PictureList)+1 } )

image

Now if you are a non developer, you might think that is a bit ugly, so let’s break it down.

  • The collect function creates/populates a collection – and the first parameter is simply the name of the collection. You could call this anything you like, but I chose to call mine PictureList.
  • The second parameter is a record to insert into the collection. This consists of a comma delimited set of fields and values inside curly braces. eg: { Photo: Camera1.Photo, ID: CountRows(PictureList)+1 }

Now that whole curly brace thing is a bit ugly so let’s break it down further. First up here is an image straight from Microsoft’s own documentation. You can see a record is a row of fields – pretty standard stuff if you are familiar with databases or SharePoint list items.

In PowerApps formulas, a record can be specified using curly braces. So { Album: “Thriller”, Price: 7.99 } is a record with 2 fields, Album and Price.

Now take a look at the record I used: { Photo: Camera1.Photo, ID: CountRows(PictureList)+1 } . This shows two fields, Photo and ID. The values for the Photo field is Camera1.Photo, which holds the latest photo taken by the camera. The ID field is a unique identifier for the photo. I generated this by calling the CountRows function, passing it the PhotoList collection and then adding 1 to the result.

So here’s what happens when this app starts:

  • The PhotoList collection is empty
  • A user clicks the camera control. A photo is taken and stored in the Camera1.Photo property.
  • I then count the number of records in the PhotoList collection. As it is currently empty, it returns 0. We add 1 to it
  • The photo and an ID value of 1 is added to the PhotoList collection
  • A user clicks on the camera control again. A photo is taken and stored in the Camera1.Photo property.
  • I then count the number of records in the PhotoList collection. As it is currently has 1 record from steps 1-4, it returns 1. We add 1 to it
  • The photo and an ID value of 2 is added to the PhotoList collection

… and so on. So let’s test this now…

Press play to test your app and take a couple of photos. It may not look like anything is happening, but don’t worry. Just exit and go to the File Menu and choose “Collections”. If everything has gone to plan, you will now see a collection called PictureList with the Photo and ID columns. Yay!

image

So next let’s bind this collection to the Gallery so we can see photos taken. This part is easy. On the Gallery you added to the page, set the Items property to PictureList (or whatever you named your collection). Depending on the type of gallery you added, you should see data from the PictureList collection. In my case, I changed the gallery layout to “Image and Title”. The ID field was bound to the title field and now you can see each photo and its corresponding ID.

image  image  image

Now let’s provide the ability to clear the photo gallery. On the button labelled “Clear”, set the OnSelect property to “Clear(PictureList)”. The clear command does exactly what it suggests: clears out all items from a collection. Now that we have the gallery bound, try it out. You can take photos and then clear them to your hearts content.

Now the point of this exercise is to generate a nice filename. One way is by modifying the record definition we were using: eg

From this:

  • Collect(PictureList,{ Photo: Camera1.Photo, ID: CountRows(PictureList)+1 })

To this crazy-ass looking formula:

  • Collect(PictureList,{ Photo: Camera1.Photo, ID: Concatenate(AuditNumber.Text,”-“,Text(Today(),”[$-en-US]dd:mm:yy”),”-“,Text(CountRows(PictureList)+1),”.jpg”) } )

To explain it, first check out the result in the gallery. Note my unique identifier has been replaced with the file-name I needed to generate.

image

So this formula basically uses the Concatenate function to build the filename in the format we need. Concatenate takes a list of strings as parameters and munges them together. In this case, it takes:

  • The audit number from the textbox – Auditnumber.Text
  • A hyphen – “-“
  • Todays date in dd:mm:yy format and converts it to text – Text(Today(),”[$-en-US]dd:mm:yy”))
  • Another hyphen – “-“
  • The row count for PictureList collection, adds 1 to it and converts the result to text – Text(CountRows(PictureList)+1)
  • The file type – “.jpg”

The net result is our unique filename for each photo.

Now we have one final step. We are going to send the entire collection of photos and their respective file names to flow to put into a SharePoint Library. The method we will use will take the PictureList collection, and save it as one giant string. We will send the string to Flow, and have Flow then pull out each photo/filename pair. Mikael describes this in detail in his post, so I will just show the code here, which we will add to the onSelect property of the submit button.

UpdateContext( { FinalData: Concat(PictureList, ID & “|” & Photo & “#”) } )

image

So what is this formula doing? Well working from inside to out, the first thing is the use of the Concat function. This function does something very useful. It works across all the records of a PowerApps collection and returns a single string. So Concat(PictureList, ID & “|” & Photo & “#”) takes the file name we generated (ID), joins it to a pipe symbol “|” and joins that to the photo, and then adding a hash “#”. The UpdateContext function enables us to save the result of the Concat into a variable called FinalData.

If we test the app by taking some photos and clicking the submit button, we can see what the FinalData variable looks like by the Variable menu as shown below. Our table is now one giant text string that looks like:

“filename 1 | encoded image data 1 # filename 2 | encoded image data 2 # filename x | encoded image data x “

image

Now a quick caveat, avoid using PowerApps desktop client to do this. You should use PowerApps web creator due to an image encoding bug.

Anyway, let’s now move to Flow to finish this off. To do this, click on the Submit button on your app and choose Flows from the Action menu and on the resulting side panel choose to Create a new flow.

image  image

A new browser tab will open and sign you into Microsoft flow, and be nice enough to create a new flow that is designed to be triggered from PowerApps. Rename the flow to something more meaningful like “Upload Photos to Audit Lib” and then click the New Step button, and add a new Action. In the search bar, type in “Data Operations” and in the list of actions, choose the “Compose” action…

image  image

Okay so at this point I should a) explain what the hell we are going to do and b) credit Mikael Svenson for first coming up with this method. In relation to the first point, PowerApps is going to send flow a giant string of photos and filenames (remember the FinalData variable – that’s what flow will receive). If you recall with the FinalData, each photo/filename pair is delimited by a hash “#” and the file name is delimited by a pipe “|”. So we need to take what PowerApps sends, and turn it back into rows. Then for each row, we grab the file name, and the file content and upload it to our friendly neighbourhood SharePoint library.

Sounds easy right?

Our first step is to use the compose action we just added to split the data from PowerApps back into photos. This particular workflow action does something really neat. It executes workflow definition language formulas. What are these? Well workflow definition language is actually a part of another Microsoft product called Azure Logic Apps. Flow leverages Azure Logic Apps, which means this language is available to us. Sounds complex? Well yeah, it does at first but when you think about it this is not new. For example, MS Teams, Groups and Planner use SharePoint behind the scenes.

Anyway, the point is that there are several workflow definition language functions we can use, namely:

  • Split() –  Takes a string, and splits it up into smaller strings based on a delimiter
  • Item() – This is used to to return an element of an array. Eg if we use the split command above, item() will refer to each smaller string
  • dataUriToBinary() – This takes an image encoded and turns it back into binary form.

Okay enough talk! Let’s fill in this compose action. First up (and this is important), rename the action to something more meaningful, such as “ProcessPhotos”. After renaming, click on the text box for the Compose action and a side panel will open, showing a PowerApps label and a box matching the PowerApps logo called Body. Click the Body button and the compose textbox should have a value called ProcessPhotos_Inputs as shown in the 3 images below…

image

image

image

So what have we just done? Essentially we told the Compose method to ask PowerApps to supply data into a variable called ProcessPhotos_Inputs. In fact, let’s test this before going any further by saving the flow.

Switch back to PowerApps, click the Submit button and select the onSelect method we used earlier. You should still see the function where we created the FinalData variable. Copy the existing function to the clipboard, as you’re about to lose everything you typed in. Now click the Flow once and it should say that it’s adding to PowerApps.

At this point, the function you so painstakingly put together has been replaced by a reference to the Flow. Delete what’s been added and paste the original function back. Add a semicolon to the end of the function (which tells PowerShell that another command is coming) and then press SHIFT+ENTER to insert a newline. Now type in the name of your Flow and it should be found via auto-complete. Click the matching flow with .Run on the end. Add a left bracket to the end of the flow and it will ask for an input parameter. If you have done it right, that parameter will be called ProcessPhotos_Inputs. Note that it matches the parameter from above image. The parameter we are passing is the FinalData variable we constructed earlier.

image   image

image

Okay so basically we have wired up PowerApps to flow and confirmed that Flow is asking PowerApps for the correct parameter. So let’s now get back to Flow and finish the first action. If you closed the Flow tab in your browser, you can start a new flow editing session from within PowerApps. Just click the ellipsis next to your flow and click Edit.

image

Right! So after that interlude, lets use the first function of interest – split(). In the text box for your compose function, modify it to look like the string below. Be sure to put the whole thing in quotes because Flow is going to try and be smart and in doing so, make things really counter intuitive and hard to use. Don’t be surprised if your ProcessPhotos_Inputs box disappears. Just add it back in again via the “dynamic content” button.

image

In fact, save and close the flow at this point and then edit it again. You will now see what the real function looks like. Note how the ProcessPhotos_Input has magically changed to {@triggerbody()[‘ProcessPhotos_Inputs’]}.

image

Unfortunately this sort of magic will not actually work… there are a few too many curly braces and excessive use of “@” symbols. So replace the function with the following (include quotes):

  • “@split(triggerBody()[‘ProcessPhotos_Inputs’], ‘#’)”

Like I said… flow is trying to be smart, only its not Smile. If you have done things right the action looks like the screen below. Double check this because if you do not have the quotes right, it will get messy. In fact if you save the flow and re-open it the quotes will disappear. This is actually a good sign…

image

After saving the flow, closing an re-opening… look Ma, no quotes!

image

Now for the record, according to the documentation,  the triggerbody() function is a reference function you use to “reference outputs from other actions in the logic app or values passed in when the logic app was created. For example, you can reference the data from one step to use it in another”. This makes sense – as ProcessPhotos_Inputs is being passed from the PowerApps trigger step to this compose function we are building.

In any event, let’s add the next workflow step. The output of the ProcessPhotos step should be an array of photos, so now we need to process each photo and upload it to SharePoint. To do this, click on “New step”, and from the more button, choose “Add an apply to each” action. In the “Select an output from previous steps” action, click “Add dynamic content” and choose the output from the ProcessPhotos step as shown in the sequence of images below.

image   image

image

Next click “Add a condition” and choose the option “Edit in advanced mode”. Replace any existing function with :

  • @not(empty(item()))

image

image

The item() function is specifically designed for a “repeating action” such as our “apply to each” event. It returns the item that is in the array for this iteration of the action. We are then using the empty() function to check if this item has any data in it and then via the not() function so we can only take action of the item has data. In case you are wondering why I need to test this, the data that comes from PowerApps has an extra blank row and this effectively filters it out.

The resulting screen should look like this:

image

At this point we should have a file name and file body pair, delimited by a pipe symbol. So let’s add an action to get the file name first. On the “If Yes” condition, click “Add an action” and choose another Compose Action. Rename the action to “Get File Name” and enter the function:

  • “@split(item(),’|’)[0]”

image  image

The square brackets are designed to return a value from an array with a specific index. Since our split() function will return an array of two values, [0] tells Flow to grab the first value.

Now let’s add an action to get the file body. Click “Add an action” and choose another Compose Action. Rename the action to “Get File Body” and enter the function:

  • “@dataUriToBinary(split(item(),’|’)[1])”

image

Looking at the above function, the split() side of things should be easy to understand. We are now grabbing the second item in the array. Since that item is the image in an encoded format, we are then passing it to the dataUriToBinary() to turn it back into an image again. Neat eh?

Now that we have our file name and file body, let’s add the final action. This time, we will choose the “Create File” action from the SharePoint connector. Rename the action to “Upload to Library” and enter the URL of the destination SharePoint site. If you have permission to that site, you can then specify which library to upload the photo to by browsing the Folder Path.

image  image

Now comes the final steps. For the File Name, click the “Add dynamic content” button and add the Output from the Get File Name step (now you know why we renamed it earlier). Do the same for the File Content textbox by choosing the output from the Get File Body step.

image

Right! We are ready to test. Sorry about screenshot hell in the Flow section, but I am writing this on the assumption you are new to it, so I hope the extra detail helped. To test, use PowerApps on your phone or via the web browser, as the PowerApps desktop tool has a bug at the time of writing that will prevent the photos being sent to Flow in the right format.

Now it is time to test.

So check your document library and see if the photos are there! In the example below I took a photo of my two books for blatant advertising purposes Smile . The 3rd image is the document library showing the submitted photos!

image   image

image

Finally, here are some tips for troubleshooting along the way…

First up if you are having trouble with your flows, one lame but effective way to debug is to add a “Send an email” action from the Ofifce365 Outlook Connector to your flow. This is particularly handy for encoded images as they can be large and often in the flow management tools, you will see a “value too big to display” error. This method is crude, and there are probably better approaches, but it is effective. In the image below you can see how I have added to action below my ProcessPhotos action prior to splitting it into an array.

image   image

Another thing that has happened to me (especially when I rename flow actions) is a disconnect between the trigger connection between Flow and PowerApps. Consider this error…

image  image

If your flow fails and you see an error like

“Unable to process template language expressions in action [one of your actions] inputs at line ‘1’ and column ‘1603’: ‘The template language expression ‘json(decodeBase64(triggerOutputs().headers[‘X-MS-APIM-Tokens’]))[‘$connections’][‘shared_office365’][‘connectionId’]’ cannot be evaluated because property ‘shared_office365′ doesn’t exist, available properties are ”. Please see https://aka.ms/logicexpressions for usage details.’

.. the connection between PowerApps and Flow has gotten screwed up.

To resolve this, disconnect your flow from PowerApps and reconnect it. Your flow will be shown as a data source which can easily be removed as shown below.

image

Once removed I suggest you go back to your submit button and copy your function to the clipboard. This is because adding the flow back will wipe the contents of the button. With your button selected, click the Flows button from the Action menu and then click on the Flow to re-associate it to PowerApps. The third image shows the onSelect property being cleared and replaced with the flow instantiation. This is where you can re-paste your original code (4th image)…

image

image

image

image

Finally, another issue you may come across is where no pictures come through, and instead you are left with an oddly named file, which (if you look closely) looks like one of your compose actions in Flow. You can see an example of this in the image below.

The root cause of this is similar to what I described earlier in the article where I reminded you to put all of your compose actions in quotes. I don’t have a definitive explanation for why this makes a difference and to be honest, I don’t care. The fix is easy: just make sure all of your compose actions are within quotes, and you should be cooking with gas.

Phew! Another supposedly quick blog post that got big because I decided to explain things for the newbie. Hopefully this was of use to you and I look forward to your feedback.

Paul Culmsee

www.hereticsguidebooks.com


So what is this newfangled apps model anyway and why do I care? (part 3)

Hiya

This is the third post in some articles aimed helping strategic or business focused users understand the SharePoint 2013 and Office365 “apps model”, and what it means for the future of SharePoint. In part 1 of this series, I outlined the opportunities and challenges that Microsoft are currently trying to addressing. They were:

  • Changing perceptions to cloud technologies and increased adoption; which enables…
  • The big scary bogeyman known as Google with a viable alternative to SharePoint, Office and Exchange in the form of Google Apps; as well as…
  • An increasing number of smaller cloud-based “point solution” players who chip away at SharePoint features with cheaper and easier to use offerings; while suffering from…
  • A serious case of Apple envy and in particularly the rise of the app and the app marketplace; while dealing with…
  • Customers unable to handle the ever increasing complexity of SharePoint, leading to delaying upgrades for years

These reasons prompted Microsoft’s to take a strongly cloud driven strategy and have really been transforming their business to deliver it. They really have transitioned from a software provider to an application hosting provider and in terms of SharePoint, the “apps” model is now the future of customisation.

Now “apps” is a multifaceted topic and the word has been overused unfortunately. So in part two we started to unpack the apps model by channelling the kids TV show playshcool to show the idea of SharePoint customisations being hosted on separate servers, but presenting a seamless experience for users.

If you never read part 1 and 2, I seriously suggest you do. To whet your appetite, here are some pretty diagrams to highlight what you missed out on!

image image  image

The main point I made was the notion that custom SharePoint components ran on separate, non SharePoint servers and were embedded into SharePoint via Iframes. These remote apps then communicate securely with SharePoint (eg read or write data from lists) via web services.

I concluded part 2 by showing the benefits of the apps model from Microsoft’s perspective. Among other things, this model of developing custom SharePoint solutions can be supported on Office365 and on-premises. For on-premises customers, SharePoint servers remain pristine and free of the muck and clutter of 3rd party code, making service packs and cumulative updates much less complex and costly. It also enables Microsoft to offer an app store, where 3rd party vendors can maintain cloud based services that can be embedded and consumed by on-premises and online SharePoint installs. If you go back to the 5 key strategic threats I started this post with, it addresses each one nicely.

So Microsoft’s intent is good, and there is nothing wrong with good intentions… or is there?

image

Digging deeper

So where does one start with unpacking the apps model? Let’s make this a little less of a dry read by channelling Big Bang Theory to find out. First up, Penny wants to know where app data stored is stored, given that the app runs on a different server to SharePoint as shown below. (If you think about it, from apps perspective – SharePoint is the remote server).

image

Sheldon’s answer? (Of course Sheldon invented the apps model right)…

image

Er… come again? Let’s see if Leonard can give a clearer explanation…

image

Leonard’s explanation is a little better. Ultimately the app developer has the choice over where app data is stored. For example, let’s say someone writes a survey app for SharePoint and it renders on the home page via an iframe. When users fill in this poll, the results could be stored on the server that hosts the app and not SharePoint at all (which in SharePoint terms is referred to as the remote web). Alternatively, the app could store the survey results in a list on a SharePoint site which the app is being invoked from (this is called the host web). Yet another alternative is something called the App Web, which I  will return to in a moment.

First lets look at the pros and cons of the first two options.

Option A: Store App Data in SharePoint Lists

If the app developer chooses this approach, the app reads/writes to SharePoint lists in the site where the app is deployed (henceforth called the host web). In this approach, when a site administrator chooses to add an app to the site, the app has to specify the level of access is required for the site, and it asks the site admin to authorise this access. In the image below, you can see that this Kodak app is requesting the ability to edit or delete items in document libraries and lists on this site, as well as access user profile information. If the site administrator clicks “Trust it”, the app now has the access it needs.

image

The pro to this approach is that all app data resides in regular old SharePoint, where it is searchable and can take advantage of all of the goodies that lists and libraries give you like versioning, information management policies and workflow. Additionally, multiple apps can access these lists, so this allows for the development of componentised solutions that work with a single authoritative data source.

The potential cons (or implications to be aware of) to the approach are:

  • SharePoint lists and libraries are not always an appropriate data stores for some types of data. Most people are well aware now that a SharePoint list is most definitely not a relational database and it has performance issues when misused (among other things). SharePoint also has in-built thresholds that kick in when lists get big (list queries that generate a result set of 5000 or more items will fail by default). Microsoft state in their SharePoint 2013 and SharePoint Online solution packs documentation “If your business needs require you to work with large data sets and query result sets, this approach won’t work”.
  • If the app has been deployed to many sites and site collections (and uses lists on each), then things can get painful if a new version of the app requires a new or modified set of columns on the list in the host web.
  • if you delete the app from the host web, the list data remains on the site as the lists will likely not be deleted. Sometimes this is a good thing as the data might be important or used in other ways, but if the app developer is storing configuration data here, would leave orphaned data in the site.

Also think about what happens when you have an on-premises SharePoint server but the app is hosted by a 3rd party outside your firewall. How is the remote app even able to get to your SharePoint box in the first place? To enable this to happen, you are likely going to need to talk to your network/security people because you are going to need some funky firewall/reverse proxy infrastructure to allow that to happen. Additionally, some organisations might be uncomfortable that an app from a 3rd party on the interweb can have the ability to read and write data inside an internal SharePoint server anyway.

So what alternatives are there here?

Option B: Store data in the remote app

The other option for the app developer is to store the app data on the same server the app is running from (called the remote web). In this approach, no data is stored in SharePoint at all. The pros for this option is that it alleviates two of the issues from option A above in that developers can use any data storage system they want (eg SQL Server, a GIS system or a graph database) and you do not have any of those pesky firewall issues with the app connecting back to your SharePoint server. The app renders in its iframe and does its thing.

Unfortunately this also has some cons.

  • There are potential data sovereignty issues. Where is the remote app hosted? Are you sure you trust the 3rd party app provider with your data? Consider that a 3rd party might host an app for many organisations. Do they have adequate precautions for keeping your data isolated and secure (ie Is your stuff stored in a separate database to everyone else?) Are they adequately backing up that data consistent with your internal standards? If you uninstall the app, is the data also uninstalled at the app provider end?
  • This data is very likely not searchable or easily usable by SharePoint for other purposes as it is not necessarily directly accessible by SharePoint.
  • Chances are that the app will have to talk to SharePoint in some way, so you really don’t get out of dealing with your network/security people to make it all work if the remote web is outside your firewall.
  • Also consider data integrity. if say, you needed to restore SharePoint because of a data loss or data corruption issue, what does this mean for the data stored on the remote app? will things get out of sync?

These (and other questions) bring us to the next option that is a bit of a mind-bending middle ground.

Option C: Store data in the App Web

Now here is where things start to mess with your head quite a bit. Most people can understand the idea behind option A and B, but what the heck is this thing known as an app web? The short answer, it is a special SharePoint sub-site that is used for certain apps. It usually gets created when a site administrator adds an app to a site and importantly, removed when a site administrator removes the app. If you consider the diagrams below we can see our mythical SharePoint 2013 homepage with 3 apps on it, all running on separate servers as explained in part 2. If we assume each of these apps have deployed an app web on our SharePoint site, there are now three SharePoint sub-sites created underneath it as shown below. These are the app webs.

image

Now app webs are no ordinary subsites in the way you might know them now. For a start, if you tried to access them from your SharePoint host web, you would not be able to at all. Through some trickery, SharePoint puts these sites on a completely different URL than the site where the apps were installed. For example, if you had a site called http://myintranet/sites/web1 and you added a survey app, a subsite exists but it would absolutely not be http://myintranet/sites/web1/survey or anything like that. It would instead look something like:

http://app-afb952fd75de4a.apps.mycompany/sites/web1/surveyapp/

Now being a business audience reading this, trust me that there are good reasons for this apparent weirdness related to security which I will speak to in the next post.

But if this makes sense so far, then in some ways, one can argue that an app web is a weird cross between option A and B in that it is a subsite on your SharePoint farm, yet SharePoint treats it as if it is a remote data store. This means the app web is a special isolated storage area for app developers to put stuff like data, configuration, CSS, JavaScript and whatever other functionality their app needs to do its thing.

This approach has some advantages:

  • The app web is technically a SharePoint site, so app developers can create whatever structure they need (think lists, libraries and columns) to store their stuff like images, css, JavaScript and other goodies. This allows for much more flexible data structures that can easily be accommodated that writing to the odd list in a host web (Option A above)
  • The app web lives is on your SharePoint server, so it means some app components (and data) can be stored here instead of on a remote web on a server far away from you. When you back up your configuration database, the app web is backed up like everything else. (Less data integrity risk than option B).
  • The app web facilitates clean install/uninstall of an app, since the app web is removed if an app is removed. In other words, no more orphaned data lying around

But if you think all of those points through, you might see several important implications:

  • If the app developer decided to store critical app data in the app web, when the app is uninstalled that data is lost (or put better, developers have to write special uninstall code to copy the data somewhere else which means yet more code)
  • Just like option A, SharePoint lists and libraries are not always an appropriate data stores for some types of data. (remember the list item threshold I mentioned in option A? They also apply here too)
  • Apps cannot share app webs between them. In other words, apps cannot reach in and access data from other app webs. Therefore you can’t easily use the information stored in app webs with other apps and applications. In fact if you want to do this you pretty much have to choose option A. Store the shared data apps need in the host web and have both apps access that data
  • You may end up with many many app webs. If you take my example above there are 3 app webs to handle 3 apps. What if this was a project site template and your organisation has hundreds of projects. That means you have thousands of app webs, all with potentially interesting data that trapped in mini information silos.
  • SharePoint search cannot index the app webs
  • A critical but often overlooked one is that developers can’t update the library/list metadata schema in an app web (think columns, content types, libraries, etc) without updating and redeploying the app. As you will see in a future post, this gets real ugly real fast!
  • SharePoint App Webs are created with special templates which block SharePoint Designer (that’s probably a good thing given the purpose of an app web)

Conclusion

So if you are a non-developer reading this post, consider that none of the above options are on their own, likely to give you a solution. For each option, there seems to be just as many advantages as flaws. The reality is that many apps will use at least two, or even all three options. Things like images, css and javascript might be loaded from the app web, some critical reusable SharePoint content from the host web and the remote web for some heavy duty data manipulation.

If you think that through, that means as SharePoint administrators and governance teams, you will likely end up dealing with all of the cons of each of the options. Imagine asking a developer to conceptually draw an app that uses each of the options and consider how many “moving parts” there are to it all. Then when you add the fact that most organisations still have a legacy of full trust solutions to deal with, you can start to see how complex this will be to manage.

Now this really is just the tip of the iceberg. In the next post I am going to talk a little about how all this stuff is wired up from an authentication and security standpoint. I am also going to focus on the application lifecycle management implications of this model. If you think about the picture I have painted here with all of the potential moving parts, how to you think an upgrade to an app would fare?

thanks for reading

Paul Culmsee


So what is this newfangled apps model anyway and why do I care? (part 2)

Hiya

This is the second post in some articles aimed at demystifying the SharePoint “apps” model for the strategic or business focused user. In case you are not aware, Microsoft have gotten a serious case of “app fever” in recent times, introducing the terminology not only into SharePoint, but Office as well. While there are very good reasons for this happening, Microsoft used the “app” terminology in multiple ways, therefore making their message rather confusing. As a result, Microsoft have not communicated their intent particularly well and customers often fail to understand why they make the changes that they do.

Things are definitely getting better, but I nevertheless see a lot of confusion around the topic. So in part 1 of this series, I explained the reasons Microsoft have adopted the strategy that they have done. To recap, they are trying to respond to five major disruptive forces that challenge their market position:

  • Changing perceptions to cloud technologies and increased adoption; which enables…
  • The big scary bogeyman known as Google with a viable alternative to SharePoint, Office and Exchange in the form of Google Apps; as well as…
  • An increasing number of smaller cloud-based “point solution” players who chip away at SharePoint features with cheaper and easier to use offerings; while suffering from…
  • A serious case of Apple envy and in particularly the rise of the app and the app marketplace; while dealing with…
  • Customers unable to handle the ever increasing complexity of SharePoint, leading to delaying upgrades for years

Microsoft’s answer to this has to go all-in with cloud, as this is the only way to beat the cloud providers at their own game, while reducing the complexity burden on their customers.  This of course is in the form of Office365, OneDrive and an ever increasing set of cloud oriented tools like Delve and Project Online.

But in SharePoint land, this has turned traditional development upside down. More than a decade of customisation “best practices” are no longer best – in fact they are no longer usable in many circumstances. The main reason is that the most common method of customisation normally applied to SharePoint (full-trust server side code) is not permitted in the cloud. Microsoft couldn’t risk untrusted, 3rd party custom code on their servers. What happens if one clients dodgy code affects everybody else sharing the service? This would threaten performance, uptime and Microsoft’s ability to upgrade their service over time.

So things had to change. Microsoft’s small army of product architects commandeered a whiteboard and started architecting innovative solutions to deal with these challenges and the apps model is the result. So let’s examine some core bits to the apps model by channelling a much loved children’s TV show.

There is a bear in there…

Now at this point I have to warn the developers or tech people writing this post. I am going to give a simplified version of the apps model intended for a decision making audience. I will omit many details I don’t deem necessary to make my key points. You have been warned…

image

Any parent of small children in most countries might be familiar with Playschool – a show for toddlers that has been around for eons. It is well known for its theme song starting with the line “There is a bear in there…and a chair as well”. When trying to come up with a suitable way to explain the SharePoint apps model, using Playschool as a metaphor turned out to work brilliantly. You see in each episode of Playschool, there was a segment where viewers were taken through the “magic window” to faraway lands. In the show, the presenter would pick one of the three windows and we would zoom into it, resulting in a transition to another segment. In our case, we have to pick the square window for two reasons. Firstly, a good many apps are in effect windows to somewhere else. Secondly, and much more importantly, it perfectly matches the new Microsoft corporate logo. Perfect metaphor or what eh? 🙂

Like the Playschool magic window, browsers have a similar capability to enable you to visit strange and magical lands… Not only is there a bear in there and a chair as well, but there are plenty of other things like YouTube videos and Yammer discussions. I have drawn this conceptually shown below. Note the black window in the SharePoint team site on the left, that can be filled with YouTube or Yammer.

image

You have no doubt visited web sites that have embedded content like YouTube videos or SlideShare slides in them (This blog site has lots of embedded ads that make me no money!). Essentially, it is possible for browsers to include content from different sites together into a single “page” experience. Users see it all as one page, even through content can come from all over the place. This is really useful, because it means you can leverage the capability of other sites to enhance the functionality of your own sites..

This my friends, is one of the core tenets of the current SharePoint 2013 apps model. Instead of running on the SharePoint server, many apps now run separately from SharePoint, embedded in SharePoint pages so that they look like they are part of SharePoint. In the example mock-up below, we have a SharePoint team site. In it, we have a remote web site that displays some pretty dashboard data. By loading that emote content into our magical square window, it now appears a part of SharePoint.

image       image

Going back to Microsoft’s core pain points, this helps things a lot. For a start, it means no custom code has to be installed onto the SharePoint server. Instead, SharePoint simply embeds the external content on the page. In the leftmost image above, you can see the SharePoint server (labelled as “Your server”), rendering a page with a placeholder in it. It then retrieves content from a remote server (labelled “my server”) and displays it in the placeholder to render the complete page (the rightmost image above).

So what feat of Microsoft innovation and general awesomeness enabled this to happen?

Everybody meet “Mr IFrame”.

Inline Frames (IFrames) are windows cut into your webpage that allow your visitor to view content on another site without reloading the entire page. The concept was first implemented in Microsoft Internet Explorer way back in 1997. Yep – you heard right… 1997. So IFrames are not a new concept at all – in fact its positively ancient when you count time in internet years. For this reason, when developers find this out, their reaction is usually something like this…

image

But there is more than meets the eye…

Now if the apps model was just IFrames alone, then you you might wonder what the big deal is with apps. In fact IFrames have been used this way in SharePoint for years via the Page Viewer Web Part. For years, companies with SharePoint deployments have embedded stuff like Twitter, YouTube or Facebook widgets via iFrames.

So of course, there is more to it…

Let’s revisit the “your server” and “my server” diagram used above and consider the question.. What if these remote applications displayed inside an iFrame can interact with SharePoint? In other words, What if the remote application running on my remote server is able to connect to your SharePoint server and read/write data? In the diagram below I have illustrated the idea. The top half of the diagram represents a SharePoint server that could be on-premises or an Office365 tenant. On the left is a Products list, that is somewhere inside this SharePoint server. At the bottom is my application running on my server that creates a pretty dashboard. What if my remote application queried the SharePoint products list to create the dashboard? Now we have an application, that while not running inside SharePoint, can nevertheless utilise live data from SharePoint to create a seamless experience for users.

image

If we now add 3 iframes to a page, the implications should start to become more clear. We can build hybrid solutions leveraging the best of what SharePoint can do, whilst leveraging the best of what other platforms can do. To the user, these are still SharePoint sites, but the reality is that we are now viewing a page that has been delivered by various different platforms. Each can interact with SharePoint data in different ways to deliver a seamless experience. Because these remote apps are not SharePoint at all, developers can write any application they want to, using the platform and tools of their choice. But to the user it is still a SharePoint page… neat huh? I’m sure the Microsoft product team thought that this was a brilliant conceptual masterpiece when they dreamt it up.

image

A beautiful model…

I don’t know if you have ever watched developers come up with API’s, but it tends to be a lot of excitement around a whiteboard as they revel in the glory of their elegant solution designs. So let’s quickly re-examne the benefits of this remotely hosted app approach from Microsoft’s perspective and see how we are going so far…

image

First and foremost, we now have SharePoint customisation approach that they can be fully support in Office365. Microsoft don’t have to put code on their online servers, yet can support extensibility. Now they are much more evenly matched with Google, while at the same time, reduce their tech support costs of SharePoint because they have isolated 3rd party code out of SharePoint. If any problems are encountered with a remote app, SharePoint will keep humming along and Microsoft can now legitimately tell the clients “no really it is not SharePoint causing your issue – go see your friendly neighbourhood app developer”.

More importantly since apps can also can be used in on-premises SharePoint deployments too, meaning both Microsoft and their customers now have pristine SharePoint servers free of the muck and clutter of 3rd party code. Therefore service packs and cumulative updates should no longer strike fear into admins. Microsoft also now nails google’s ass because Google has no real concept of on-premises at all in the way Microsoft does. Thus when hybrid scenarios come up in conversation, Microsoft has a much stronger story to tell.

But there is a more important implication than all of that. Microsoft can now do the app store thing. Vendors can maintain cloud based services that can be embedded and consumed by on-premises and online SharePoint installs. This means 3rd parties can tap into the customer ecosystem with a captive marketplace and customers can browse the store to examine what options are out there to extend SharePoint functionality. In theory, this should enable hundreds of vendors to do some slight modifications to their existing web based applications and incorporate them into the SharePoint ecosystem.

image

But reality is not what’s on the whiteboard…

At this point, I hope I have painted a pretty good picture of the advantages offered by this new paradigm and you can probably appreciate the Microsoft nerds completely falling in love with this conceptual model of future SharePoint customsiations. The Microsoft strategy dudes probably loved it too because it elegantly dealt with all of the challenges they were seeing. Unfortunately though, with most conceptual models, reality is a very different beast from the convenient fiction of models.

So in the next post, we are going to dig a little deeper. For example, how can a remote app even have permissions to talk to SharePoint in the first place? Do you really want code running in some untrusted 3rd party server to be fiddling with data in your SharePoint lists and libraries? How does that even work anyway in an on-premises scenario when a cloud hosted app has to access data behind your firewall?

Fear not though – the Microsoft guys thought of this (and more) when they were drawing their apps model concept on the big whiteboard. So in the next post, we are going to look at what it takes to bring this conceptual masterpiece into reality.


Thanks for reading

Paul Culmsee


So what is this newfangled apps model anyway and why do I care? (part 1)

Hiya

I’ve been meaning to write about the topic of the apps model of SharePoint 2013 for a while now, because it is a topic I am both fascinated and slightly repulsed by. While lots of really excellent material is out there on the apps model (not to mention a few good rants by the usual suspects as well), it is understandably written by developers tasked with making sense of it all, so they can put the model into practice delivering solutions for their clients or organisations.

I spent considerable time reading and researching the various articles and videos on this topic produced by Microsoft and the broader SharePoint community and made a large IBIS map of it. As I slowly got my head around it all, subtle, but significant implications begin to emerge for me. The more I got to know this topic, the more I realised that the opportunities and risks of the apps model holds many important insights and lessons for how organisations should be strategically thinking about SharePoint. In other words, it is not so much about the apps model itself, but what the apps model represents for organisations who have invested into the SharePoint platform.

So these posts are squarely aimed at the business camp. Therefore I am going to skip all sorts of things that I don’t deem necessary to make my points. Developers in particular may find it frustrating that I gloss over certain things, give not quite technically correct explanations and focus on seemingly trivial matters. But like I said, you are not my audience anyway.

So let’s see if we can work out what motivated Microsoft head in this direction and make such a significant change. As always, context is everything…

As it once was…

I want you to picture Microsoft in 2011. SharePoint 2010 has come out to positive reviews and well and truly cemented itself in the market. It adorns the right place in multiple Gartner magic quadrants, demand for talent is outstripping supply and many organsiations are busy embarking on costly projects to migrate from their legacy SharePoint 2007 and 2003 deployments, on the basis that this version has fixed all the problems and that they will definitely get it right this time around. As a result, SharePoint is selling like hotcakes and is about to crack the 2 billion dollar revenue barrier for Microsoft. Consultants are also doing well in this time since someone has to help organsiations get all of that upgrade work done. Life is good… allegedly.

But even before the release of SharePoint 2010, winds of change were starting to blow. In fact, way back in 2008, at my first ever talk at a SharePoint conference, I showed the Microsoft pie chart of buzzwords and asked the crowd what other buzzwords were missing. The answer that I anticipated and received was of course “cloud”, which was good because I had created a new version of the pie and invited Microsoft to license it from me. Unfortunately no-one called.

image

Winds of change…

While my cloud picture was aimed at a few cheap laughs at the time, it holds an important lesson. Early in the release cycle of SharePoint 2007, cloud was already beginning to influence people’s thinking. Quickly, services traditionally hosted within organisations began to appear online, requiring a swipe of the credit card each month from the opex budget which made CFO’s happy. A good example is Dropbox which was founded in 2008. By 2010, won over the hearts and minds of many people who were using FTP. Point solutions such as Salesforce appeared, which further demonstrated how the the competitive landscape was starting to heat up. These smaller, more nimble organsiations were competing successfully on the basis of simplicity and focus on doing one thing well, while taking implementation complexity away.

Now while these developments were on Microsoft’s radar, there was really only one company that seriously scared them. That was Google via their Google Docs product. Here was a company just as big and powerful as Microsoft, playing in Microsoft’s patch using Microsoft’s own approach of chasing the enterprise by bundling products and services together. This emerged as a credible alternative to not only SharePoint, but to Office and Exchange as well.

Some of you might be thinking that Apple was just a big a threat to Microsoft as Google. But Microsoft viewed Apple through the eyes of envy, as opposed to a straight out threat. Apple created new markets that Microsoft wanted a piece of, but Apple’s threat to their core enterprise offerings remained limited. Nevertheless, Microsoft’s strong case of crimson green Apple envy did have a strategic element. Firstly, someone at Microsoft decided to read the disruptive innovation book and decided that disruptive was obviously cool. Secondly, they saw the power of the app store and how quickly it enabled an developer ecosystem and community to emerge, which created barriers for the competition wanting to enter the market later.

Meanwhile, deeper in the bowels of Microsoft, two parallel problems were emerging. Firstly, it was taking an eternity to work through an increasingly large backlog of tech support calls for SharePoint. Clients would call, complaining of slow performance, broken deployments after updates, unhandled exceptions and so on. More often than not though, these issues had were not caused by the base SharePoint platform, but via a combination of SharePoint and custom code that leaked memory, chewed CPU or just plain broke. Troubleshooting and isolating the root cause very difficult which led to the second problem. Some of Microsoft’s biggest enterprise customers were postponing or not bothering with upgrades to SharePoint 2010. They deemed it too complex, costly and not worth the trouble. For others, they were simply too scared to mess with what they had.

A perfect storm of threats

image  image

So to sum up the situation, Microsoft were (and still are) dealing with five major forces:

  • Changing perceptions to cloud technologies (and the opex pricing that comes with it)
  • The big scary bogeyman known as Google with a viable alternative to SharePoint, Office and Exchange
  • An increasing number of smaller point solution players who chip away at SharePoint features with cheaper and easier to use offerings
  • A serious case of Apple envy and in particularly the rise of the app and the app marketplace
  • Customers unable to contend with the ever increasing complexity of SharePoint and putting off upgrades

So what would you do if you were Microsoft? What would your strategy be to thrive in this paradigm?

Now Microsoft is a big organisation, which affords it the luxury of engaging expensive management consultants, change managers and corporate coaches. Despite the fact that it doesn’t take an MBA to realise that just a couple of these factors alone combine as a threat to the future of SharePoint, lots of strategic workshops were no doubt had with associated whiteboard diagrams, postit notes, dodgy team building games and more than one SWOT analyses to confirm the strategic threats they faced were a clear and present danger. The conclusion drawn? Microsoft had to put cloud at the centrepiece of their strategy. After all, how else can you bring the fight to the annoying cloud upstarts, stave off the serious Google threat, all the while reducing the complexity burden on their customers?

A new weapon and new challenges…

In 2011, Microsoft debuted Office365 as the first salvo in their quest to mitigate threats and take on their competitors at their own game. It combined Exchange, Lync and SharePoint 2010 – packaging them up in a per-user per month approach. The value proposition for some of Microsoft’s customers was pretty compelling because up-front capital costs reduced significantly, they now could get the benefits of better scalability, bigger limits on things like mailboxes, while procurement and deployment was pretty easy compared to doing it in-house. Given the heritage of SharePoint, Exchange and Lync, Microsoft was suddenly competitive enough to put Google firmly on the back foot. My own business dumped gmail and took up Office365 at this time, and have used it since.

Of course, there were many problems that had to be solved. Microsoft was now switching from a software provider to a service provider which necessitated new thinking, processes, skills and infrastructure internally. But outside of Microsoft there were bigger implications. The change from software provider to service provider did not go down well with many Microsoft partners who performed that role prior. It also freaked out a lot of sysadmins who suddenly realised their job of maintaining servers was changing. (Many are still in denial to this day). But more importantly there was a big implication for development and customisation of SharePoint. This all happened mid-way through the life-cycle of SharePoint 2010 and that version was not fully architected for cloud. First and foremost, Microsoft were not about to transfer the problem of dodgy 3rd party customisations onto their servers. Recall that they were getting heaps of support calls that were not core SharePoint issues, but caused by custom code written by 3rd parties. Imagine that in a cloud scenario when multiple clients share the same servers. This means that that one clients dodgy code could have a detrimental effect on everybody else, affecting SLA’s while not solving the core problem Microsoft were having of wearing the cost and blame via tech support calls for problems not of their doing.

So with Office365, Microsoft had little choice but to disallow the dominant approach to SharePoint customisation that had been used for a long time. Developers could no longer use the methods they had come to know and love if a client wanted to use Office 365. This meant that the consultancies who employed them would have to change their approach too, and customers would have to adjust their expectations as well. Office365 was now a much more restricted environment than the freedom of on-premises.

Is it little wonder then, that one of Microsoft’s big focus areas for SharePoint 2013 was to come up with a way to readdress the balance. They needed a customisation model that allowed a consistent approach, whether you chose to keep SharePoint on-premises, or move off to the cloudy world of Office 365. As you will see in the next post, that is not a simple challenge,. The magnitude of change required was going to be significant and some pain was going to have to happen all around.

Coming next…

So with that background set, I will spend time in the next post explaining the apps model in non technical terms, explaining how it helps to address all of the above issues. This is actually quite a challenge, but with the right dodgy metaphors, its definitely possible. 🙂 Then we will take a more critical viewpoint of the apps model, and finally, see what this whole saga tells us about how we should be thinking about SharePoint in the future…

thanks for reading

Paul Culmsee


Next Page »

Today is: Wednesday 3 June 2026 -