Back to Cleverworkarounds mainpage
 

PowerApps, Flow and Managed Metadata fields–part 4

Hi and welcome to the final post in this series of articles that examined how we can work around an unsupported function in PowerApps and Flow. Along the journey we have learnt about app principals, the SharePoint REST API and written some crazy JSON.

In this final post, we will tie up a few loose ends. Currently the flow hard-codes the term ID from managed metadata when in fact, we want it to be sent from PowerApps. I will also also give you some insight into handling more complex situations, like multiple managed metadata fields as opposed to a single one.

But first, the (giant) weak spot…

As I write this I if any of you, as you read the first 3 posts, realised the weakness to this method. A strong hint was given in the last post. Recall that the JSON to update a managed metadata field required a term GUID…

{
   "__metadata": { "type": "SP.Data.Coffee_x0020_Shop_x0020_RatingsListItem" },
   "Bean":
   { "__metadata": {"type":"SP.Taxonomy.TaxonomyFieldValue"},
     "TermGuid":"0937fbc2-0dfe-439e-a24f-ba6d13897abd",
     "WssId":"-1"
   }
}

Now right now in PowerApps, there is no managed metadata control. This means you cannot browse a term store like you can in SharePoint. Among other things, one likely reason for this is that there is no REST API support for managed metadata. This has been a constant source of frustration for many as you can see in the 761 votes (as I type this) in uservoice.

What’s the implication of this limitation? For a start, there is no way we can build a REST call that will return us all of the terms in a term set. We have to either hard-code the term GUID’s in our application (ugh) or find another way to get the list of terms (ugh again). One thing that should be noted is that sometimes, hard coding terms and GUID’s isn’t as bad as it sounds. For example, you might have a term set for your corporate offices in certain countries. Since those terms are unlikely to change quickly, one can embed their GUID’s into PowerApps without too much concern.

For the first part of this article, we will use this approach and hard-code our term set of coffee beans into our Powerapp. Then we will modify our flow to expect this parameter from PowerApps.

Back to PowerApps…

If you go back to the PowerApp we built way back in part 1 and also the term set of coffee beans, they looked like this:

image  image

To hardcode our terms into PowerApps, I am going to use the ClearCollect function to create a collection called BeanDetails. I have grabbed the term label and GUID from managed metadata and constructed this function:

ClearCollect(BeanDetails,
{
   Name:  "Fiori",
   Id:  "96a085d2-ed7d-4a75-8d63-c6ca56d0b358"
},
{
   Name:  "Jungle Coffee",
   Id:  "eb04988d-acc4-4bde-9861-506e90de94c5"
},
{
   Name:  "Alfredo",
   Id:  "38db966f-3b0c-4872-a7d3-982ecd8528dd"
},
{
   Name:  "Death Wish Coffee",
   Id:  "e33c65f9-4202-40d7-89f2-aa1a1016ad9f"
})

Next, I use the OnStart property of the screen and paste the ClearCollect function as shown below.

image

Now you will need to save, close and reopen the app for this to take effect. Alternatively add a temporary button and use the above code on the OnSelect property. Either way, you should be able to see your terms and GUID’s when going to Collections from the File menu…

image

Now that we have our term set stored in PowerApps, let’s add a dropdown list to the screen that lists our coffee beans. Choose Insert > Drop Down and set its Items property to BeanDetails.

image

image

Now you should be able to see the choice of beans in the dropdown as shown below:

image

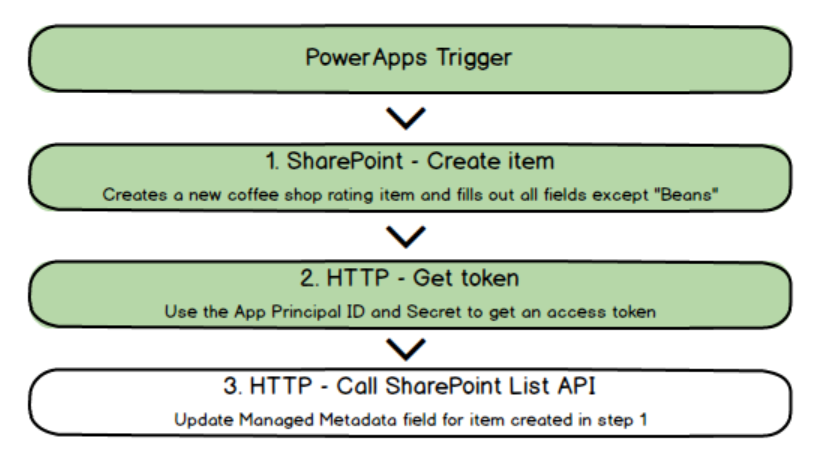
Next, we have to go back to Flow and modify it to accept a term GUID as a parameter (if you recall in part 3 the term is currently hard-coded).

Tweaking Flow…

If you have followed our Flow adventure so far, you should have a flow action called Set Test Term GUID that looks something like this:

image

First, rename this flow step to Get Term GUID and then delete the GUID that we previously had in the Value field. From the Dynamic Content pane, choose Ask in PowerApps.

image

image

Update your flow and before returning to PowerApps, click the Run Now button. Ensure you are now prompted for three parameters, rather than the original two.

image

image

Back to PowerApps…

Now in PowerApps, we have to delete and flow and re-add it so it finds the new parameter we just added.

Select the Submit button and review the OnSelect property. It should show the function below…

image

Now go to View > Data Sources and remove the NewCoffeePlace data source. You should see an error appear on the Submit button. It will say “Invocation of unknown or unsupported function”. Makes sense right? After all, we just took away its connection to flow.

image   image

Once again make sure your Submit button is selected, and select Action > Flows. Choose the flow called New Coffee Place. In a few moments, it will ask you to complete the parameters in the formula bar. If you did this correctly, you should see a prompt for a third parameter – the term GUID.  

image  image

image

The third parameter will be the GUID that matches the term in the dropdown list. The formula for this is:

image

Now to explain Dropdown1.Selected.Id, remember that we set the Items property of the dropdown to BeanDetails collection, which has two columns, ID and Name. Essentially, by specifying Dropdown1.Selected.Id, whichever bean name is the currently selected one in the dropdown, the GUID will be sent to Flow…

image

Test this by putting the Powerapp into preview and adding a new café. If all things go to plan, you will see your new entry along with the managed metadata term. Yay!!

image  image

Hard-coding sucks – surely there a better way?

At this point you might still be hating the fact we had to hard-code the term ID’s into our app. I can sympathise, as it irritates me too. So is there a way to dynamically load the term set into PowerApps? Turns out there is, provided you use an Azure function along with PnP PowerShell.

I won’t cover this in detail here, unless there is sufficient demand, but I will explain the high level overview.

  1. Set up an Azure function using PowerShell
  2. Load PnP PowerShell modules
  3. Write a PowerShell script to connect to your tenant and pull the terms from the term set.
  4. Convert the terms to JSON output
  5. Create a custom connector for PowerApps to consume it.
  6. Add the custom connector to your app, and pull down the latest term set on startup.

Now I wrote another blog post where I went through another example of using Azure functions with PowerApps, and that covers a lot of detail on steps 1, 2, 5 and 6.

In relation to step 3 and 4, here is some PowerShell code sample to do this that you can use as a starting point. Be warned though… you will need to have some understanding of PnP PowerShell to make sense of it!


Import-Module "D:\home\site\wwwroot\modules\2.19.1710.1\SharePointPnPPowerShellOnline.psd1" -Global
$requestBody = Get-Content $req -Raw | ConvertFrom-Json
$name = $requestBody.name
$username = "paul@culmsee.onmicrosoft.com"
$password = $env:PW;
$siteUrl = "https://culmsee.sharepoint.com"
$secpasswd = ConvertTo-SecureString $password -AsPlainText -Force
$creds = New-Object System.Management.Automation.PSCredential ($username, $secpasswd)
Connect-PnPOnline -url $siteUrl -Credentials $creds
$tg = Get-PnPTermGroup -Identity 2830778b-dbfa-4441-bb45-0cbb97b582e7
$ts = Get-PnPTermSet -TermGroup $tg -Identity "Coffee"
$tl = Get-PnPTerm -TermSet $ts -TermGroup $tg -Includes Terms
foreach ($term in $tl) {
   $terms+=$term.terms
}
$output = $terms | Select Name, Id | ConvertTo-Json
Out-File -Encoding Ascii -FilePath $res -inputObject $output

Like I said, if you are interested in knowing more about this, let me know and if there is sufficient demand, I will make a dedicated blog post about it…

Handling multiple managed metadata columns…

I will end this series by showing you how to handle updating multiple managed metadata columns. This is an advanced topic, but is a good test for developing JSON manipulation skills in Flow. Like the previous section I will cover it in a high level only and leave it to you to figure it out for your environment…

So far we have updated a single column, but my real-world project that led to this series actually had 3 columns that were managed metadata. What made this interesting and tricky was that these columns were entirely optional. The complexity is easy to illustrate by looking at what a JSON payload looks like when updating multiple columns. In the example below, I am updating 3 columns called ProjectType, ProjectPhase and ProjectElement respectively…

{
   "__metadata": {
     "type": "SP.Data.ProjectListItem"
     },
   "ProjectType": {
     "__metadata": {
     "type": "SP.Taxonomy.TaxonomyFieldValue"
     },
     "TermGuid": "d4e4494f-34a4-4278-b0ee-7eba372a3f80",
     "WssId": "-1"
   },
   "ProjectPhase": {
     "__metadata": {
     "type": "SP.Taxonomy.TaxonomyFieldValue"
     },
     "TermGuid": "78d647c7-8b92-4ee0-a29d-22346b1af560",
     "WssId": "-1"
   },
   "ProjectElement": {
     "__metadata": {
     "type": "SP.Taxonomy.TaxonomyFieldValue"
   },
     "TermGuid": "6f9f653f-09ec-4771-9063-676d16734b37",
     "WssId": "-1"
   }
}

Contrast the above example with the one below where only one is updated…

{
   "__metadata": {
     "type": "SP.Data.ProjectListItem"
   },
   "ProjectElement": {
     "__metadata": {
     "type": "SP.Taxonomy.TaxonomyFieldValue"
     },
     "TermGuid": "6f9f653f-09ec-4771-9063-676d16734b37",
     "WssId": "-1"
   }
}

So the trick is to build a flexible enough flow that could generate the JSON needed to update 1, 2 or 3 columns. Without knowing whether the column would have a supplied value, meant we have to find a way to handle any combination. The pattern I ended up using was to build the JSON for each of the columns individually before joining them together. Here’s how…

First, I used an Initialize Variable flow action to create the base JSON for each column. The key was to make this conditional, so if the column value was empty, I added an empty string. E.g.

image

The expression used for the value of this variable was this crazy looking Workflow Definition Language Expression:

if(not(empty(triggerBody()['GetProjectTypeTermID_Value'])), concat('"ProjectType":{"__metadata":{"type":"SP.Taxonomy.TaxonomyFieldValue"},"TermGuid":"',triggerBody()['GetProjectTypeTermID_Value'],'","WssId":"-1"}'),'')

Basically this grabs the term ID for a column (in the above example the columns is called ProjectType). I test if the column value is supplied – which is what the “if(not(empty” bit does. I then then construct the necessary JSON to update that managed metadata column. (Note if you need a refresher on the JSON in this function, review part 3)

I repeat this action for the other columns, and then perform the following steps in Flow to construct the complete JSON…

First I initialize an array variable that I call JsonPayloadArray.

image

Next I add the outer JSON for a managed metadata update to the array using the Variables – Append to array variable workflow task…

image

image

Here I am using the concat() function because I need to use the ListItemEntity variable. Note, if you have forgotten about ListItemEntryFullName property,  re-read part 3.

concat('{ "__metadata": { "type": "',variables('ListItemEntity'),'" }')

Next, I add the JSON for each column to the array, provided it is not null. I do this by adding a condition for each column.

The first image below shows the three conditions and the second image shows an expanded view of one of them. You can see in the example below, if a ProjectType was supplied, I add the variable initialized in the above steps to the JsonPayloadArray variable….

image

image

Finally, I use the Join() function to take this array and turn it back into a single string, delimited by commas. This elegantly handles the situation in JSON where the last name/value pair does not have a comma separator.  I do this by initializing a new variable called JsonPayload as a string as follows…

image

concat(join(variables('JsonPayLoadArray'),','),' } ')

Conclusion

This is one of those series that I know only a few people will get some use out of. Hopefully this whole issue of managed metadata will be gone by year-end and these approaches are not necessary. In any event the techniques outlined in these four posts apply to various other scenarios, so learning about JSON manipulation using Flow, or talking to SharePoint via REST/App principals might come in handy for you in other situations.

As for me, this is probably the geekiest series I have written in a long time! I think I better get back to management consulting now!!


Thanks for reading

Paul Culmsee

www.hereticsguidebooks.com


PowerApps, Flow and Managed Metadata fields–part 3

Hi all

Welcome to part 3 of my posts that are intended to teach people more about the intricacies of Flow, SharePoint Web Services and oAuth. The cover story for this journey was the issue that presently, managed metadata fields are not supported natively in PowerApps nor Flow.

As a result, we are taking an approach where we update managed metadata values by talking to the SharePoint REST web service.

To recapitulate our journey, we have managed to achieve the following thus far. We have a basic powerapp, and a flow that now has an access token that will allow us to update the managed metadata column via API. If you are new to this series, then I strongly suggest going back and reading parts 1 and 2, before continuing here…

image

A SharePoint Web Service Interlude…

Those of you who got past part 2, and think the hard stuff is over, think again. You are about to take a dive into the weird world of talking to SharePoint via API, so go get yourself a coffee and I will do my best to provide an accessible explanation to what is going on.

To start with, let’s do a couple of general queries to SharePoint via API and get a feel for things. To do this, use the Chrome browser and sign into your SharePoint site collection. Once signed in, try the following URL. Note, if you are using a different list name to the one I have been using in this series, adjust accordingly:

https://<site collection url>/_api/web/lists/GetByTitle('Coffee Shop Ratings')

If this worked, you will be rewarded with a ton of data related to the Coffee Shop Ratings list. It won’t be overly meaningful in the Chrome output, but rest assured this is a good thing…

image

Now let’s make things a little less scary by being more specific about the information we want to retrieve…

https://<site collection url>/_api/web/lists/GetByTitle('Coffee Shop Ratings')/items?$select=Title

This API call is basically saying “get all items from this specified list, and only show me the Title column for each item” (that is what the $select=Title bit is doing). While the formatting in Chrome sucks, you can nevertheless see the output being returned in XML format. Note the title columns below showing the café names.

image

Now let’s get specific and select a particular item from the list by its ID. I can achieve this in the following way…

https://<site collection url>/_api/web/lists/GetByTitle('Coffee Shop Ratings')/items(16)?$Select=Title

This call is still only asking for the Title column from the list ($Select=Title), but now it only wants the item 16 in the list. I happen to know in my list this is Café Gelato and the output confirms this…

image

Finally for now, let’s bring back the 3 columns we are using, including the one that’s been causing us all the trouble… I do this by specifying multiple columns in the $select bit at the end of the URL.

https://<site collection url>/_api/web/lists/GetByTitle('Coffee Shop Ratings')/items(16)?$Select=Title,Rating,Beans

This time I will format the XML output a bit nicer for you and strip out some uninteresting stuff. In the <m:properties> section, you can see the information returned about our 3 columns…

image

A cursory glance shows the Title and Ratings columns are pretty simple. The ratings column differs from title in being numeric (m:type=”Edm.Double”) but still is a single line and fairly easy to understand. But take a look at the Beans column. It is a lot more complex than the others in that instead of being a single value, this column actually consists of three properties, Label, TermGuid and WssId.

At this point I should say that the SharePoint List API has a lot more to it than the simple examples above. If you are interested in learning more then start here. The key thing I want you to take away from this section is this: We are going to use Flow to perform queries just like we have done. We will query the lists web service to get some data and more importantly, we will also use calls to the web service to update the managed metadata column.

So let’s have a look at how we can do that…

Updating a List Item via REST API

Note: when I wrote this I was not aware you could reduce the amount of JSON manipulation you have to do via the odata=nometadata directive that Marc wrote about. I strongly suggest you use that article to sense-check what I write about here.

First up we need to understand the general pattern to updating a list item using the API. We need to issue a POST call to the list web service and in the body of our post, send our instructions about what to update. The URL is unchanged from what we have been working with…

http://<site collection url>/_api/web/lists/GetByTitle('Coffee Shop Ratings')/items(item id)

In terms of the format of the update instruction, the example below shows updating the Title field. While some bits of it might not make sense right now, we can see that the Title column is being updated to the value “TestUpdated”…

{ '__metadata': { 'type': 'SP.Data.TestListItem' },
  'Title': 'TestUpdated'
}

So what is the SP.Data.TestListItem? A hint comes from Microsoft’s own documentation that states: “The ListItemEntityTypeFullName property is especially important if you want to create and update list items. This value must be passed as the type property in the metadata that you pass in the body of the HTTP request whenever you create and update list items”

We will return to this mysterious ListItemEntityTypeFullName when we start building the flow, but for now lets park it and look at what needs to be sent in the HTTP Headers when posting to the API..

Authorization: "Bearer " + accessToken
IF-MATCH: etag or "*"
X-HTTP-Method:"MERGE"
accept: "application/json;odata=verbose"
content-type: "application/json;odata=verbose"

Wow – that’s quite a bit to do, and we have not even gotten to the Managed Metadata column yet! So let’s take a look at that now since we have already dug ourselves a bit of a theory-hole. Soon enough we will put all of this stuff into practice…

Updating a Managed Metadata Column

Now that we have seen the anatomy of a POST to update a list item, let’s now look at example of updating a managed metadata column. In a nutshell, the body of the POST looks like this: Note that in this example I have specified the ListItemEntityTypeFullName property for my Coffee Shop Ratings list. Don’t worry, I will show you how to find this out in the next section.

{
   "__metadata": { "type": "SP.Data.Coffee_x0020_Shop_x0020_RatingsListItem" },
   "Bean":
     { "__metadata": {"type":"SP.Taxonomy.TaxonomyFieldValue"},
     "TermGuid":"0937fbc2-0dfe-439e-a24f-ba6d13897abd",
    "WssId":"-1"
   }
}

Unlike the title column above,  here we need to set two parameters – a TermGuid and a WssID. The former is the GUID of a term in managed metadata and can easily be found when looking at a term: for example:

image

The WssID parameter you can ignore. We need to specify it, but we will always be putting “-1” in the value. If you really want to know what it does, check this post. Also for those who have read other articles on this topic and are wondering why I left out the Label parameter… the answer is that with my testing, it was not necessary, so I omitted it.

So let’s summarise our journey so far… we need to do the following:

image

So let’s get back to the land of Flow and finish this!

Finishing off Flow…

1. Picking up from where we last left off, add a HTTP action. Rename it to “Get ListItemEntity”, set it to a GET, and set the URL to:

https://<your site collection>/_api/lists/GetByTitle(%27Coffee%20Shop%20Ratings%27)?$select=ListItemEntityTypeFullName')

in my example the site collection is:

https://culmsee.sharepoint.com/_api/lists/GetByTitle(%27Coffee%20Shop%20Ratings%27)?$select=ListItemEntityTypeFullName')

Check the URL carefully. You can see that I am using the $select to only bring back the property we are interested in… ListItemEntityTypeFullName. Also note that I have encoded the spaces in the list, I.e. ‘Coffee Shop Ratings’ has now become ‘Coffee%20Shop%20Ratings’.

image

2. In the headers section of the request, add:

  • a key called Accept, with a value of application/json; odata=verbose
  • a key called Authorization, with a value of “Bearer “ and then the AccessToken variable from the Dynamic Content panel…

image

image

Now before we get to the final bit, we have another minor theory interlude. The output of the web service you just created follows a particular structure. An example output is below and I have highlighted the bit we need.
{"d": 
   {"__metadata":
     { "id": <url>,
     "uri": <url>,
     "etag":"id",
     "type":"SP.List"
   },
   "ListItemEntityTypeFullName":"SP.Data.Coffee_x0020_Shop_x0020_RatingsListItem"
   }
}

This means we will need to parse this output and just grab the ListItemEntityTypeFull name parameter. The expression in Flow to do this will be:

actionBody(<Name of the workflow action you just created>)['d']['ListItemEntityTypeFullName']

So using my tenant, the expression is:

actionBody('Get_ListItemEntity')['d']['ListItemEntityTypeFullName']

Note: if you want to know more about these expressions, this is the place to go…

So with that bit of context, lets continue…

3. Add an Initialize Variable action and rename it to “Set ListitemEntity”. Name the variable ListitemEntity and make it a string. In the value, use the expression builder and use the expression I outlined above:

image

The final task…

Now we get to the final and most mind-bending piece of the puzzle. It is time to build the JSON payload that we will POST to SharePoint to update the managed metadata column. Let’s begin this bit with the end-in-mind and work back.

First up, we need to make a variable to store the Term ID that we will write to managed metadata. This eventually come from PowerApps, but right now we need to test so we will hard code a term.

1. Add an Initialise Variable action and name it “Set Test Term ID”. Call the variable TermGuid and make it a string. Set the value to any term in your managed metadata term set that the Beans column is using. In my case, the GUID 96a085d2-ed7d-4a75-8d63-c6ca56d0b358 refers to the term “Fiori”.

image

2. Add an Initialise Variable action and name it “Build Update Managed Metadata JSON payload”. Call the variable JsonPayload and make it a string. In the value field, type in

{ "__metadata": { "type": "'

…and then add the variable ListItemEntity from the Dynamic Content tab.

image

image

3. Next append the following text to the value…

" },"Beans":{"__metadata":{"type":"SP.Taxonomy.TaxonomyFieldValue"},"TermGuid":"

image

4. From the Dynamic Content tab, insert the TermGUID variable that you created in step 1

image

5. Next append the following text to the value…

", "WssId":"-1"}}

image

This completes the JSON payload that will update the managed metadata column. To recap, it has built the following string which is entirely consistent with the theory at the start of this article.

{ "__metadata": { "type": "SP.Data.Coffee_x0020_Shop_x0020_RatingsListItem" },
   "Beans":
     {"__metadata":{"type":"SP.Taxonomy.TaxonomyFieldValue"},
     "TermGuid":"96a085d2-ed7d-4a75-8d63-c6ca56d0b358",
     "WssId":"-1"
   }
}

Now bear in mind this payload is a string and not in JSON format yet. We will take care of that in the final HTTP call.

6. Add a HTTP action, name it “Update Managed Metadata” and set the method to POST. In the URL field, enter the following:

https://culmsee.sharepoint.com/_api/lists/GetByTitle('Coffee%20Shop%20Ratings')/items(

image

7. From the Dynamic content menu, find the CoffeePlace content, find and insert the ID field and then add a close bracket to the end…

image

image

In case you are wondering, we already know the ID of the newly created coffee shop entry because of the SharePoint – Create Item action that we created way back in part 1. Fortunately for us, that action returns the ID of the newly created item, making it easy for us to specify it in our API call. Neat eh?

8. In the headers section, add an entry for each of the headers I described earlier in this article, namely:

  • IF-MATCH: etag or “*”
  • X-HTTP-Method:”MERGE”
  • accept: “application/json;odata=verbose”
  • content-type: “application/json;odata=verbose”

image

9. Now let’s add the access token that took up the bulk of part 2. In the headers, add a key called Authorize and in the value, type in:

“Bearer “ (showing quotes to illustrate a space on the end)

Then insert the variable AccessToken from the dynamic content pane…

image

10. Finally, let’s convert our payload to JSON and send it off. In the Body field, use the expression builder and enter the following:

json(variables('Jsonpayload'))

image

Are you ready???

Okay, so we have wired everything up. Save the workflow and either submit a new entry via PowerApps or use the Run Now function in Flow. If all things go to plan, you should see a bunch of green. In the screenshot below, I ran from Flow and added a title and rating (no metadata of course because we are not asking PowerApps for it.

image

After running the workflow I see green goodness Smile

image

Now let’s check SharePoint for the evidence… Yeah baby!!!

image

Conclusion

Okay so that was quite an effort. If you have stuck with me through this, well done! Messing with JSON payloads and web services is bloody fiddly, but I have to say that understanding app principals and the SharePoint API is very useful knowledge.

You will be pleased to know that at this point the worst is over. In the next post we will return to PowerApps and set it up to send the term set item to flow, so it is not hard-coded like it is now. We will also discuss some weaknesses and limitations with this approach and look at ways we can make this whole thing a bit more resilient.

Until then, thanks for reading…

Paul Culmsee


PowerApps, Flow and Managed Metadata fields–part 2

Hi and welcome to part 2 of my series on showcasing the utility of Flow. Specifically, we are updating managed metadata fields – which is something that neither PowerApps or Flow can do natively as I type this. Having said that, if you are reading this in 2018 and beyond, it is likely this post is out of date the the gap has been addressed. Nevertheless, there are lots of good nuggets of info in this series that actually go beyond this particular use-case and will arm you with the knowledge to use Flow in all sorts of interesting ways.

At the end of our last exciting instalment, we had created an app principal, a flow and a powerapp. In this post we are going to focus on the first of the three – the app principal. Recall my analogy from part 1 where I described how the type of oAuth we are using is roughly analogous to getting into a nightclub. Basically our flow is like someone waiting in line to get into the club. Once they get past the bouncer at the door and pay the entrance fee, they are stamped so that they can enter and exit the club as they please, without having to wait in line and pay the entrance fee all over again. The stamp is temporary though, so if the patron returns the next night they will have to show their ID all over again and pay up.

The following diagram illustrates the idea…

image

In the last post, we registered an application principal. It looked like this:

image

This is what our virtual doorman is going to use to verify who we are. Our “dooman” is actually a Microsoft API sitting in Azure named https://accounts.accesscontrol.windows.net and not only will we need the Client ID and Client Secret from the app principal, but he also wants to know which Office365 tenant that we belong to. For that, we need the Office365 tenant ID, so let’s go get it.

Getting the Tenant ID (and other bits)…

As Microsoft states, “Your Office 365 tenant ID is a globally unique identifier (GUID) that is different than your tenant name or domain. On rare occasion, you might need this identifier, such as when configuring Windows group policy for OneDrive for Business”.

Guess what – this is one of those rare occasions.

To find the ID, either use one of the methods specified in this article, or go back to your site collection and append /_layouts/15/appprincipals.aspx. This URL will display your registered apps and also display your tenant ID (highlighted yellow below).

image

Now that we have a Client ID, Client Secret and Tenant ID, we can look at what a request to the doorman known as https://accounts.accesscontrol.windows.net actually looks like…

First up we need to add the tenant ID to the URL. E.g. https://accounts.accesscontrol.windows.net/[Tenant ID]/tokens/OAuth/2 where [TenantID] is replaced with your actual tenant ID we just discussed.

The second requirement is to send a payload of data to that URL via a HTTP POST. In the header of the post, we set a parameter called Content-Type to a value of application/x-www-form-urlencoded. This tells the web service to expect the rest of the data we send to be in a single string where name/value pairs are separated by the ampersand (&), and names are separated from values by the equals symbol (=). Trust me this will make sense in a moment…

Inside the payload, our doorman is expecting the following parameters:

  • grant_type – this is where we specify the type of oAuth request we are making. As discussed in part 1, we are using the Client Credentials approach, so the value will be: “client_credentials”.
  • client_id – this is actually a combination of the client id and tenant id. eg: “417ab7b8-c1bb-4475-8117-38ecec3cc63c@777e0ae8-66e6-4e0e-9ba4-0a8d9f02e915”
  • client_secret – exactly as specified in the app principal
  • resource – this specifies the actual data the access token is intended for. It is a combination of “00000003-0000-0ff1-ce00-000000000000” which is the ID for SharePoint within Office365, then it has the domain name of your tenant, followed by the tenant ID. Eg: “00000003-0000-0ff1-ce00-000000000000/culmsee.sharepoint.com@777e0ae8-66e6-4e0e-9ba4-0a8d9f02e915”

If we supply these parameters correctly, the service will return a data structure that contains various parameters. The only one we need is called access_token, which is highlighted below.

{

   "token_type":"Bearer",

   "expires_in":"3599",

   "not_before":"1507958657",

   "expires_on":"1507962557",

   "resource": “…”,

       "access_token":"…"

}

Our first few flow steps will create variables to store the parameters we need, and then we will try to get past our virtual doorman with a correctly formed HTTP request.

Back to Flow…

Let’s reopen the flow we created in part 1. It should have a trigger and one action – the create item action used to write the new coffee stop to SharePoint.

image

1. Add a new action and choose Variables – Initialize Variable. Call the Variable ClientID, make it a string and set its value to the client ID from the application principal. Also rename it to Set Client ID.

image

2. Add a second initialize variable action. Call this variable ClientSecret, make it a string and set its value to the Client Secret from the application principal. Rename it to Set Client Secret

image

Note: If the client secret has symbols in it like a +, you will see the following error:

Error validating credentials. AADSTS50012: Invalid client secret is provided. error_codes”:[70002,50012]

This error occurs because we need to encode the key to account for these characters. Use an expression and call the function encodeUriComponent. E.g.

encodeUriComponent(‘xxxxxxxxxxxxxxxxxxxxxxxxxxxxxx+xxxxxxxxxxxxx’)

3. Add a third initialize variable action. Call this variable TenantID, make it a string and set its value to the tenant ID you obtained in the last section. Rename it to Set Tenant ID

image
As described above, we need to take the client ID and tenant ID and join them together to get our access token. So we will make a new variable that is a combination of the existing ones…

4. Add a fourth initialize variable. Rename it to Combine Tenant and Client ID. Call this variable Realm and make it a string. This time though, instead of typing in a value, click the expression tab to the right.

image

Now follow this section carefully as the UI is not obvious here. First type in concat() and place your cursor inside the two brackets. Then click on the “Dynamic content” tab and click the ClientID variable you created in a step 1. If you did it right, the concat function will now have a reference to that variable as shown in the 3rd image below.

image

image  image

Now type in ,‘@’, exactly as shown below (include the single quote)…

image

Finally, click on the Dynamic content tab and click the TenantID variable you created in a step 3. If you did it right, the concat function will now have a reference to that variable as shown below.

image

For reference, the expression should look like this:

  • concat(variables(‘ClientID’),’@’,variables(‘TenantID’))

Click ok and the value in the step will look like the image below:

image

5. Add a fifth initialize variable. Rename it to Set Resource. Call this variable Resource and make it a string. using a similar approach to step 4, add the expression as follows:

  • concat(‘00000003-0000-0ff1-ce00-000000000000/<tenant name>.sharepoint.com@’,variables(‘TenantID’))

Make sure you replace <tenant name> with the name of your tenant. I.e. mine is culmsee.sharepoint.com, resulting in:

  • concat(‘00000003-0000-0ff1-ce00-000000000000/culmsee.sharepoint.com@’,variables(‘TenantID’))

image

At this point your workflow should look like this:

image

Let’s do a quick test and see if things are working as we expect. Go back to PowerApps and add a new café… eg:

image

In flow, check the history to confirm things ran successfully… lots of green ticks will be there if you got things right…

image

In particular, make sure the last two actions worked. Click on them and check the output to ensure your concat expressions worked as expected.

image   image

Getting the token…

Now it’s time to craft the HTTP action that will get our access token. As a reminder, the URL is actually: https://accounts.accesscontrol.windows.net/[Tenant ID]/tokens/OAuth/2. Our POST to this URL will supply grant_type, client_id, client_secret and resource. Let’s get this done!

1. Add a HTTP action and set the Method to POST. In the URL field, type https://accounts.accesscontrol.windows.net/

image

2. Click Add dynamic content and add the TenantID variable

image

3. Finish the URL by typing in /tokens/OAuth/2. You now have the URL ready to go.

image

4. In the header section, add a key called Content-Type with a value of application/x-www-form-urlencoded

image

5. In the body section, add the text grant_type=client_credentials&client_id=. From the dynamic content menu, add the Realm variable.

image

6. Add the text &client_secret=. From the dynamic content menu, add the ClientSecret variable.

image

7. Add the text &resource=. From the dynamic content menu, add the Resource variable.

image

8. Finally, rename the action to Call Token Service. Your action should look like the following:

image

9. Add a new initialize variable action. Call this variable AccessToken and make it a string. Rename the action to “Get Access Token”. Click the expression tab to the right and enter the following expression…

actionBody(<Name of your HTTP Action>’)[‘access_token’] – eg: actionBody(‘Call_Token_Service’)[‘access_token’]

This basically says to flow “Take the body text that came back from the HTTP step and pull out just the parameter called “access_token”

image

10. Finally, save the flow and submit another coffee place review, either via PowerApps, or by clicking the Run Now button in flow. Flow will ask for the same parameters that it expects from PowerApps.

image

In the debug of the flow, check the HTTP task and ensure it has a green tick.

Note: Setting all this up us tricky, so take your time, check everything and above all, DO NOT PROGRESS UNTIL YOU HAVE A GREEN TICK! If you do, examine the output of the Get Access Token. If everything has worked, you should see a string that looks like the second image below…

image

image

Conclusion:

If you have made it this far, congratulations! You have just done something quite tricky and usually the realm of developers. In terms of the breakdown of work we need to do, we have now progressed quite far…

In the next post, we are going to use the access token to call the SharePoint API that allows us to update Managed metadata.

In the meantime, thanks for reading and I hope these articles are starting to make this whole process a little less mysterious…

Paul Culmsee


PowerApps, Flow and Managed Metadata fields–part 1

Hi budding PowerApps and Flow users…

One (current) issue affecting both PowerApps and Flow is that neither support Managed Metadata Columns properly. I have a method to get around this issue, but it will take more than one post to explain. Lately I have refrained from writing epic multi-part posts because things change quickly. In fact this issue will likely go away by the end of 2017. <update> Native support for Managed metadata is now available. Be careful when you use this content</update>.

Due to this pace of change, this is very likely the last multi-part blog series I will do. So consider this a last hurrah from a bygone era of Cleverworkarounds Smile

Now let’s get to work. To illustrate the managed metadata issue we currently have to contend with, consider the list below that tracks the most business critical task ever – where the best coffee is near the office…

image

The beans column is actually a managed metadata column, linked to the following term set which has a list of locations and coffee beans from that location. As you can see above, each café sells a certain type of coffee bean…

image

Now that we all understand the vital importance of the data contained in this list, it is obvious that we need an app for it so that our workforce can have locations of the best coffee at their fingertips. So let’s quickly examine the degree to which PowerApps is able to handle this list. I created a blank app and connected it to the above list. I then tested with a gallery, data table, display form and edit form. Here are the results below…

Gallery: Fail

As you can see in the image below, the gallery is bound to the Coffee Shop Ratings list, but in the dropdown highlighted below, the managed metadata “Beans” column is not listed.

image

Data table: Pass

The data table does work. You can see below that the Beans column is visible….

image

Display Form: Pass

Like the data table, a display form also will display the managed metadata value…

image

Edit Form: Fail

As you can see below, the edit form sees the Beans column, but will not render it as editable in PowerApps… bummer. Not a great solution if you want your users to add new coffee places to the list via the app.

image

Flow to the rescue?

If you have read some of my recent posts, I have found Flow to be very useful to work around various obstacles. For example, I use flow to handle photo uploads from PowerApps to SharePoint. So how does Flow fare with Managed Metadata? Unfortunately this is also a bust at present. The built-in “SharePoint – Create Item” action will not show the managed metadata columns. Notice the Beans column is missing from the image below…

image

Now all is not lost. Just because the built-in Flow actions do not work, does not mean we cannot achieve our goal. One can also talk to SharePoint via it’s API’s. Flow makes this possible because one of its built-in actions called the HTTP action. This is a super powerful action because you can use it to pretty much make any form of web request you want.

image

So let’s do an experiment and find out how easy it is to support managed metadata via Flow, by talking to SharePoint via API.

But there is one issue we have to contend with first. The SharePoint actions in flow take care of authentication for us, whereas the HTTP action is generic by definition. So how are we going to make an authenticated connection to SharePoint using the HTTP action?

The answer is we are going to use oAuth to request an access token. For the non-developers reading this who’s eyes start to glaze over when terms like oAuth start getting bandied about, let me use an analogy…

An oAuth primer using beer…

Let’s say that you are going to a nightclub or a bar, and you have to prove that a) you are over the legal age and b) you are wearing suitable attire for the venue. You present your drivers license or other form of ID. The doorman checks your ID, decides if you are good looking enough and permits you to enter. You then walk into the club, pay your entrance fee, and an ink stamp is used to mark your arm. This tells staff that are are legally allowed to be in the club and can enjoy a frothy beer or two. Think of that stamp as your access token. If you walk out of the club for a break, you can skip the line to get back in, because you have already been stamped. You just show them your hand…

So the basic pattern is to get an access token is:

image

Once you have access, no one has to check your ID, instead they just make sure the stamp on your arm is the same as the one they issued you earlier. Eg:

image

Now access tokens don’t last forever. If you turn up the next day, try and skip the line and present your stamp, the doorman will turn you away because today they used the blue stamp and last night they used the green stamp. So you will have no choice but to go to the other line, get your ID checked, and pay up before getting a new blue stamp issued…

image

So let’s now turn our attention to SharePoint and how this works in real life. What I just described above is roughly equivalent to something in oAuth called the Client credentials grant. In short, before we do anything related to managed metadata, we need to get into the club. So we will need to get some identification so we can get our hand stamped. So who issues the ID in the first place?

Enter the app principal

In our analogy above, there was an implicit trust going on. You showed your identification to the doorman, and they trusted that the ID you flashed before him was genuine. In the context of SharePoint, we need to have SharePoint itself issue your ID for it to be deemed trustworthy. After all, even bouncers have problems with fake IDs.

So our flow is going to need to use an app principal (a genuine ID) before it can be issued a “stamp” (or access token). Fortunately for us, the plumbing to do this in SharePoint has been in place since the oft-derided app/app-in model was brought in. I am not going to get too caught up in the details here, because all-round guru Wictor has detailed the process in a few posts. In particular, have a read of this one, and in particular the “Create the App Principal” page…

Here are the basic steps to create an app principal to use in flow:

1. Navigate to your site collection and append /_layouts/15/AppRegNew.aspx

2. Generate an App ID, App secret and enter some other identifying info

image  image

3. Copy the client id and secret to clipboard.

4. Append /_layouts/15/AppInv.aspx to your site collection and grant the permissions needed by this app principal.

image

In our example, we are updating a managed metadata field in a single list, so this app principal is going to be given the ability to write to SharePoint lists. The XML is below, and the schema for other scenarios is here:

<AppPermissionRequests AllowAppOnlyPolicy=”true”>

    <AppPermissionRequest Scope=”http://sharepoint/content/sitecollection/web/list” Right=”Write”>

    </AppPermissionRequest>

</AppPermissionRequests>

6. Choose the list that the app principal will be working with. In my case it is the coffee shop rating list with the managed metadata column.

image

Although I said I would not get into too much detail, here are some handy notes around this process:

  • The permission XML is very fussy. It will not tolerate spaces between elements
  • This app principal is registered/stored in azure active directory. You need privileged access in Azure AD to do this (site collection admin is not enough)
  • You can also do all of this in PowerShell
  • The app principal is valid for 1 year. So just like your drivers license expires periodically, the same happens here. If you want something longer, do this in PowerShell. (in our case native support for Managed Metadata in PowerApps/Flow is a few months off, so a year is fine
  • The oAuth method we are using doesn’t actually use the App Domain nor the request URL. But other methods do, hence why we have to enter something anyway
  • Microsoft are now steering people to the Graph API, which is a unified API that allows access to all of Office365 services. This will become the approach to take, but Wictor Wilen told me on Twitter that currently you cannot scope an access token down to a particular site collection.

Back to Flow…

Now that we have an app principal with permission to our site collection, it is time to start work on our Flow.

The basic operation for the flow is follows… First, the flow will be triggered by PowerApps, which will send Coffee shop name, rating and Bean. We will create a new entry in the list using the standard SharePoint flow action, before using the HTTP action to get an access token, and then update the newly created item with the coffee bean used by the shop.

image

Now the actual flow is going to look different to what I have outlined above. There are multiple actions involved for each of the steps, and some architectural and security considerations too. So we will adjust our flow as we go…

So let’s end this post by dealing with the trigger and step 1 above, as they are easiest. Part 2 will deal with the access token and part 3 will deal with the updating of the managed metadata column.

1. Create a new flow and choose the PowerApps trigger…

image

2. Add a SharePoint – Create Item action.

image

3. Specify the site collection where your list is stored and then the Coffee ratings list. Flow will read the list and display the fields it has found (excusing Beans)

image

4. Rename the flow to CoffeePlace and for the Title and Rating columns, set it to ask PowerApps for the data

image

image

image

5. Save the flow and give it an appropriate name…

image

image

Build a PowerApp…

Now let’s go to PowerApps and build a basic app to add a new coffee place.

1. In PowerApps create a new blank app using the phone layout

image
2. Insert 2 text boxes and 2 labels as shown below… note that I have named my controls to be more meaningful. I suggest you do the same…

image

3. Add a button to the bottom the app and label it “Submit”

image
4. Select the button, and from the actions menu, choose “Flows”

image

5. A panel will open to the right of your app screen, and you should see the flow we made earlier. Basically PowerApps will show any flows that you have access to, that use a PowerApps trigger

image

6. Choose your Flow, and PowerApps will add a submit action to the button that calls the flow. Any “Ask in PowerApps” parameters will be displayed in the function as shown below. Now hopefully you can see why I made you rename your Create Item action when building the flow! The image on the right is the flow action where we told it to ask PowerApps. Note the names in both images…

image  image

7. Fill in the parameters by choosing the text boxes we added in step 2. Now you will see why I recommend naming them…

image

8. Save your flow and then preview it… Enter a shop name, rating and click the button. Check your SharePoint list and you should see the new entry…

image  image

Conclusion…

Awesome! If you have gotten this far, we have all of our raw ingredients set up. We have an app principal, a PowerApp and a flow. In the next post, we will focus on getting our access token, so we can update the managed metadata field.

Thanks for reading…

Paul Culmsee


So what is this newfangled apps model anyway and why do I care? (part 3)

Hiya

This is the third post in some articles aimed helping strategic or business focused users understand the SharePoint 2013 and Office365 “apps model”, and what it means for the future of SharePoint. In part 1 of this series, I outlined the opportunities and challenges that Microsoft are currently trying to addressing. They were:

  • Changing perceptions to cloud technologies and increased adoption; which enables…
  • The big scary bogeyman known as Google with a viable alternative to SharePoint, Office and Exchange in the form of Google Apps; as well as…
  • An increasing number of smaller cloud-based “point solution” players who chip away at SharePoint features with cheaper and easier to use offerings; while suffering from…
  • A serious case of Apple envy and in particularly the rise of the app and the app marketplace; while dealing with…
  • Customers unable to handle the ever increasing complexity of SharePoint, leading to delaying upgrades for years

These reasons prompted Microsoft’s to take a strongly cloud driven strategy and have really been transforming their business to deliver it. They really have transitioned from a software provider to an application hosting provider and in terms of SharePoint, the “apps” model is now the future of customisation.

Now “apps” is a multifaceted topic and the word has been overused unfortunately. So in part two we started to unpack the apps model by channelling the kids TV show playshcool to show the idea of SharePoint customisations being hosted on separate servers, but presenting a seamless experience for users.

If you never read part 1 and 2, I seriously suggest you do. To whet your appetite, here are some pretty diagrams to highlight what you missed out on!

image image  image

The main point I made was the notion that custom SharePoint components ran on separate, non SharePoint servers and were embedded into SharePoint via Iframes. These remote apps then communicate securely with SharePoint (eg read or write data from lists) via web services.

I concluded part 2 by showing the benefits of the apps model from Microsoft’s perspective. Among other things, this model of developing custom SharePoint solutions can be supported on Office365 and on-premises. For on-premises customers, SharePoint servers remain pristine and free of the muck and clutter of 3rd party code, making service packs and cumulative updates much less complex and costly. It also enables Microsoft to offer an app store, where 3rd party vendors can maintain cloud based services that can be embedded and consumed by on-premises and online SharePoint installs. If you go back to the 5 key strategic threats I started this post with, it addresses each one nicely.

So Microsoft’s intent is good, and there is nothing wrong with good intentions… or is there?

image

Digging deeper

So where does one start with unpacking the apps model? Let’s make this a little less of a dry read by channelling Big Bang Theory to find out. First up, Penny wants to know where app data stored is stored, given that the app runs on a different server to SharePoint as shown below. (If you think about it, from apps perspective – SharePoint is the remote server).

image

Sheldon’s answer? (Of course Sheldon invented the apps model right)…

image

Er… come again? Let’s see if Leonard can give a clearer explanation…

image

Leonard’s explanation is a little better. Ultimately the app developer has the choice over where app data is stored. For example, let’s say someone writes a survey app for SharePoint and it renders on the home page via an iframe. When users fill in this poll, the results could be stored on the server that hosts the app and not SharePoint at all (which in SharePoint terms is referred to as the remote web). Alternatively, the app could store the survey results in a list on a SharePoint site which the app is being invoked from (this is called the host web). Yet another alternative is something called the App Web, which I  will return to in a moment.

First lets look at the pros and cons of the first two options.

Option A: Store App Data in SharePoint Lists

If the app developer chooses this approach, the app reads/writes to SharePoint lists in the site where the app is deployed (henceforth called the host web). In this approach, when a site administrator chooses to add an app to the site, the app has to specify the level of access is required for the site, and it asks the site admin to authorise this access. In the image below, you can see that this Kodak app is requesting the ability to edit or delete items in document libraries and lists on this site, as well as access user profile information. If the site administrator clicks “Trust it”, the app now has the access it needs.

image

The pro to this approach is that all app data resides in regular old SharePoint, where it is searchable and can take advantage of all of the goodies that lists and libraries give you like versioning, information management policies and workflow. Additionally, multiple apps can access these lists, so this allows for the development of componentised solutions that work with a single authoritative data source.

The potential cons (or implications to be aware of) to the approach are:

  • SharePoint lists and libraries are not always an appropriate data stores for some types of data. Most people are well aware now that a SharePoint list is most definitely not a relational database and it has performance issues when misused (among other things). SharePoint also has in-built thresholds that kick in when lists get big (list queries that generate a result set of 5000 or more items will fail by default). Microsoft state in their SharePoint 2013 and SharePoint Online solution packs documentation “If your business needs require you to work with large data sets and query result sets, this approach won’t work”.
  • If the app has been deployed to many sites and site collections (and uses lists on each), then things can get painful if a new version of the app requires a new or modified set of columns on the list in the host web.
  • if you delete the app from the host web, the list data remains on the site as the lists will likely not be deleted. Sometimes this is a good thing as the data might be important or used in other ways, but if the app developer is storing configuration data here, would leave orphaned data in the site.

Also think about what happens when you have an on-premises SharePoint server but the app is hosted by a 3rd party outside your firewall. How is the remote app even able to get to your SharePoint box in the first place? To enable this to happen, you are likely going to need to talk to your network/security people because you are going to need some funky firewall/reverse proxy infrastructure to allow that to happen. Additionally, some organisations might be uncomfortable that an app from a 3rd party on the interweb can have the ability to read and write data inside an internal SharePoint server anyway.

So what alternatives are there here?

Option B: Store data in the remote app

The other option for the app developer is to store the app data on the same server the app is running from (called the remote web). In this approach, no data is stored in SharePoint at all. The pros for this option is that it alleviates two of the issues from option A above in that developers can use any data storage system they want (eg SQL Server, a GIS system or a graph database) and you do not have any of those pesky firewall issues with the app connecting back to your SharePoint server. The app renders in its iframe and does its thing.

Unfortunately this also has some cons.

  • There are potential data sovereignty issues. Where is the remote app hosted? Are you sure you trust the 3rd party app provider with your data? Consider that a 3rd party might host an app for many organisations. Do they have adequate precautions for keeping your data isolated and secure (ie Is your stuff stored in a separate database to everyone else?) Are they adequately backing up that data consistent with your internal standards? If you uninstall the app, is the data also uninstalled at the app provider end?
  • This data is very likely not searchable or easily usable by SharePoint for other purposes as it is not necessarily directly accessible by SharePoint.
  • Chances are that the app will have to talk to SharePoint in some way, so you really don’t get out of dealing with your network/security people to make it all work if the remote web is outside your firewall.
  • Also consider data integrity. if say, you needed to restore SharePoint because of a data loss or data corruption issue, what does this mean for the data stored on the remote app? will things get out of sync?

These (and other questions) bring us to the next option that is a bit of a mind-bending middle ground.

Option C: Store data in the App Web

Now here is where things start to mess with your head quite a bit. Most people can understand the idea behind option A and B, but what the heck is this thing known as an app web? The short answer, it is a special SharePoint sub-site that is used for certain apps. It usually gets created when a site administrator adds an app to a site and importantly, removed when a site administrator removes the app. If you consider the diagrams below we can see our mythical SharePoint 2013 homepage with 3 apps on it, all running on separate servers as explained in part 2. If we assume each of these apps have deployed an app web on our SharePoint site, there are now three SharePoint sub-sites created underneath it as shown below. These are the app webs.

image

Now app webs are no ordinary subsites in the way you might know them now. For a start, if you tried to access them from your SharePoint host web, you would not be able to at all. Through some trickery, SharePoint puts these sites on a completely different URL than the site where the apps were installed. For example, if you had a site called http://myintranet/sites/web1 and you added a survey app, a subsite exists but it would absolutely not be http://myintranet/sites/web1/survey or anything like that. It would instead look something like:

http://app-afb952fd75de4a.apps.mycompany/sites/web1/surveyapp/

Now being a business audience reading this, trust me that there are good reasons for this apparent weirdness related to security which I will speak to in the next post.

But if this makes sense so far, then in some ways, one can argue that an app web is a weird cross between option A and B in that it is a subsite on your SharePoint farm, yet SharePoint treats it as if it is a remote data store. This means the app web is a special isolated storage area for app developers to put stuff like data, configuration, CSS, JavaScript and whatever other functionality their app needs to do its thing.

This approach has some advantages:

  • The app web is technically a SharePoint site, so app developers can create whatever structure they need (think lists, libraries and columns) to store their stuff like images, css, JavaScript and other goodies. This allows for much more flexible data structures that can easily be accommodated that writing to the odd list in a host web (Option A above)
  • The app web lives is on your SharePoint server, so it means some app components (and data) can be stored here instead of on a remote web on a server far away from you. When you back up your configuration database, the app web is backed up like everything else. (Less data integrity risk than option B).
  • The app web facilitates clean install/uninstall of an app, since the app web is removed if an app is removed. In other words, no more orphaned data lying around

But if you think all of those points through, you might see several important implications:

  • If the app developer decided to store critical app data in the app web, when the app is uninstalled that data is lost (or put better, developers have to write special uninstall code to copy the data somewhere else which means yet more code)
  • Just like option A, SharePoint lists and libraries are not always an appropriate data stores for some types of data. (remember the list item threshold I mentioned in option A? They also apply here too)
  • Apps cannot share app webs between them. In other words, apps cannot reach in and access data from other app webs. Therefore you can’t easily use the information stored in app webs with other apps and applications. In fact if you want to do this you pretty much have to choose option A. Store the shared data apps need in the host web and have both apps access that data
  • You may end up with many many app webs. If you take my example above there are 3 app webs to handle 3 apps. What if this was a project site template and your organisation has hundreds of projects. That means you have thousands of app webs, all with potentially interesting data that trapped in mini information silos.
  • SharePoint search cannot index the app webs
  • A critical but often overlooked one is that developers can’t update the library/list metadata schema in an app web (think columns, content types, libraries, etc) without updating and redeploying the app. As you will see in a future post, this gets real ugly real fast!
  • SharePoint App Webs are created with special templates which block SharePoint Designer (that’s probably a good thing given the purpose of an app web)

Conclusion

So if you are a non-developer reading this post, consider that none of the above options are on their own, likely to give you a solution. For each option, there seems to be just as many advantages as flaws. The reality is that many apps will use at least two, or even all three options. Things like images, css and javascript might be loaded from the app web, some critical reusable SharePoint content from the host web and the remote web for some heavy duty data manipulation.

If you think that through, that means as SharePoint administrators and governance teams, you will likely end up dealing with all of the cons of each of the options. Imagine asking a developer to conceptually draw an app that uses each of the options and consider how many “moving parts” there are to it all. Then when you add the fact that most organisations still have a legacy of full trust solutions to deal with, you can start to see how complex this will be to manage.

Now this really is just the tip of the iceberg. In the next post I am going to talk a little about how all this stuff is wired up from an authentication and security standpoint. I am also going to focus on the application lifecycle management implications of this model. If you think about the picture I have painted here with all of the potential moving parts, how to you think an upgrade to an app would fare?

thanks for reading

Paul Culmsee


So what is this newfangled apps model anyway and why do I care? (part 2)

Hiya

This is the second post in some articles aimed at demystifying the SharePoint “apps” model for the strategic or business focused user. In case you are not aware, Microsoft have gotten a serious case of “app fever” in recent times, introducing the terminology not only into SharePoint, but Office as well. While there are very good reasons for this happening, Microsoft used the “app” terminology in multiple ways, therefore making their message rather confusing. As a result, Microsoft have not communicated their intent particularly well and customers often fail to understand why they make the changes that they do.

Things are definitely getting better, but I nevertheless see a lot of confusion around the topic. So in part 1 of this series, I explained the reasons Microsoft have adopted the strategy that they have done. To recap, they are trying to respond to five major disruptive forces that challenge their market position:

  • Changing perceptions to cloud technologies and increased adoption; which enables…
  • The big scary bogeyman known as Google with a viable alternative to SharePoint, Office and Exchange in the form of Google Apps; as well as…
  • An increasing number of smaller cloud-based “point solution” players who chip away at SharePoint features with cheaper and easier to use offerings; while suffering from…
  • A serious case of Apple envy and in particularly the rise of the app and the app marketplace; while dealing with…
  • Customers unable to handle the ever increasing complexity of SharePoint, leading to delaying upgrades for years

Microsoft’s answer to this has to go all-in with cloud, as this is the only way to beat the cloud providers at their own game, while reducing the complexity burden on their customers.  This of course is in the form of Office365, OneDrive and an ever increasing set of cloud oriented tools like Delve and Project Online.

But in SharePoint land, this has turned traditional development upside down. More than a decade of customisation “best practices” are no longer best – in fact they are no longer usable in many circumstances. The main reason is that the most common method of customisation normally applied to SharePoint (full-trust server side code) is not permitted in the cloud. Microsoft couldn’t risk untrusted, 3rd party custom code on their servers. What happens if one clients dodgy code affects everybody else sharing the service? This would threaten performance, uptime and Microsoft’s ability to upgrade their service over time.

So things had to change. Microsoft’s small army of product architects commandeered a whiteboard and started architecting innovative solutions to deal with these challenges and the apps model is the result. So let’s examine some core bits to the apps model by channelling a much loved children’s TV show.

There is a bear in there…

Now at this point I have to warn the developers or tech people writing this post. I am going to give a simplified version of the apps model intended for a decision making audience. I will omit many details I don’t deem necessary to make my key points. You have been warned…

image

Any parent of small children in most countries might be familiar with Playschool – a show for toddlers that has been around for eons. It is well known for its theme song starting with the line “There is a bear in there…and a chair as well”. When trying to come up with a suitable way to explain the SharePoint apps model, using Playschool as a metaphor turned out to work brilliantly. You see in each episode of Playschool, there was a segment where viewers were taken through the “magic window” to faraway lands. In the show, the presenter would pick one of the three windows and we would zoom into it, resulting in a transition to another segment. In our case, we have to pick the square window for two reasons. Firstly, a good many apps are in effect windows to somewhere else. Secondly, and much more importantly, it perfectly matches the new Microsoft corporate logo. Perfect metaphor or what eh? 🙂

Like the Playschool magic window, browsers have a similar capability to enable you to visit strange and magical lands… Not only is there a bear in there and a chair as well, but there are plenty of other things like YouTube videos and Yammer discussions. I have drawn this conceptually shown below. Note the black window in the SharePoint team site on the left, that can be filled with YouTube or Yammer.

image

You have no doubt visited web sites that have embedded content like YouTube videos or SlideShare slides in them (This blog site has lots of embedded ads that make me no money!). Essentially, it is possible for browsers to include content from different sites together into a single “page” experience. Users see it all as one page, even through content can come from all over the place. This is really useful, because it means you can leverage the capability of other sites to enhance the functionality of your own sites..

This my friends, is one of the core tenets of the current SharePoint 2013 apps model. Instead of running on the SharePoint server, many apps now run separately from SharePoint, embedded in SharePoint pages so that they look like they are part of SharePoint. In the example mock-up below, we have a SharePoint team site. In it, we have a remote web site that displays some pretty dashboard data. By loading that emote content into our magical square window, it now appears a part of SharePoint.

image       image

Going back to Microsoft’s core pain points, this helps things a lot. For a start, it means no custom code has to be installed onto the SharePoint server. Instead, SharePoint simply embeds the external content on the page. In the leftmost image above, you can see the SharePoint server (labelled as “Your server”), rendering a page with a placeholder in it. It then retrieves content from a remote server (labelled “my server”) and displays it in the placeholder to render the complete page (the rightmost image above).

So what feat of Microsoft innovation and general awesomeness enabled this to happen?

Everybody meet “Mr IFrame”.

Inline Frames (IFrames) are windows cut into your webpage that allow your visitor to view content on another site without reloading the entire page. The concept was first implemented in Microsoft Internet Explorer way back in 1997. Yep – you heard right… 1997. So IFrames are not a new concept at all – in fact its positively ancient when you count time in internet years. For this reason, when developers find this out, their reaction is usually something like this…

image

But there is more than meets the eye…

Now if the apps model was just IFrames alone, then you you might wonder what the big deal is with apps. In fact IFrames have been used this way in SharePoint for years via the Page Viewer Web Part. For years, companies with SharePoint deployments have embedded stuff like Twitter, YouTube or Facebook widgets via iFrames.

So of course, there is more to it…

Let’s revisit the “your server” and “my server” diagram used above and consider the question.. What if these remote applications displayed inside an iFrame can interact with SharePoint? In other words, What if the remote application running on my remote server is able to connect to your SharePoint server and read/write data? In the diagram below I have illustrated the idea. The top half of the diagram represents a SharePoint server that could be on-premises or an Office365 tenant. On the left is a Products list, that is somewhere inside this SharePoint server. At the bottom is my application running on my server that creates a pretty dashboard. What if my remote application queried the SharePoint products list to create the dashboard? Now we have an application, that while not running inside SharePoint, can nevertheless utilise live data from SharePoint to create a seamless experience for users.

image

If we now add 3 iframes to a page, the implications should start to become more clear. We can build hybrid solutions leveraging the best of what SharePoint can do, whilst leveraging the best of what other platforms can do. To the user, these are still SharePoint sites, but the reality is that we are now viewing a page that has been delivered by various different platforms. Each can interact with SharePoint data in different ways to deliver a seamless experience. Because these remote apps are not SharePoint at all, developers can write any application they want to, using the platform and tools of their choice. But to the user it is still a SharePoint page… neat huh? I’m sure the Microsoft product team thought that this was a brilliant conceptual masterpiece when they dreamt it up.

image

A beautiful model…

I don’t know if you have ever watched developers come up with API’s, but it tends to be a lot of excitement around a whiteboard as they revel in the glory of their elegant solution designs. So let’s quickly re-examne the benefits of this remotely hosted app approach from Microsoft’s perspective and see how we are going so far…

image

First and foremost, we now have SharePoint customisation approach that they can be fully support in Office365. Microsoft don’t have to put code on their online servers, yet can support extensibility. Now they are much more evenly matched with Google, while at the same time, reduce their tech support costs of SharePoint because they have isolated 3rd party code out of SharePoint. If any problems are encountered with a remote app, SharePoint will keep humming along and Microsoft can now legitimately tell the clients “no really it is not SharePoint causing your issue – go see your friendly neighbourhood app developer”.

More importantly since apps can also can be used in on-premises SharePoint deployments too, meaning both Microsoft and their customers now have pristine SharePoint servers free of the muck and clutter of 3rd party code. Therefore service packs and cumulative updates should no longer strike fear into admins. Microsoft also now nails google’s ass because Google has no real concept of on-premises at all in the way Microsoft does. Thus when hybrid scenarios come up in conversation, Microsoft has a much stronger story to tell.

But there is a more important implication than all of that. Microsoft can now do the app store thing. Vendors can maintain cloud based services that can be embedded and consumed by on-premises and online SharePoint installs. This means 3rd parties can tap into the customer ecosystem with a captive marketplace and customers can browse the store to examine what options are out there to extend SharePoint functionality. In theory, this should enable hundreds of vendors to do some slight modifications to their existing web based applications and incorporate them into the SharePoint ecosystem.

image

But reality is not what’s on the whiteboard…

At this point, I hope I have painted a pretty good picture of the advantages offered by this new paradigm and you can probably appreciate the Microsoft nerds completely falling in love with this conceptual model of future SharePoint customsiations. The Microsoft strategy dudes probably loved it too because it elegantly dealt with all of the challenges they were seeing. Unfortunately though, with most conceptual models, reality is a very different beast from the convenient fiction of models.

So in the next post, we are going to dig a little deeper. For example, how can a remote app even have permissions to talk to SharePoint in the first place? Do you really want code running in some untrusted 3rd party server to be fiddling with data in your SharePoint lists and libraries? How does that even work anyway in an on-premises scenario when a cloud hosted app has to access data behind your firewall?

Fear not though – the Microsoft guys thought of this (and more) when they were drawing their apps model concept on the big whiteboard. So in the next post, we are going to look at what it takes to bring this conceptual masterpiece into reality.


Thanks for reading

Paul Culmsee


So what is this newfangled apps model anyway and why do I care? (part 1)

Hiya

I’ve been meaning to write about the topic of the apps model of SharePoint 2013 for a while now, because it is a topic I am both fascinated and slightly repulsed by. While lots of really excellent material is out there on the apps model (not to mention a few good rants by the usual suspects as well), it is understandably written by developers tasked with making sense of it all, so they can put the model into practice delivering solutions for their clients or organisations.

I spent considerable time reading and researching the various articles and videos on this topic produced by Microsoft and the broader SharePoint community and made a large IBIS map of it. As I slowly got my head around it all, subtle, but significant implications begin to emerge for me. The more I got to know this topic, the more I realised that the opportunities and risks of the apps model holds many important insights and lessons for how organisations should be strategically thinking about SharePoint. In other words, it is not so much about the apps model itself, but what the apps model represents for organisations who have invested into the SharePoint platform.

So these posts are squarely aimed at the business camp. Therefore I am going to skip all sorts of things that I don’t deem necessary to make my points. Developers in particular may find it frustrating that I gloss over certain things, give not quite technically correct explanations and focus on seemingly trivial matters. But like I said, you are not my audience anyway.

So let’s see if we can work out what motivated Microsoft head in this direction and make such a significant change. As always, context is everything…

As it once was…

I want you to picture Microsoft in 2011. SharePoint 2010 has come out to positive reviews and well and truly cemented itself in the market. It adorns the right place in multiple Gartner magic quadrants, demand for talent is outstripping supply and many organsiations are busy embarking on costly projects to migrate from their legacy SharePoint 2007 and 2003 deployments, on the basis that this version has fixed all the problems and that they will definitely get it right this time around. As a result, SharePoint is selling like hotcakes and is about to crack the 2 billion dollar revenue barrier for Microsoft. Consultants are also doing well in this time since someone has to help organsiations get all of that upgrade work done. Life is good… allegedly.

But even before the release of SharePoint 2010, winds of change were starting to blow. In fact, way back in 2008, at my first ever talk at a SharePoint conference, I showed the Microsoft pie chart of buzzwords and asked the crowd what other buzzwords were missing. The answer that I anticipated and received was of course “cloud”, which was good because I had created a new version of the pie and invited Microsoft to license it from me. Unfortunately no-one called.

image

Winds of change…

While my cloud picture was aimed at a few cheap laughs at the time, it holds an important lesson. Early in the release cycle of SharePoint 2007, cloud was already beginning to influence people’s thinking. Quickly, services traditionally hosted within organisations began to appear online, requiring a swipe of the credit card each month from the opex budget which made CFO’s happy. A good example is Dropbox which was founded in 2008. By 2010, won over the hearts and minds of many people who were using FTP. Point solutions such as Salesforce appeared, which further demonstrated how the the competitive landscape was starting to heat up. These smaller, more nimble organsiations were competing successfully on the basis of simplicity and focus on doing one thing well, while taking implementation complexity away.

Now while these developments were on Microsoft’s radar, there was really only one company that seriously scared them. That was Google via their Google Docs product. Here was a company just as big and powerful as Microsoft, playing in Microsoft’s patch using Microsoft’s own approach of chasing the enterprise by bundling products and services together. This emerged as a credible alternative to not only SharePoint, but to Office and Exchange as well.

Some of you might be thinking that Apple was just a big a threat to Microsoft as Google. But Microsoft viewed Apple through the eyes of envy, as opposed to a straight out threat. Apple created new markets that Microsoft wanted a piece of, but Apple’s threat to their core enterprise offerings remained limited. Nevertheless, Microsoft’s strong case of crimson green Apple envy did have a strategic element. Firstly, someone at Microsoft decided to read the disruptive innovation book and decided that disruptive was obviously cool. Secondly, they saw the power of the app store and how quickly it enabled an developer ecosystem and community to emerge, which created barriers for the competition wanting to enter the market later.

Meanwhile, deeper in the bowels of Microsoft, two parallel problems were emerging. Firstly, it was taking an eternity to work through an increasingly large backlog of tech support calls for SharePoint. Clients would call, complaining of slow performance, broken deployments after updates, unhandled exceptions and so on. More often than not though, these issues had were not caused by the base SharePoint platform, but via a combination of SharePoint and custom code that leaked memory, chewed CPU or just plain broke. Troubleshooting and isolating the root cause very difficult which led to the second problem. Some of Microsoft’s biggest enterprise customers were postponing or not bothering with upgrades to SharePoint 2010. They deemed it too complex, costly and not worth the trouble. For others, they were simply too scared to mess with what they had.

A perfect storm of threats

image  image

So to sum up the situation, Microsoft were (and still are) dealing with five major forces:

  • Changing perceptions to cloud technologies (and the opex pricing that comes with it)
  • The big scary bogeyman known as Google with a viable alternative to SharePoint, Office and Exchange
  • An increasing number of smaller point solution players who chip away at SharePoint features with cheaper and easier to use offerings
  • A serious case of Apple envy and in particularly the rise of the app and the app marketplace
  • Customers unable to contend with the ever increasing complexity of SharePoint and putting off upgrades

So what would you do if you were Microsoft? What would your strategy be to thrive in this paradigm?

Now Microsoft is a big organisation, which affords it the luxury of engaging expensive management consultants, change managers and corporate coaches. Despite the fact that it doesn’t take an MBA to realise that just a couple of these factors alone combine as a threat to the future of SharePoint, lots of strategic workshops were no doubt had with associated whiteboard diagrams, postit notes, dodgy team building games and more than one SWOT analyses to confirm the strategic threats they faced were a clear and present danger. The conclusion drawn? Microsoft had to put cloud at the centrepiece of their strategy. After all, how else can you bring the fight to the annoying cloud upstarts, stave off the serious Google threat, all the while reducing the complexity burden on their customers?

A new weapon and new challenges…

In 2011, Microsoft debuted Office365 as the first salvo in their quest to mitigate threats and take on their competitors at their own game. It combined Exchange, Lync and SharePoint 2010 – packaging them up in a per-user per month approach. The value proposition for some of Microsoft’s customers was pretty compelling because up-front capital costs reduced significantly, they now could get the benefits of better scalability, bigger limits on things like mailboxes, while procurement and deployment was pretty easy compared to doing it in-house. Given the heritage of SharePoint, Exchange and Lync, Microsoft was suddenly competitive enough to put Google firmly on the back foot. My own business dumped gmail and took up Office365 at this time, and have used it since.

Of course, there were many problems that had to be solved. Microsoft was now switching from a software provider to a service provider which necessitated new thinking, processes, skills and infrastructure internally. But outside of Microsoft there were bigger implications. The change from software provider to service provider did not go down well with many Microsoft partners who performed that role prior. It also freaked out a lot of sysadmins who suddenly realised their job of maintaining servers was changing. (Many are still in denial to this day). But more importantly there was a big implication for development and customisation of SharePoint. This all happened mid-way through the life-cycle of SharePoint 2010 and that version was not fully architected for cloud. First and foremost, Microsoft were not about to transfer the problem of dodgy 3rd party customisations onto their servers. Recall that they were getting heaps of support calls that were not core SharePoint issues, but caused by custom code written by 3rd parties. Imagine that in a cloud scenario when multiple clients share the same servers. This means that that one clients dodgy code could have a detrimental effect on everybody else, affecting SLA’s while not solving the core problem Microsoft were having of wearing the cost and blame via tech support calls for problems not of their doing.

So with Office365, Microsoft had little choice but to disallow the dominant approach to SharePoint customisation that had been used for a long time. Developers could no longer use the methods they had come to know and love if a client wanted to use Office 365. This meant that the consultancies who employed them would have to change their approach too, and customers would have to adjust their expectations as well. Office365 was now a much more restricted environment than the freedom of on-premises.

Is it little wonder then, that one of Microsoft’s big focus areas for SharePoint 2013 was to come up with a way to readdress the balance. They needed a customisation model that allowed a consistent approach, whether you chose to keep SharePoint on-premises, or move off to the cloudy world of Office 365. As you will see in the next post, that is not a simple challenge,. The magnitude of change required was going to be significant and some pain was going to have to happen all around.

Coming next…

So with that background set, I will spend time in the next post explaining the apps model in non technical terms, explaining how it helps to address all of the above issues. This is actually quite a challenge, but with the right dodgy metaphors, its definitely possible. 🙂 Then we will take a more critical viewpoint of the apps model, and finally, see what this whole saga tells us about how we should be thinking about SharePoint in the future…

thanks for reading

Paul Culmsee


Today is: Wednesday 3 June 2026 -