CleverWorkarounds After much frustration, it seems DEFAULT is the way to go…

December 24, 2013

Trials or tribulation? Inside SharePoint 2013 workflows–Part 7

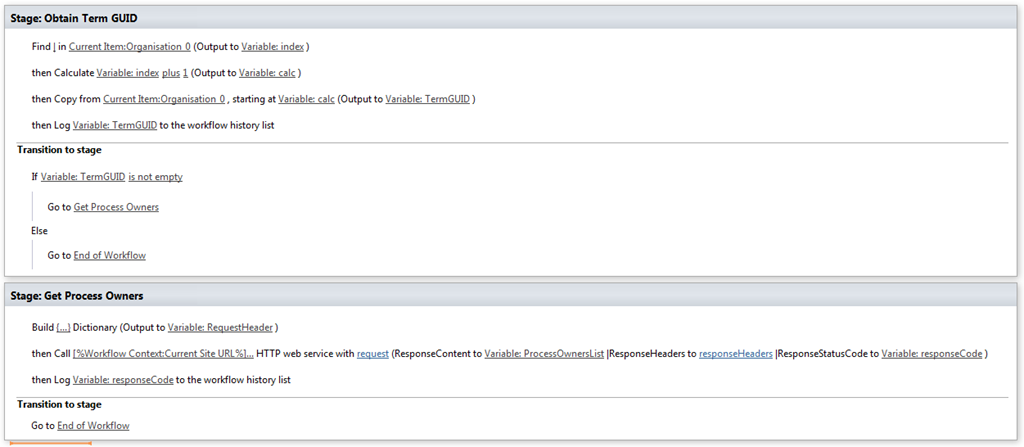
Hi and welcome to part 7 of my series of articles around SharePoint 2013 workflows. We have been examining the trials and tribulations (mainly trials so far) of implementing a relatively simple document approval workflow for a mythical organisation called Megacorp Inc. In the last post, I started illustrating the first of two approaches to filtering a list based on a managed metadata column using the Call HTTP Web Service capability. If you have been following along with me, we just successfully called the SharePoint lists web service via REST. The diagram below shows where we are at… Now it is time to work with the data that is returned.

image

Very soon we are going to use the loop function of workflows to go through each process owner and check the GUID of the Organisation field. This is probably best done as a new workflow stage that only runs if the response code from the webservice is 200 (OK). So let’s make some minor changes to the workflow…

Step 1:

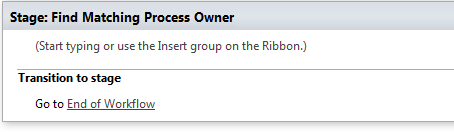
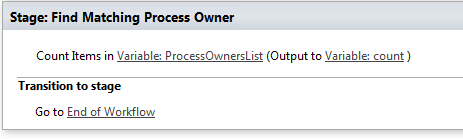
Add a new workflow stage and name it “Find Matching Process Owner

Step 2.

In the Transition to stage section of the new stage, add a Go to a stage action and set the stage as “End of Workflow

image

Step 3:

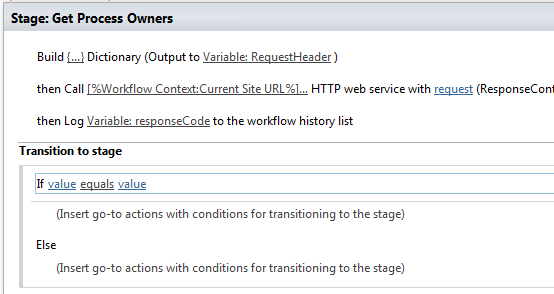
In the Transition to stage section of “Get Process Owners” Stage, delete the “Go to End of Workflow” action. In its place, add an “If any value equals value” condition

Step 4:

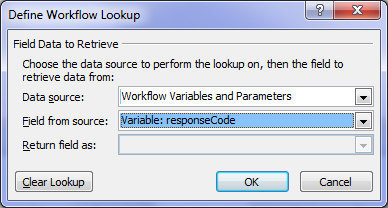
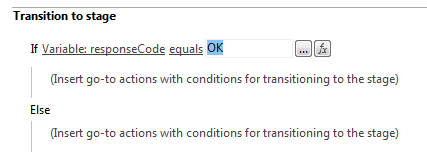
Click the first value hyperlink of the newly added condition from step 3 and click the fx button. In the Define Workflow lookup dialog, choose Workflow Variables and Parameters as the Data source and choose the responseCode variable in the Field from Source dropdown. Click OK
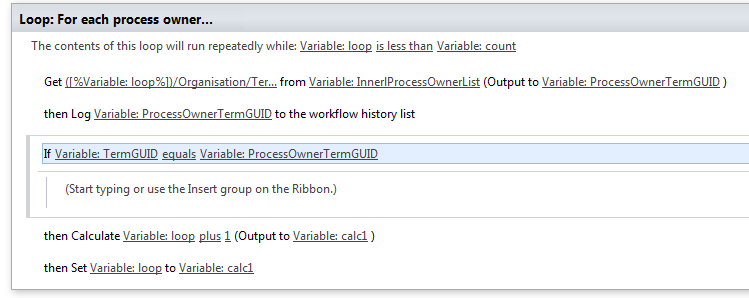
image  image

Step 5:

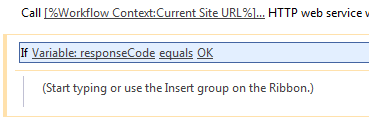
Click the second value link of the newly added condition from step 3. Type in the value “OK” and press enter.

image

Step 6:

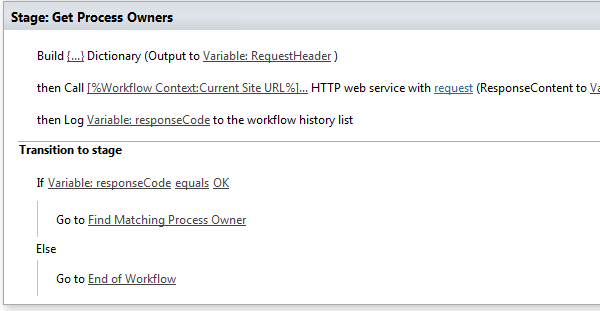
Under the If Variable: responseCode equals OK condition, add a Go to a stage action. Set the stage as Find Matching Process Owner (the stage created in step 1).

Step 7.

Under the Else condition, add a Go to a stage action. Set the stage as End of Workflow

image

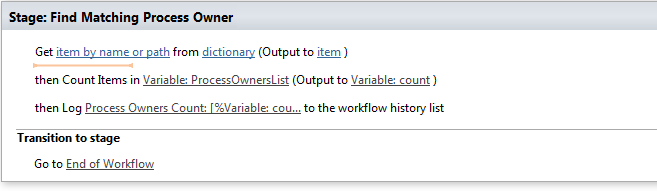
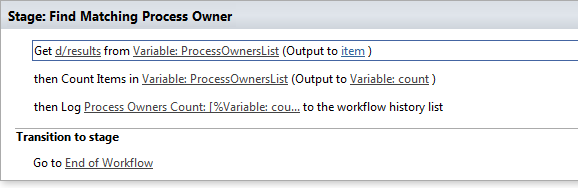
Ok, so now we have a new workflow stage to work with called Find Matching Process Owner. This is where we are going to manipulate dictionary variables and in particular, the ProcessOwnersList variable that contains the data returned by the call we made to the REST webservice in part 6. The first thing we will do is count how many items are in the ProcessOwnersList dictionary, otherwise we won’t know when to stop the loop. This is where the Count Items in a Dictionary workflow action comes in. Let’s try it on the ProcessOwnerList variable now.

Step 8:

In the Find Matching Process Owners stage, add a Count Items in a Dictionary action. Click the dictionary hyperlink and choose Variable: ProcessOwnersList from the list of dictionary variables.

image

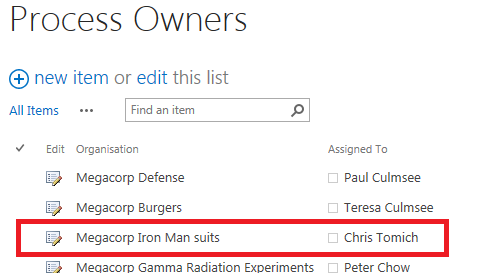
Now we should check to see if the value of count is what  we are expecting. For your reference, here are the 9 entries currently in the Process Owners list…

Megacorp Defense Paul Culmsee
Megacorp Burgers Teresa Culmsee
Megacorp Iron Man suits Chris Tomich
Megacorp Gamma Radiation Experiments Peter Chow
Megacorp Pharmaceutical Hendry Khouw
Megacorp Fossil Fuels Sam Zhou
Perth Du Le
Sydney Paul Culmsee
Alaksa Du Le

Step 9:

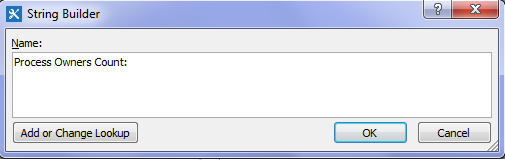
Add a Log to Workflow History action. Click the message hyperlink and click the ellipses button. In the string builder dialog, type in “Process Owners count: “

image

Step 10:

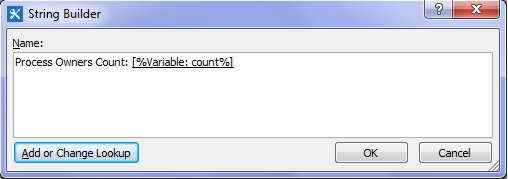
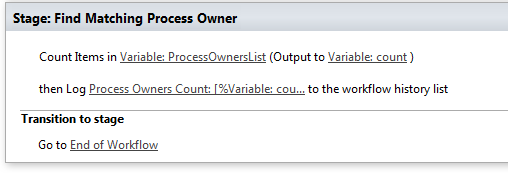
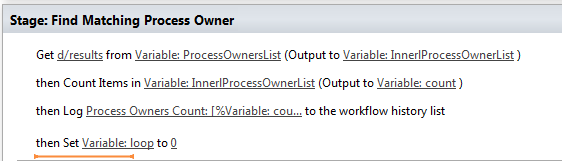
Click the Add or Change Lookup button. In the Lookup for string dialog, choose Workflow Variables and Parameters from the data source dropdown and choose the variable count. Click OK. You should see the following text in the string builder dialog. Click OK. Review the workflow stage and confirm it looks like the second image below.

image  image

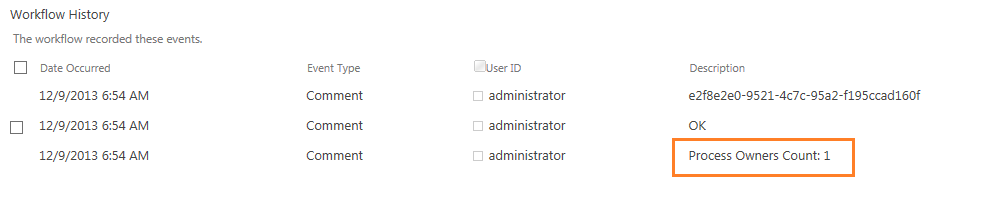
Publish the workflow and run it. Take a look at the workflow history and see what we get. Uh-oh… what now? It says we only have 1 item in the dictionary, but we have 9 process owners. What the…?

image

A JSON (and fiddler) interlude…

In part 6, I stressed the point that dictionary variables can contain any type of variable available in the SharePoint 2013 Workflow platform, including other dictionary variables! This now becomes important because of the way JSON works. To explain better, it is time for me to formally introduce you Fiddler.

Fiddler is a multipurpose utility that sits between the web browser and web sites. It logs all HTTP(s) traffic and is used to view and debug web traffic. Any web developer worth their salt has Fiddler as part of the troubleshooting toolkit because of its ability to manipulate the data as it travels between browser and server. Bets of all, it can be used to compose your own HTTP requests.

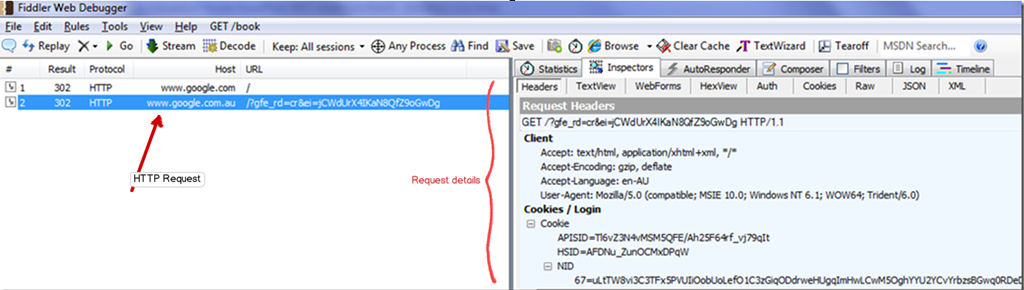
So first up, install Fiddler and then start it. In your browser, head over to a web site like Google. Go back to Fiddler and you should see entries logged in the left hand panel. Click on an entry and click the inspectors tab. From here you can see all the gory detail of the conversation between your web browser and the web site.  Neat eh?

Snapshot

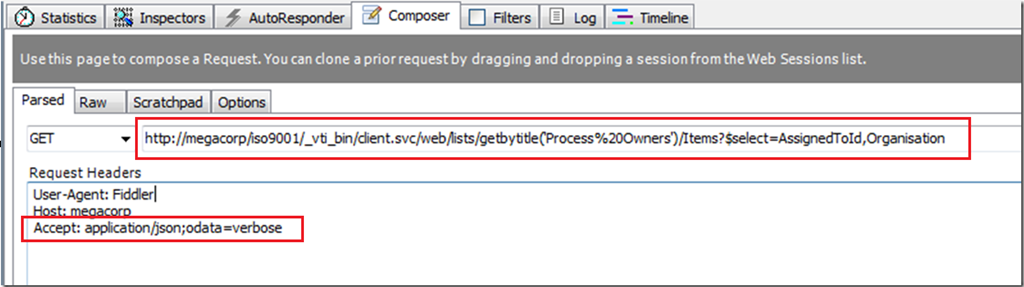
If you look in the tabs in the Fiddler window, you will see one labelled Composer. Let’s use it right now… Paste the webservice URL that we used in part 6 into the composer textbox as shown below. Also, paste the string “Accept: application/json;odata=verbose” into the Request headers textbox as shown below. If you recall the HTTP interlude from part 6, this tells SharePoint to bring back the data in JSON format, rather than XML.

image

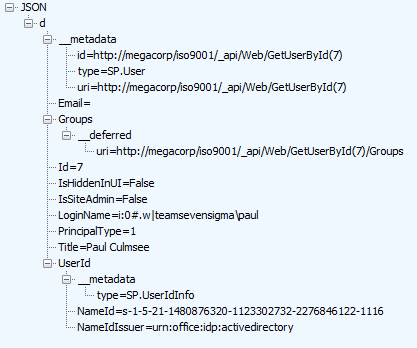
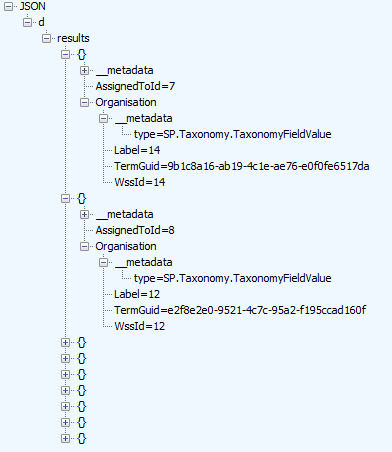
Click execute and Fiddler will send the request to the server. It will also switch to inspector mode for you to see the request and the response as it happened. If you look closely at the response (by clicking the JSON tab), you will see a structure that looks a bit like that I have pasted below. This is the same data that is now being stored in the ProcessOwnerList dictionary variable.

image

So why did the workflow report that there was only one item in the dictionary then? The short answer is, because there is only one item in the dictionary! A dictionary called “d”. To understand better, take another look at the JSON structure below. What is the first entry in the JSON data? a section called “d”. If you were to collapse d, all other data would be inside it. Therefore, as far as the dictionary variable is concerned, there truly is only one entry.

- JSON
  + d

Note: In case you are wondering what the deal is with the whole “d” thing, given that the it appears to be somewhat redundant. The answer that Microsoft oData standards stipulate that all data returned is wrapped by an outer “d”. Why you may ask? Well you really don’t want to know, but if you must insist, it is for security reasons related to JavaScript (see, I told you that you didn’t want to know!).

So if there is only one entry in the dictionary, than how can we get to the data we need buried deeper? The answer is that this is one of those “dictionary in a dictionary” situations that I described in part 6. The dictionary variable ProcessOwnerList has a single item. That item happens to be another dictionary with multiple items in it. So our first task is to get to the inner dictionary that contains the data we need!

Getting to the real count…

Now we will make use of the Get Item from a Dictionary action to get stuff under the d branch. Looking at the fiddler JSON output above, we need to get to the children of the results branch.

Step 1:

In the Find Matching Process Owner stage, add a Get Item from a Dictionary action as the first action in the stage.

image

Step 2:

Click the item by name or path hyperlink and type in “d/results”. Note: This is case sensitive, so has to match the JSON data shown in the fiddler screenshots. Click the dictionary hyperlink and choose the ProcessOwnersList dictionary variable as the source data.

image

Step 3:

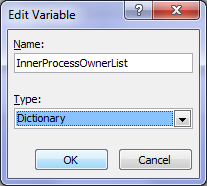
Click the item hyperlink and choose the create a new variable (the bottom option in the dropdown). Call the variable InnerProcessOwnerList and make sure it is set to type dictionary.

image

Step 4:

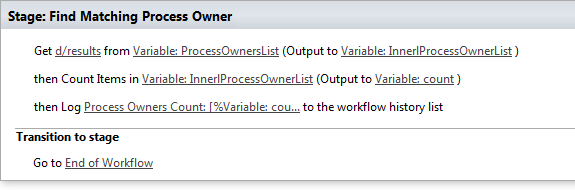
Now we need to modify the count items action to count the new variable InnerProcessOwnerList. In the Count Items action below the action we just created, click the Variable: ProcessOwnersList and change it to InnerProcessOwnerList.

image

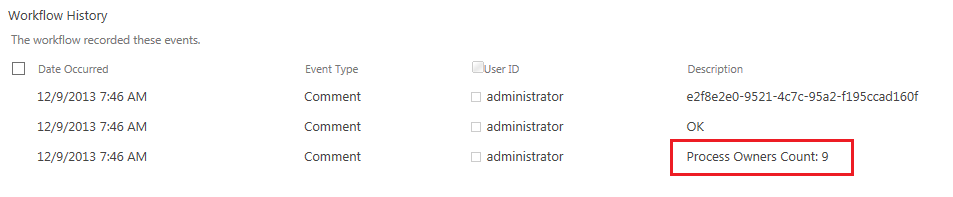
Right! Let’s retest this workflow by republishing it and running it. Now that’s more like it!!!

image

Building the loop…

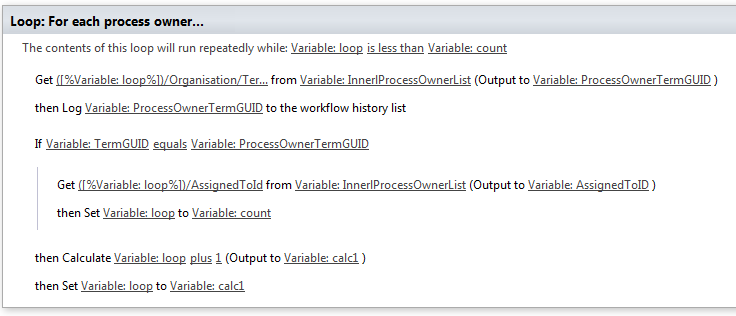
Now we get to a powerful new feature of workflows in SharePoint 2013 – the ability to perform loops. What we need to do here is loop through the 9 process owners, and for each, compare the GUID of the Organisation column to the GUID on the document from which the workflow was triggered. If the term matches, we exit the loop and assign a task to the person in the Assigned To column.

Let’s go through the process step by step.

Step 1:

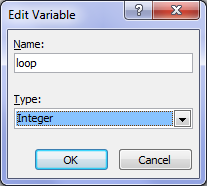
Make sure that your cursor is below the last action in the Find Matching Process Owner stage. Add a Set Workflow Variable action. Click the workflow variable hyperlink and choose to create a new variable. Call the variable loop and make it an integer. Click the value hyperlink and set it to zero “0”.

image  image

We are going to use this variable in the looping section  of the workflow to get to each process owner. It’s purpose will become clear soon…

Step 2:

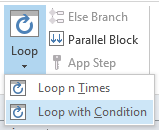
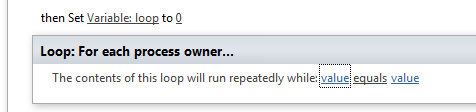
In the ribbon, click the Loop button and choose Loop with Condition. This will add a loop step into the stage. The name “1” is not exactly meaningful so lets change it. Click the title bar of the loop and change the name to For each process owner…

image  image

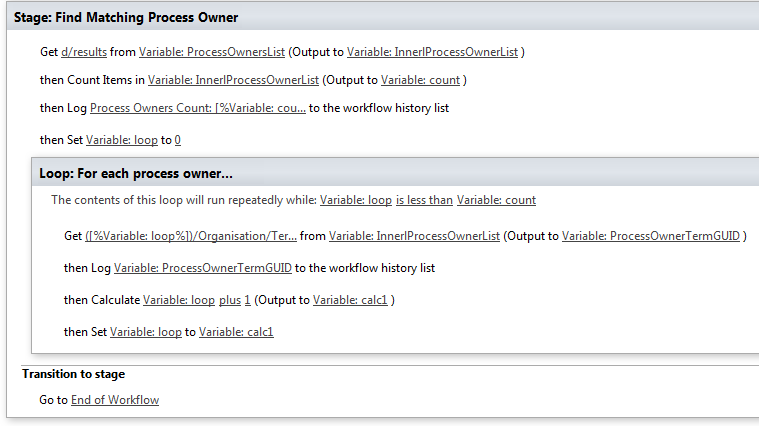
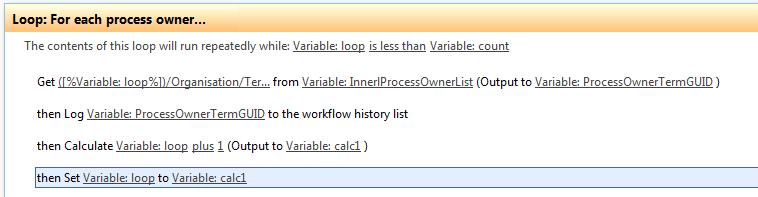
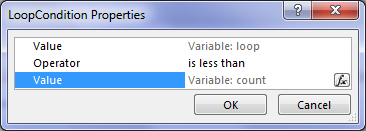
Now we will set the condition for how long this loop will run for. Note that we have a variable called count that stores the number of entries in the process owners list and in step 1, we created a variable called loop. We will set the workflow to loop around while the value of loop is less than the value of count.

Step 3:

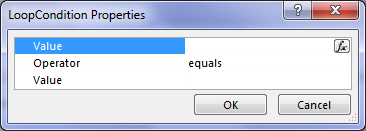
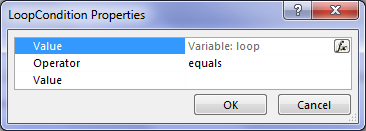
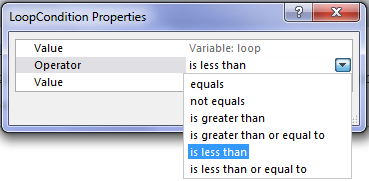
Click the leftmost value hyperlink. In the LoopCondition Properties dialog, click the fx button for the top value. In the Define Workflow Lookup dialog, choose Workflow Variables and Parameters as the data source and find the variable called loop. Click the equals dropdown and choose Is less than. Finally, click the fx button for the bottom value. In the Define Workflow Lookup dialog, choose Workflow Variables and Parameters as the data source and find the variable called count.

image  image  image   image

image

Step 4:

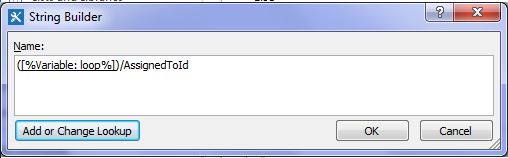
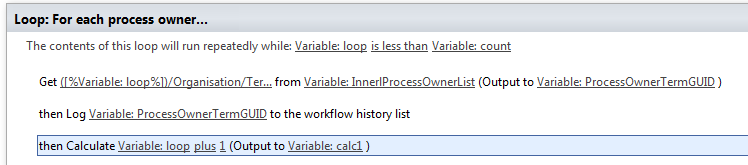
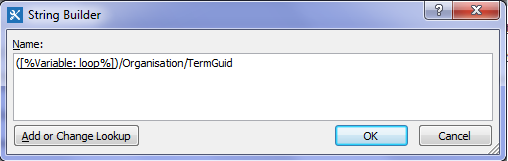
Inside the newly created loop, add a Get Item from a Dictionary action. Click the item by name or path hyperlink and click the ellipses button to display the string builder. Type in a left bracket “(“ and then click the Add or Change lookup button. In the Lookup for String dialog, choose Workflow Variables and Parameters as the data source and find the variable called loop  and click OK. Finally, type in the following string “)/Organisation/TermGuid”.

image

If you look closely at this string, it is referring to the TermGuid in the JSON data. The value of loop (currently 0) will be used to create the string. Hence “(0)/Organisation/TermGuid” will be used to grab the first Organsiation GUID, (1)/Organisation/TermGuid for the second and so on…

Step 5:

Click the dictionary hyperlink and choose InnerProcessOwnerList.

Step 6:

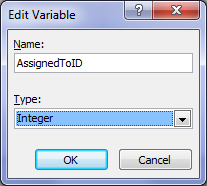
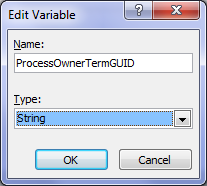
Click the item hyperlink and choose to create a new variable. Call the variable ProcessOwnerTermGUID and set it to a string.

image  image

By this stage, we should have the value of the term GUID for the process owner. Let’s log the value to workflow history so we can confirm things are working…

Step 7:

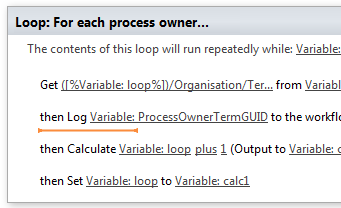
Add a log to workflow history action and click the message hyperlink. Click the fx button and in the Lookup for String dialog, choose Workflow Variables and Parameters as the data source and find the variable called ProcessOwnerTermGUID.

Step 8:

Now we need to increment the value of the loop variable so it can select the next process owner from the InnerProcessOwnerList variable. Add a Do calculation workflow action, click the first value hyperlink and click the fx button. In the Lookup for Number dialog, choose Workflow Variables and Parameters as the data source and find the variable called loop. Click the second value hyperlink and type in the value “1”.

image

Note that this action creates a new workflow variable (called calc1 by default) that stores the value of loop + 1. We will use this variable in the next workflow step.

Step 9:

Add a Set Workflow Variable action. Click the workflow variable hyperlink and choose loop. Click the value hyperlink and click the fx button. In the Lookup for Number dialog, choose Workflow Variables and Parameters as the data source and find the variable called calc1.

image

Right, that should be enough to test. The each iteration of the loop will log the Organisation term GUID for each process owner. It then increments the value of loop and does it again. Once the value of loop is equal to the value of the variable count, the loop should finish. So publish the workflow and let’s see what happens.. Brilliant! Below the count of process owners (line 3), we have looped though the process owners list and extracted the GUID for the organisation term!

image

Conclusion…

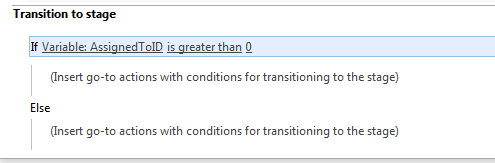
Well, it has taken us a while to get here, but we now have all of the information we need to be able to assign a task to the process owner. if you look in the log above, the first entry was the GUID for the organisation assigned to the document this workflow was run against. Scanning the list of GUID’s from the process owners list, we can see that the matching GUID was on line 5. So in the next post, we will modify our loop to stop when it has a match, and we will examine what we need to do to assign a task to the appropriate process owner.

Until then thanks for reading…

Paul Culmsee

HGBP_Cover-236x300.jpg

www.hereticsguidebooks.com

Trials or tribulation? Inside SharePoint 2013 workflows–Part 6

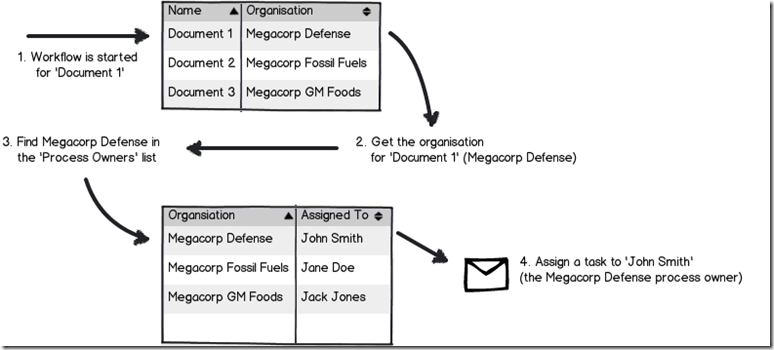
Hi and welcome to part 6 of my series of articles aimed at demystifying various aspects to SharePoint 2013 workflows. We have been using a mythical example of a document approval workflow from our mythical multinational called Megacorp Inc. We have been trying to create a workflow attempting to implement the process below…

Snapshot_thumb3

Seems straightforward enough, but in part 3, we foiled by the use of check in/check out on document libraries and a completely useless error message didn’t help matters. We eventually worked around that issue, but in part 4, we got stuck on a bigger snag because of our chosen information architecture. The Organisation column we created is a managed metadata column. It turns out that you cannot use a Managed Metadata column as a filter for a list (steps 2 and 3 above). In the last article, we took a detour into the world of dictionary variables and a very powerful new workflow action called “Call HTTP Web Service”. We learnt that in situations where a built-in workflow action does not cut it for you, but you might be able to use Call HTTP Web Service to do what you need. This sets the scene for our next exciting instalment. Perhaps we can get around this managed metadata issue with one of SharePoint’s many web services? If so, which one do I need to use and why?

In this post and the next few, I am going to show you two ways that we can get around the problem of not being able to filter via Managed metadata using the Call HTTP Web Service capability. The first method is a little easier to build than the second method, but it has a flaw that hopefully will become self evident as we proceed. Having said this, I feel it is really important to cover both approaches, because each showcases different features and capabilities of SharePoint Designer 2013 workflows. Therefore, this article and the next two will show the easier but flawed way, and articles 9, 10, 11 and 12 will show what I think is the better way to go.

The workflow looping method…

The gist of the approach we are going to take is to:

  • Get the unique ID of the Organisation for the selected document in the Documents library
  • Using the SharePoint lists REST web service, we will load the the Assigned to and Organisation columns from the Process Owners list and store it into a Dictionary variable
  • Using workflow looping capability, we will step through each item in the dictionary, and find the first entry where the unique ID of the Organisation from step 1 matches the Organisation in process owners
  • For the marching entry, Assign a task to the person mentioned in the Assigned to column.

Now to pull this off, we are going to bring together all of the topics that I have covered in this series. I am also going to be a little less verbose with screenshots, because by now some aspects of workflow creation using SharePoint designer should be getting more familiar. Speaking of more familiar, let’s take a closer look at the lists web service again. In my second REST interlude in part 4, I demonstrated how you could specify the columns that you want to bring back from a web service call, rather than all columns. In the example below, I am showing how you can bring back just the Organisation and Assigned to columns from the Process Owners list (AssignedToId a REST specific thing that represents the Assigned To column. More about that in part 8).

http://megacorp/iso9001/_vti_bin/client.svc/web/lists/getbytitle(‘Process%20Owners’)/Items?$select=AssignedToId,Organisation

Here is the XML for a single process owner entry… Note that we never get to see the name of the Organisation in the XML for the Organisation column (for that matter, we don’t see the name person in the Assigned column either – an issue I will deal with later). Instead, we have the GUID for the Organisation in the <d:TermGuid> section.

  - <content type="application/xml">
    - <m:properties>
      - <d:Organisation m:type="SP.Taxonomy.TaxonomyFieldValue">
          <d:Label>14</d:Label> 
          <d:TermGuid>e2f8e2e0-9521-4c7c-95a2-f195ccad160f</d:TermGuid> 
          <d:WssId m:type="Edm.Int32">14</d:WssId> 
        </d:Organisation>
        <d:AssignedToId m:type="Edm.Int32">7</d:AssignedToId> 
      </m:properties>
    </content>

Now also in part 4, I explained the Organsiation_0 hidden column and showed that it stores both the organisation name, as well as the GUID of that organisation. So if Organisation has been set to Megacorp Burgers for a document, the value of Organsiation_0 for that document would be:

Megacorp Burgers|e2f8e2e0-9521-4c7c-95a2-f195ccad160f

The common element between the XML from the Process Qwners list, and the value of Organsiation_0 from the Documents library is the Term GUID. Therefore if we can extract the GUID part of Organsiation_0, we can use it to search the Process Owners list and find which entry where the GUID specified in the <d:TermGuid> matches. So first up, let’s clean things up, then use some workflow actions to get hold of the GUID from the Organsiation_0 column.

Getting the GUID…

Step 1:

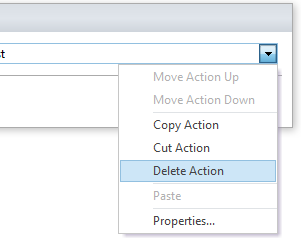
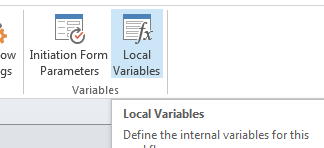
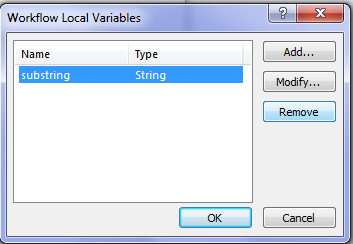
Turning our attention back to the Process Owners Approval workflow, let’s delete our existing workflow actions, workflow variables and start afresh. Click on any existing workflow actions and choose Delete Action from the dropdown menu as shown below. To delete variables, click the local variables ribbon icon and remove any listed…

image  image  image

Now you should be looking at a clean workflow.

Step 2:

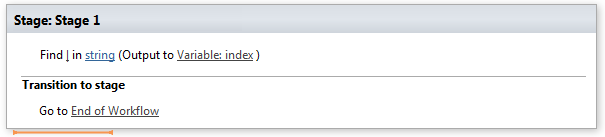
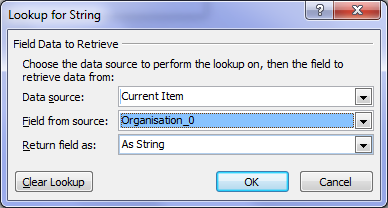
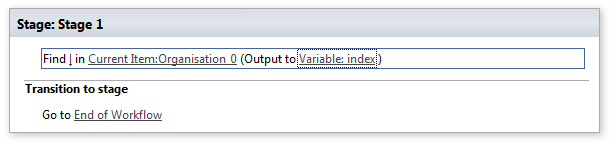
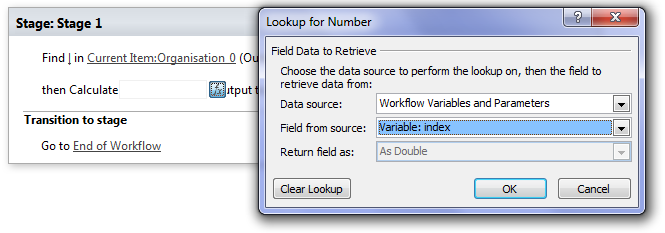
Add the workflow action Find substring in string. To complete the configuration of this action, click the substring hyperlink and add a pipe symbol “|”. Click the string hyperlink, the fx button and from Current Item, choose Organisation_0 as shown below…

image  image

image

The result of this workflow action, will be the position in the string of the pipe symbol will be stored in a variable called index. For example, if you count the number of characters until you get to the pipe symbol in the string, “Megacorp Burgers|e2f8e2e0-9521-4c7c-95a2-f195ccad160f”, the answer is 17.

Our next step is to grab all of the characters in the string after the pipe symbol because that is the GUID we need. The way we will do this, we will use another workflow action called Extract substring from index of string. This action takes a string and an index position, and returns all characters to the right of the index. Thus, with the string “Megacorp Burgers|e2f8e2e0-9521-4c7c-95a2-f195ccad160f”, if we start at position 17 we will end up with “|e2f8e2e0-9521-4c7c-95a2-f195ccad160f”. This is not quite right because we do not want the pipe symbol, so we will use another workflow action called Do Calculation to add 1 to the index variable first.

Step 3:

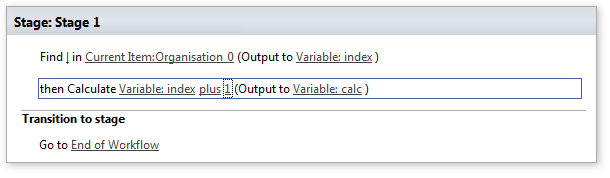
Add the Do Calculation action, click the value hyperlink and click the fx button. Change the data source to Workflow Variables and Parameters and choose the variable called index. Click the value hyperlink and type in the number 1.

image

image

The net result of this is we have a variable called calc that storing the position after the pipe symbol in Organsiation_0.

Step 4:

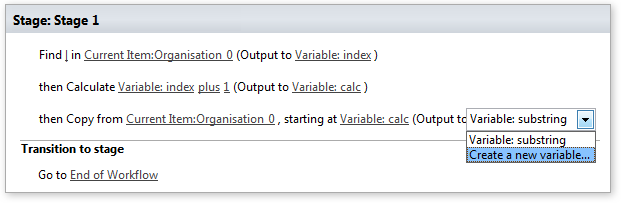
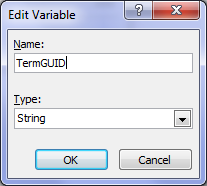
Add the Extract substring from index of string workflow action. Click the string hyperlink, the fx button and from Current Item, choose Organisation_0. Click the “0” hyperlink next to “starting from” and click the fx button. Change the data source to Workflow Variables and Parameters and choose the variable called calc. Finally, click on Variable: substring and choose to Create a new variable… and call it TermGUID as shown below…

image  image

At this point, it might be handy to use the log the value of TermGUID to the workflow history to make sure that things are working as we expect. We can delete this step later…

Step 5:

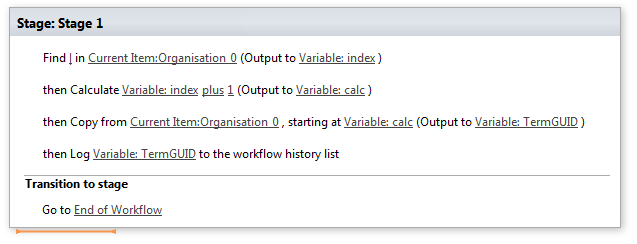
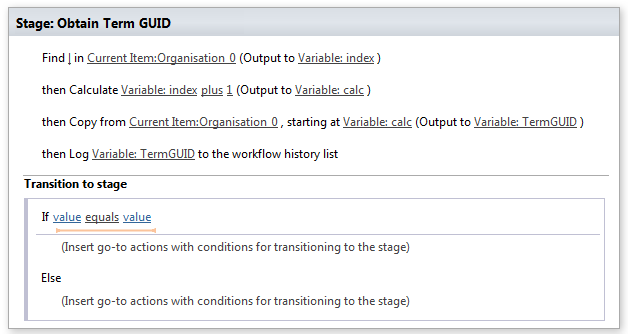
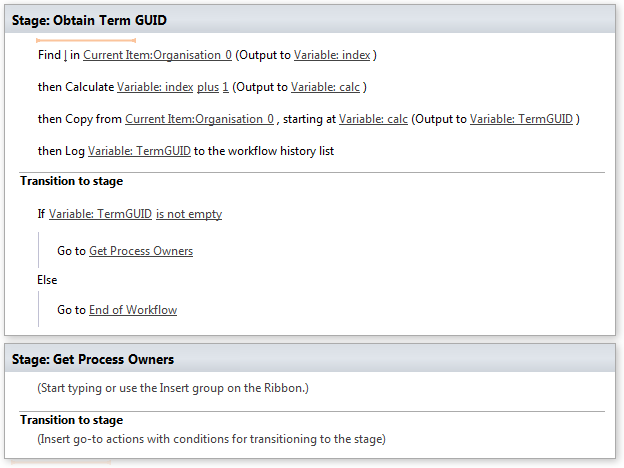
Add a log to workflow history action and log the value of TermGUID. The final workflow should look like this…

image

Step 6:

Publish this workflow, confirm there are no errors and then run it against a document in the documents library. Wohoo! we now have the GUID!

image

Using stages…

Now that we have the GUID, it makes sense that we can make this sequence of actions a workflow stage. Then we can add a new stage for the rest of the workflow and add some error checking logic.

Step 1:

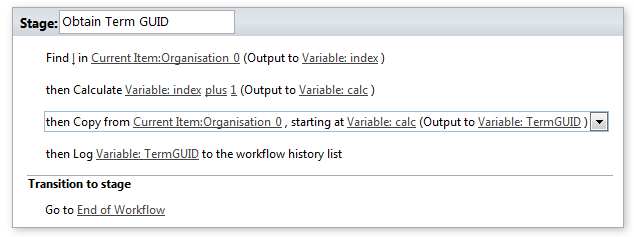
Click the stage header and rename the stage to Obtain Term GUID.

image

Step 2:

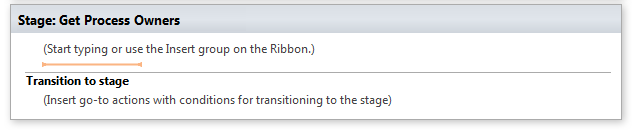
Click outside the stage and from the ribbon, click the Stage icon. A new stage will be added to the workflow. Call this stage Get Process Owners.

image

Now let’s create the logic that connects up the stages. We will set it that we will only move to the Get Process Owners stage if the TermGUID variable has a value. After all, if there is not a valid GUID, there is no point continuing the workflow.

Step 3:

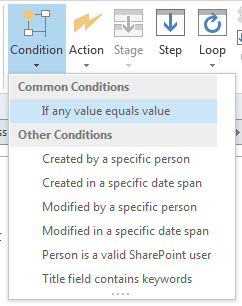
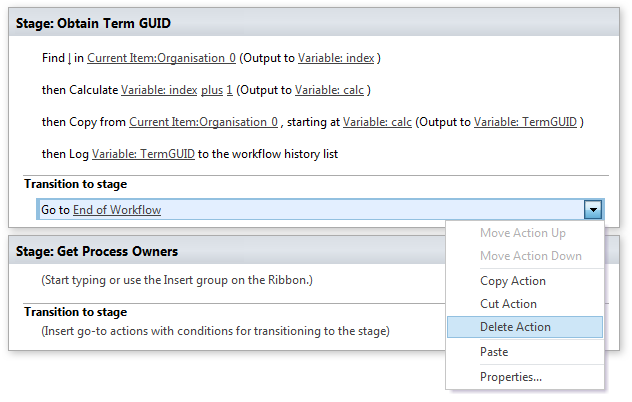
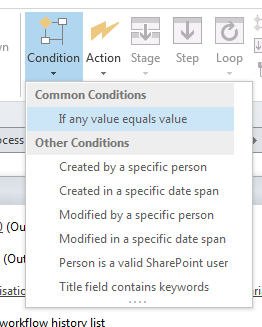
In the Obtain Term GUID stage, select the Go to End of Workflow action and delete it. In the ribbon, click the Condition button and choose If any value equals value from the drop down menu. Confirm that the condition section has been added to the Transition to stage section of the workflow stage…

image   image

image

Step 4:

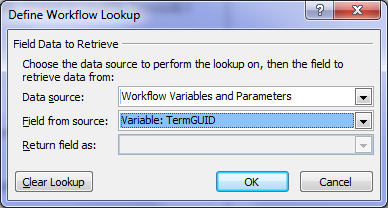
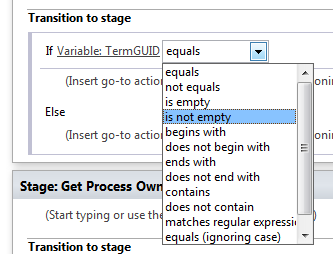
Click the value hyperlink, click the fx button and choose Workflow Variables and Parameters from the Data source dropdown. Find the TermGUID variable in the Field from source dropdown. Click the equals hyperlink and from the dropdown, choose “is not empty”.

image  image  image

Step 5:

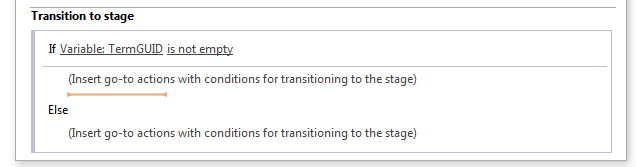
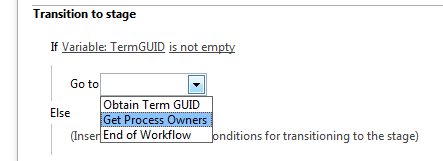
Click on the top “Insert go-to actions with conditions” section, and add a Go to a Stage action. From the stage dropdown, choose “Get Process Owners”

image

Step 6:

Click on the bottom “Insert go-to actions with conditions” section, and add a Go to a Stage action. From the stage dropdown, choose “End of Workflow”. The complete workflow should look like the image below:

image

A HTTP interlude…

Our next task is to get all of the process owners into a dictionary variable. Before we do this, I am going to give you a little lesson on how the HTTP protocol works, because we are literally going to be hand crafting our own request. Therefore it is handy to understand the basics.

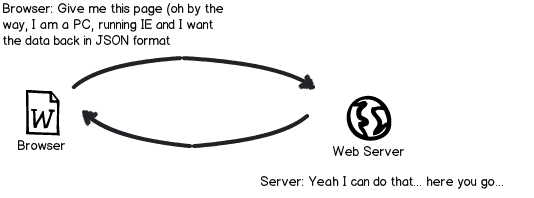
When your browser makes a request to a website or web service, it does not just say “Gimme this URL”. Often the server will change its behaviour based on the nature of the request.  For example, if the requestor is a mobile device, the server will send back different HTML compared to a PC browser. So how can the server tell if a request is made from a mobile device versus a PC? The answer is, that when the browser makes a request, it sends additional information in the form of request headers. Request headers are used for all sorts of things, and we are going to need to make use of them. Why? Remember in part 4, that I mentioned the JSON data format and that we need to tell SharePoint that any data it sends us has to be JSON format. Here is another of my dodgy diagrams explaining this by example…

Snapshot

Technically, we have to send the string “Accept: application/json;odata=verbose” in the request header to make this happen. So let’s see how we can put this request together via SharePoint Designer. Just to remind you the URL of the web service to get all of the process owners is:

http://megacorp/iso9001/_vti_bin/client.svc/web/lists/getbytitle(‘Process%20Owners’)/Items?$select=AssignedToId,Organisation

Crafting the request…

The first thing we need to do is to create the request header that tells SharePoint to return the data in JSON format. This is done via creating a dictionary variable.

Step 1:

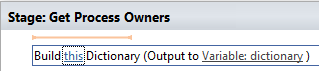
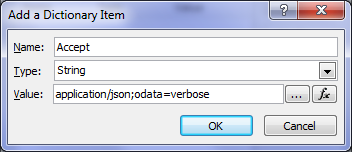
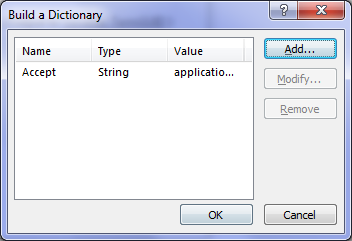
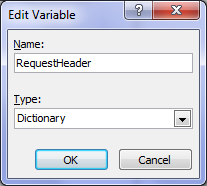
In the Get Process Owners workflow stage, add a Build Dictionary action. Click the this hyperlink to display the Build Dictionary window. Click the Add button and type “Accept” into the Name textbox and application/jason;odata=verbose into the value textbox. Click OK twice, then click the Variable: dictionary hyperlink and create a new variable called RequestHeader.

image  image  image

image  image  image

Step 2:

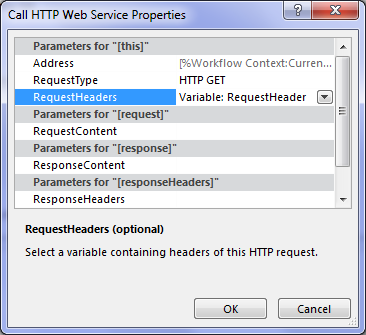
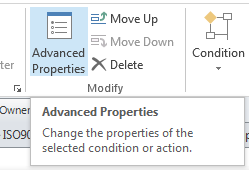
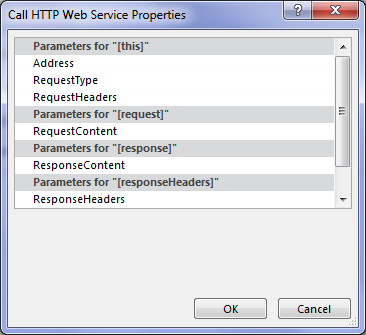
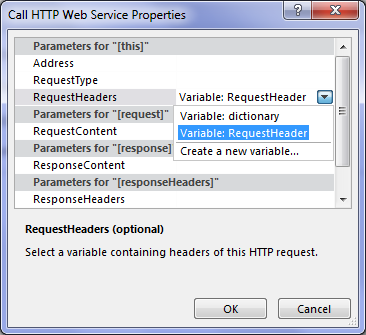
Add a Call HTTP Web Service action and then click to select it as shown below. If you look at the parameters you can set, there is no mention of request header. To set it, click the Advanced Properties icon in the ribbon. In the Call HTTP Web Service Properties dialog box, click the RequestHeaders parameter and in the drop down list to the right of it, choose the RequestHeader variable created in step 1. Click OK. Now the request for JSON format has been set.

image   image

image  image

Step 3:

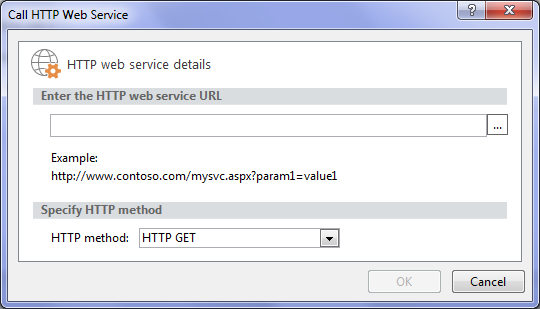
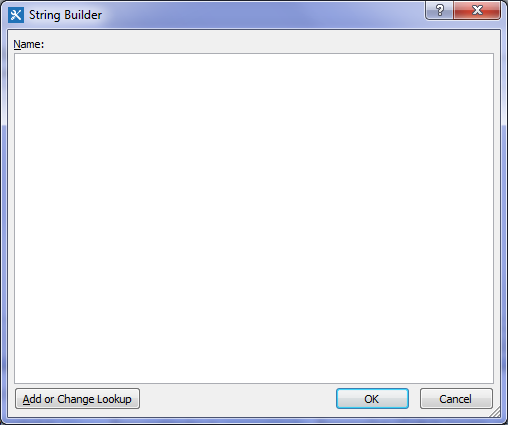
Click on the “this” hyperlink to the left of “HTTP web service”. This will bring up the HTTP Web Service Details screen. At this point we could paste in the URL above, but we are going to this a little smarter than that. Click the ellipsis next to the textbox to bring up the String Builder dialog box.

image  image

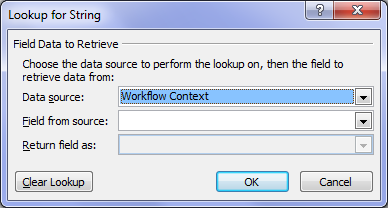
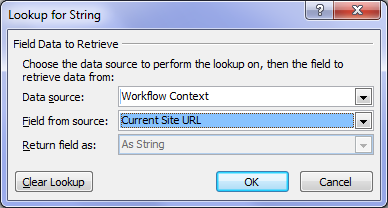
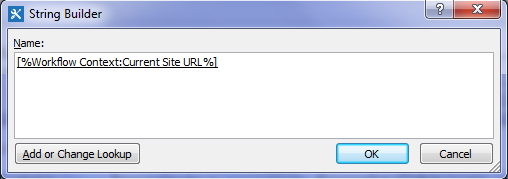
Click the Add or Change Lookup button and in the Data source dropdown, choose Workflow context. This data source comes built in with any workflow you create and as you will see, contains some very handy information that we can use in our workflows. From the Field from source dropdown, choose Current Site URL and click OK. What this will do is take whatever site the workflow is run from and bring it back as a string – in this case http://megacorp/iso9001/. The reason this is a good thing is when you want to use this workflow on another site, such as from development to production. If you use the Current Site URL workflow context, we are not hard-coding the current site name into the workflow.

image  image  image

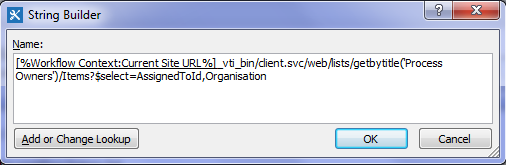
Anyhow, now that we have the site name, let’s complete the rest of the URL. In the string builder dialog, add “_vti_bin/client.svc/web/lists/getbytitle(‘Process Owners’)/Items?$select=AssignedToId,Organisation” and click OK

image

Our call HTTP Web service now looks like this:

image

Now we are expecting a JSON data feed as a response to this request, so we need to create another dictionary variable to handle it.

Step 4:

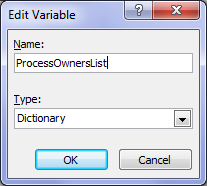
Click the response hyperlink and choose to Create a new variable and call it ProcessOwnersList.

image  image

image

Right! At this point, we have built the Call HTTP Web Service and we should test things to make sure it is working. If you look closely at the Call HTTP Web Service action, one of the variables that get created is called responseCode, which is the way the HTTP protocol reports whether the request worked or not. If the response code is 200 (OK), then the query worked. So let’s log the response code to the workflow history and run a test.

Step 5:

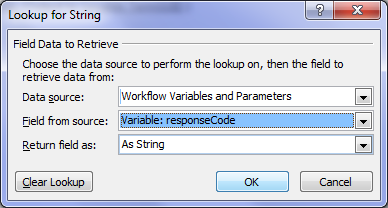
Add a Log to History List action. Click the message hyperlink and click the fx button. In the Lookup for String dialog box, choose Workflow Variables and Parameters from the Data source dropdown and choose responseCode from the Field from source dropdown and click ok.

image

Step 6:

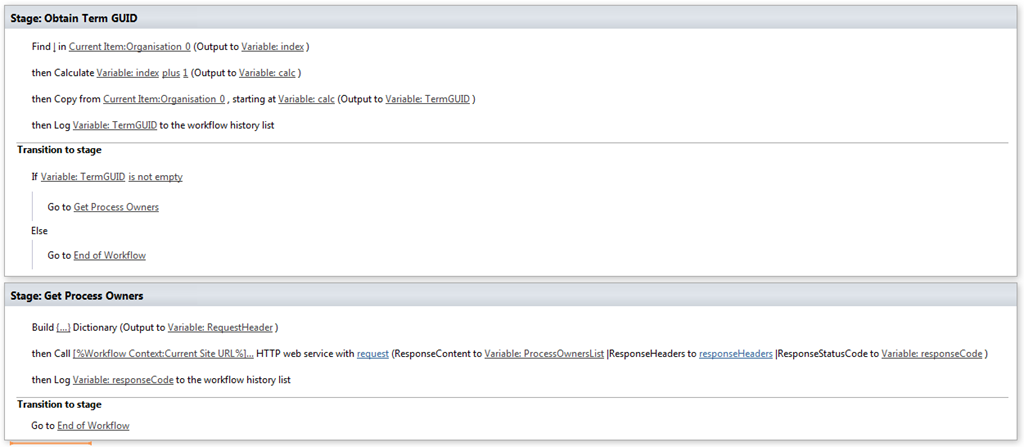
In the Transition to stage section, add a Go to a Stage action and set the stage as End of Workflow. Click OK and review the workflow. It should look like the screen below.

image

Testing our progress and next steps…

Publish the workflow, run it and check the results in workflow history.  Wohoo! Our HTTP call worked! Note the OK in the workflow history!

image

At this point I will stop with this post, as it is getting rather long and we still have a bit to do. Although we know that the HTTP call worked, we have not looked at the data that came back. In the next post, we will use some more workflow actions to loop through the data returned to find the matching process owner.

Until then, thanks for reading…

Paul Culmsee
HGBP_Cover-236x300.jpg

www.hereticsguidebooks.com

Powered by WordPress