Trials or tribulation? Inside SharePoint 2013 workflows–Part 2
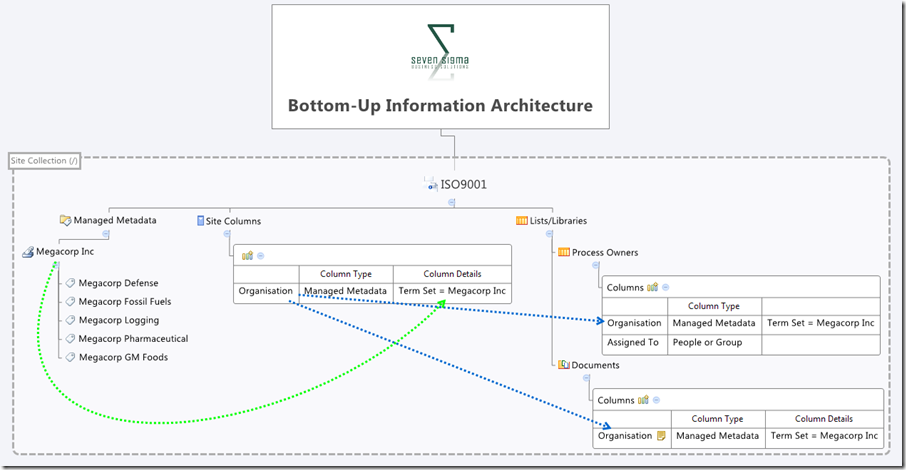
Hi and welcome to part 2 of a series that aims to showcase the good and the bad of SharePoint 2013 workflows, using a simple use-case. In part 1 I introduced you to the mythical multinational called Megacorp and its document control requirements. Also in part 1, we created a site with the necessary lists and libraries from which we can build the workflow. To recap, we used the Document Center site template, and then modified the built-in document library (Documents) to store the organisation that each document belongs to. We created a custom list called Process Owners that stored who is accountable for controlled documents in each organisation. Below is an XMind map to show you the Information Architecture of the Megacorp document control site.
Our workflow is going to:
- Look at a document and determine the organisation that a document belongs to
- Look in the process owners list for that organisation and then determine the process owner for the organisation by grabbing the information in the “Assigned To” field
- Create an approval task for the process owner to approve the release of a controlled document.
Now this all sounds straightforward enough in theory, but this is SharePoint we are talking about. Let’s see how reality stacks up against theory. I will give lots of screenshots for readers who have never tried using SharePoint Designer Workflow before…
Creating the workflow
Step 1:
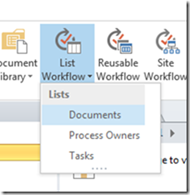
Right, so the workflow will fire when a document is modified, so we will start by adding a list workflow and link it to the Documents library. So using SharePoint Designer 2013, we open the Megacorp site and in the ribbon, we click the List Workflow button. This will cause a dropdown menu to appear below the icon, showing the lists and libraries on the Megacorp site. From this list, we choose the Documents library.
Step 2:
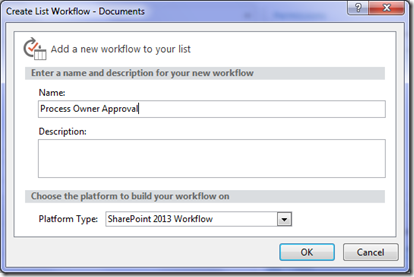
We are presented with the workflow creation screen. Call the workflow “Process Owner Approval” and click OK.
Note: If, at this point, you get an error, it means that Workflow manager has not been provisioned properly. Remember that in SharePoint 2013, workflow is a separate product and needs to be installed. This is a change from previous versions of SharePoint where workflow was always there, as it was part of SharePoint.
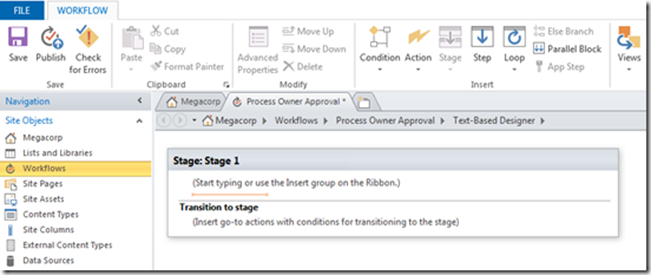
Assuming SharePoint is configured right, SharePoint Designer will have a think for a while and eventually display the following workflow creation screen, ready for us to do cool things!
The next step is to add a workflow action. The most logical workflow action for us to try is one of the task actions. We will attempt to assign a task to the process owner for a document.
Step 3:
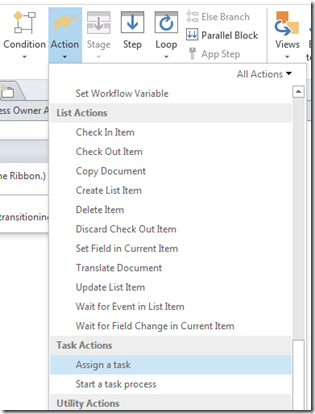
From the workflow ribbon, click the Action icon and choose “Assign a task”. The action will be added to the workflow, ready for you to fill in. For those of you reading this who have never done this before, the process is reminiscent of configuring email rules in outlook in that the action is added and you then fill in the blanks..
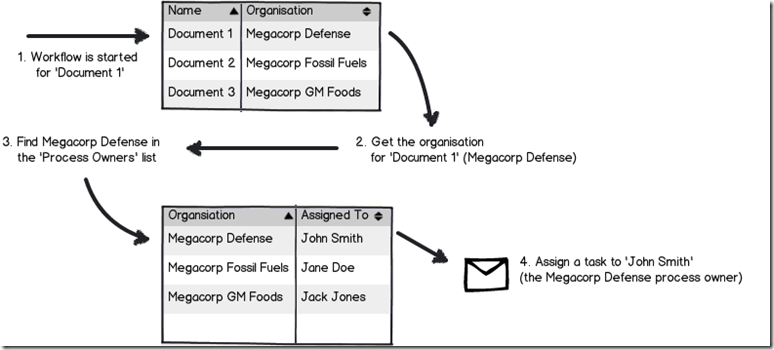
Now let’s configure the finer details of the Assign action above. A task needs to be assigned to a user, and we need to set up the logic for the workflow to work out who that user is. If you recall, the Documents library has a column called Organisation that specifies which Megacorp entity owns each document. A separate list called Process Owners then stores whoever is assigned as the process owner for each organisation (using the Assigned To column). So when the workflow runs on a particular document, we have to take Organisation specified for that document and use it to search the Process Owners list for the matching Organisation. Once we find it, we grab the value of the Assigned to user and create a task for them.
Here is a dodgy diagram that explains the logic I just described.
So let’s give it a go…
Step 4:
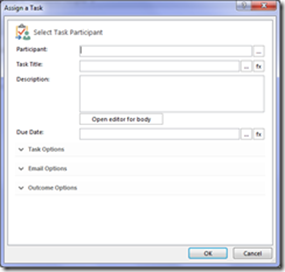
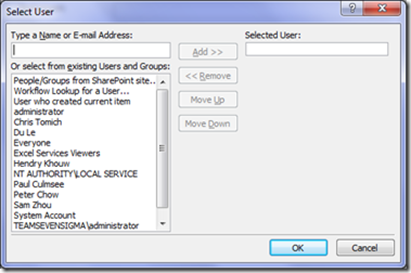
Go back to your newly minted “assign task” that you just added. Click the “this user” hyperlink on the newly created task. The task properties screen will appear as shown below. In the Participant textbox, click the ellipses button to bring up the Select User dialog box.
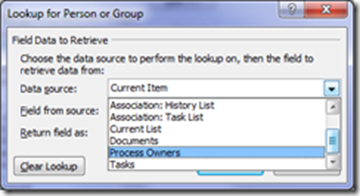
In the Select User dialog box, choose Workflow Lookup for a User and click the Add >> button. This will bring up the ambiguously named Lookup for string dialog box that allows us to choose where to look for our process owner. In the Data source drop down, we choose Process Owners from the list.
Next we have to tell the workflow which column holds the details of the person to perform the task. In the Field from source drop down, choose the Assigned to column as we talked about above.
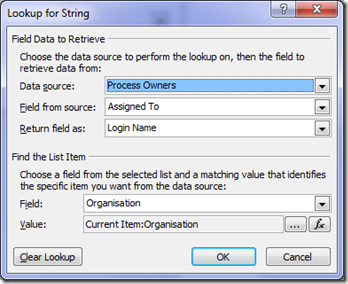
At this point, the workflow knows which list and column holds the information it needs as per the image below:
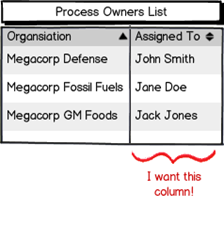
But currently we do not know the specific user we need. Is it John Smith, Jane Doe or Jack Jones? Fear not though – this is what the Find the list item section of the Lookup for string dialog box is for. This is where we will tell the workflow to find only the person who matches the value of the Organisation column assigned to the document.
Step 5:
First up, we tell the workflow which field in Process Owners will be used to compare. This is the Organisation column, so in the Field: drop down, choose Organisation. Next we have to match that organisation column with the one in the Documents library. Click the Fx button next to column textbox called Value. A new dialogue box will appear called Lookup for Extended Field. Leave the Data source dropdown as Current item and in the Field from source dropdown, choose the Organisation column.
Note 1: in a workflow, “Current item” refers to the item that the workflow has been invoked from. If you recall at the start of this post, we created a list workflow and associated with the Documents library. Current item refers therefore to any document in the Documents library that has had a workflow invoked. All of the metadata associated with the current document is available to the workflow to use.
Note 2: Keen eyed readers may be wondering what the deal is with the column labelled Organsiation_0. Don’t worry – I’ll get to that later.
Now that you have selected the organisation column from the Documents library, we have filled in all of the logic we need to grab the right Assigned to user. Clicking ok, the workflow designer will warn you that if you have been silly enough to add multiple process owners for a given organisation, that it will use the first one it finds.
Finally, we are back at the task designer screen. A lot of screenshots just to wire up the logic for finding the right process owner eh? We haven’t even configured the behaviour of the task itself yet!
In fact, for now we are not going to wire up the rest of the task. I would like to know if the logic we have just wired up will work. If I can confirm that, I will come back and finish off creating the task with the behaviours I want. So instead, let’s click Ok to go back to the workflow designer. Now we can see our Assign a task action, ready to go.
Now before we can test and publish the workflow, we need to tell it to end. Now this is a little counter intuitive to someone who is used to SharePoint 2010 workflows, but it makes sense once you understand the concept of a workflow stage.
SharePoint Workflow 2013 Stages – an interlude…
If you have ever sat around and tried to map out a business process, you have probably experienced the fun (not) of discovering that even a relatively simple business process has a lot of variations to it – some quite ad-hoc or dynamic. Trying to account for all of these variations in workflow design can make for some very complex and scary diagrams with even scarier implementations. As an example, take a look at the diagram below – this is a real process and apparently it is only page 12 of a 136!
Now in SharePoint 2010, implementing these sorts of workflows was pretty brutal, but in 2013 it has been rethought. A stage is a construct that allows you to group a number of workflow actions together, as well as defining conditions that govern how those actions happen. Each stage in a workflow can transition to any other workflow stage based on conditions. This means that a workflow can effectively loop around different stages and greatly simplify implementing business logic compared to SharePoint 2010.
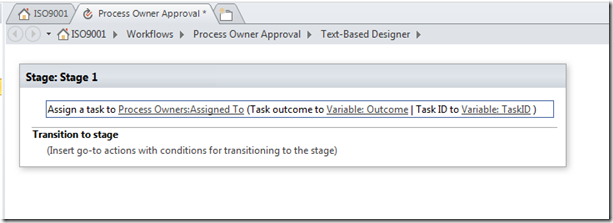
The means by which this is done is via the the new Transition to Stage workflow action. The way this works is at the end of each workflow stage, there is a transition to stage section as shown below:
Step 6:
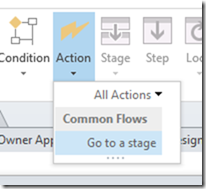
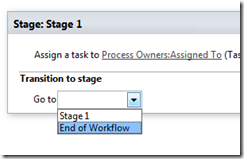
When you click into the Transition to stage section of the workflow, there is only one workflow action available: the Go To A Stage action. Adding this to the workflow will present a dropdown that will allow you to transfer the workflow to any the you have defined, or to end the workflow. Right now we will end the workflow, but we will be revisiting this stage idea later in the series.
All right! We are done. The final step is to save and publish the workflow.
Step 7:
In the ribbon, look for the Publish icon and click it. Assuming everything goes according to plan, you will be back at the workflow overview screen in SharePoint Designer.
Congratulations – you have published your workflow. “Well that was easy,” I hear you say… But we haven’t tested it yet! In the next post we will test our masterpiece and see what happens. You might already have an inkling that the result may not be what you expect… but let’s save that for the next post.
Thanks for reading
Paul Culmsee











Hi there, this weekend is nice designed for me, for the reason that this point in time i
am reading this wonderful educational piece of writing
here at my home.