How’s the weather? Using a public API with PowerApps (part 2)
Introduction
Hi again
This is the second half to a post that will use the OpenWeatherMap API in PowerApps. The business scenario is around performing inspections. In the first post I gave the example of a park ranger or plant operator, both conducting inspections where weather conditions can impact the level of danger or the result of the inspection. In such a scenario it makes sense to capture weather conditions when a photo is taken.
PowerApps has the ability to capture location information such as latitude and longitude, and public weather API’s generally allow you to get weather conditions for a given location. So the purpose of these posts is to show you how you can not only capture this data in PowerApps, but then send it to SharePoint in the form of metadata via Flow.
In Part 1, we got the painful stuff out of the way – that is, getting PowerApps to talk to the OpenWeather web service via a custom connector. Hopefully if you got through that part, you now have a much better understanding of the purpose of the OpenAPI specification and can see how it could be used to get PowerApps to consume many other web services. Now we are going to actually build an app that takes photos and captures weather data.
App prerequisites…
Now to get through this post, we are going to do this is to leverage a proof of concept app I built in a separate post. This app was also an inspection scenario, allowing a user to take a bunch of photos, which were then sent to SharePoint via Flow, with correctly named files. If you have not read that post, I suggest you do so now, because I am assuming you have that particular app set up and ready to go.
Go on… its cool, I will wait for you… ![]()
Seriously now, don’t come back until you can do what I show below. On the left is PowerApps, taking a couple of photos, and on the right is the photos now in a SharePoint document library.


Now if you have performed the tasks in the aforementioned article, not only do you have a PowerApp that can take photos, you’ll have a connection to Flow and ready to go (yeah the pun was intended).
First up, lets recap two key parts of the original app.
1. Photo and file name…
When the camera was clicked, a photo was taken and a file name was generated for it. The code is below:
Collect(PictureList,{
Photo: Camera1.Photo,
ID: Concatenate(AuditNumber.Text,”-“,Text(Today(),”[$-en-US]dd:mm:yy”),”-“,Text(CountRows(PictureList)+1),”.jpg”)
} )
This code created an in-memory table (a collection named PictiureList) that, when a few photos are taken, looks like this:

2. Saving to Flow
The other part of the original app was saving the contents of the above collection to Flow. The Submit button has the following code…
UpdateContext( { FinalData : Concat(PictureList, ID & “|” & Photo & “#”) } );
UploadPhotostoAuditLib.Run(FinalData)
The first line takes the PictureList collection above and munges it into a giant string called FinalData. Each row is delimited by a hash “#” and each column delimited by a pipe “|”. The second line then calls the Flow and passes this data to it.
Both of these functions are about to change…
Getting the weather…
The first task is to get the weather. In part 1 we already created the custom connector to the service. Now it is time to use it in our app by adding it as a data source. From the View menu, choose Data Sources. You should see your existing data source that connects to Flow.


Click Add data source and then New connection. If you got everything right in part 1, you should see a data source called OpenWeather. Click on it, and you will be asked to enter an API key. You should have this key from part 1 (and you should understand exactly why you were asked for it at this point), so go ahead, add it here and click the Create button. If all things to go plan, you will now see OpenWeather added as a data source.


Now we are connected to the API, let’s test it by modifying the code that takes a photo. Instead of just capturing the photo and generating a file name, let’s also grab the latitude, longitude from PowerApps, call the API and collect the current temperature.
First here is the code and then I will break it down…

UpdateContext( { Weather: OpenAPI.GetWeather(Location.Latitude,Location.Longitude,”metric”) } );
Collect(PictureList,{
Photo: Camera1.Photo,
ID: Concatenate(AuditNumber.Text,”-“,Text(Today(),”[$-en-US]dd:mm:yy”),”-“,Text(CountRows(PictureList)+1),”.jpg”),
Latitude:Location.Latitude,
Longitude:Location.Longitude,
Temp:Weather.main.temp } )
The first line is where the weather API is called: OpenAPI.GetWeather(Location.Latitude,Location.Longitude,”metric”) . The parameters Location.Latitude and Location.Longitude come straight from PowerApps. I want my temperature in Celsius so I pass in the string “metric” as the 3rd parameter.
My API call is then wrapped into an UpdateContext() function, which enables us to save the result of the API call into a variable I have called Weather.
Now if you test the app by taking photos, you will notice a couple of things. First up, under variables, you will now see Weather listed. Drill down into it and you will see that a complex data structure is returned by the API. In the example below I drilled down to Weather->Main to find a table that includes temperature.


The second line of code (actually I broke it across multiple lines for readability) is the Collect function which, as its title suggests, creates collections. A collection is essentially an in-memory data table and the first parameter of Collect() is simply the name of the collection. In our example it is called PictureList. The second second parameter is a record to insert into the collection. A record is a comma delimited set of fields and values inside curly braces. eg: { Title: “Hi”, Description: “Greetings” }. In our example, we are building a table consisting of:
- Photo
- File name for Photo
- Latitude
- Longitude
- Temperature
The last parameter is the most interesting, because we are getting the temperature from the Weather variable. As this variable is a complex data type, we have to be quite specific about the value we want. I.e. Weather.main.temp.
Here is what the PictureList collection looks like now. If you have understood the above code, you should be able to extend it to grab other interesting weather details like wind speed and direction.

Getting ready for Flow…
Okay, so now let’s look at the code behind the Submit button. The change made here is to now include the additional columns from PictureList into my variable called FinalData. If this it not clear then I suggest you read this post or even Mikael Svenson’s work where I got the idea…

UpdateContext( { FinalData : Concat(PictureList, ID & “|” & Photo & “|” & Latitude & “|” & Longitude & “|” & Temp & “#”) } );
UploadPhotosToAuditLib.Run(FinalData)
So in case it is not clear, the first line munges each row and column from PictureList into a giant string called FinalData. Each row is delimited by a hash “#” and each column delimited by a pipe “|”. The second line then calls the Flow and passes it FinalData.
At this point, save your changes to PowerApps and publish as you are done here. Let’s now make some changes to the SharePoint document library where the photos are currently being uploaded to. We will add columns for Temperature, Latitude and Longitude and I am going to assume you know enough of SharePoint to do this and will paste a screenshot of the end in mind…


Right! Now it is time to turn our attention to Flow. The intent here is to not only upload the photos to the document library, but update metadata with the location and temperature data. Sounds easy enough right? Well remember how I said that we got rid of most of the painful stuff in part 1?
I lied…
Going with the Flow…
Now with Flow, it is easy to die from screenshot hell, so I am going to use some brevity in this section. If you played along with my pre-requisite post, you already had a flow that more or less looks like this:
- A PowerApps Trigger
- A Compose action that splits the photo via hash: @split(triggerbody()[‘ProcessPhotos_Inputs’],”#”)
- An Apply to each statement with a condition inside @not(empty(item()))
- A Compose action that grabs the file name: @split(item(),’|’)[0]
- A Compose action that grabs the file contents and converts it to binary: @dataUriToBinary(@split(item(),’|’)[1])
- A SharePoint Create File action that uploads the file to a document library
The image below illustrates the basic layout.

Our task is to now modify this workflow to:
- Handle the additional data sent from PowerApps (temperature, latitude and longitude)
- Update SharePoint metadata columns on the uploaded photos with this new data.
As I write these lines, Flow has very poor support for doing this. It has been acknowledged on UserVoice and I know the team are working on improvements. So the method I am going to use here is essentially a hack and I actually feel a bit dirty even suggesting it. But I do so for a couple of reasons. Firstly, it helps you understand some of the deeper capabilities of Flow and secondly, I hope this real-world scenario is reviewed by the Flow team to help them understand the implications of their design decisions and priorities.
So what is the issue? Basically the flow actions in SharePoint have some severe limitations, namely:
- The Create File action provides no way to update library metadata when uploading a file
- The Create Item action provides access to metadata but only works on lists
- The Update Item action works on document libraries, but requires the item ID of the document to do so. Since Create File does not provide it, we have no reference to the newly created file
The Get Items function allows you to search a list/library for content, but cannot match on File Name(actually it can! I have documented a much better method here!)
So my temporary “clever” method is to:
- Use Create File action to upload a file
- Use the Get Items action to bring me back the metadata for the most recently created file in the library
- Grab the ID from step 2
- Use the Update Item action to set the metadata on the recently uploaded image.
Ugh! This method is crude and I fear what happens if a lot of flows or file activity was happening in this library and I really hope that soon the next section is soon redundant…
Okay so let’s get started. First up let’s make use of some new Flow functionality and use Scopes to make this easier. Expand the condition block and find the Compose action that extracts the file name. If you dutifully followed my pre-req article it will be called “Get File Name”. Above this, add a Scope and rename it to “Get File and Metadata”. Drag the “Get File Name” and “Get File Body” actions to it as shown below.


Now let’s sort out the location and temperature data. Under “Get File Body”, add a new Compose action and rename it to “Get Latitude”. In the compose function add the following:
Under “Get Latitude”, add a new Compose action and rename it to “Get Longitude”. In the compose function add the following:
Under “Get Longitude”, add a new Compose action and rename it to “Get Temperature”. In the compose function add the following:
- @split(item(),’|’)[4]
This will result in the following:


Now click on the Get File and Metadata scope and collapse it to hide the detail of metadata extraction (now you know what a scope is for ![]() )
)

So now we have our metadata, we need to apply it to SharePoint. Under the “Create File” action, add a new scope and call it “Get Item ID”. This scope is where the crazy starts…
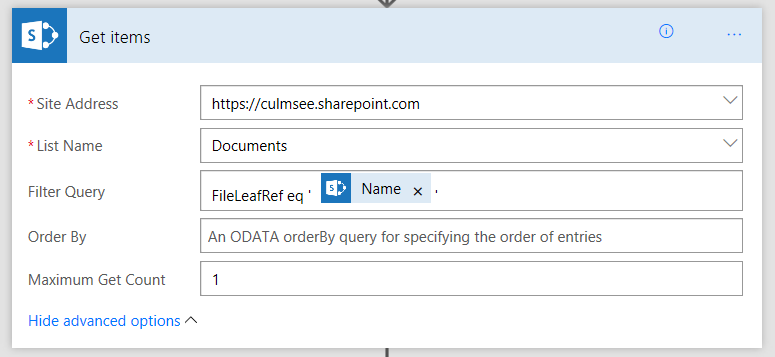
Inside the scope, add a SharePoint – Get Items action. Enter the URL of your site collection and in the name (not URL) of your document library. In the Order By field, type in Created desc and set the Maximum Get Count to 1. Basically this action is calling a SharePoint list web service and “Created desc” says “order the results by Created Date in descending order (newest first).
Actually what you do is set Filter Query to FileLeaf eq ‘[FileName]’ as described in this later post!
Now note the plural in the action: “Get Items”. That means that by design, it assumes more than 1 result will be returned. The implication is that the data will comes back as an array. in JSON land this looks like the following:
[ { “Name”: “Value” }, { “Name”: “Value2” }, { “Name”: “Value3” } ]
and so on…
Also note that there is no option in this action to choose which fields we want to bring back, so this action will bring back a big, ugly JSON array back from SharePoint containing lots of information.
Both of these caveats mean we now have to do some data manipulation. For a start, we have to get rid of the array as many Flow actions cannot handle them as data input. Also, we are only interested in the item ID for the newly uploaded photo. All of the other stuff is just noise. So we will add 3 more flow actions that:
- clear out all data apart from the ID
- turn it from an array back to a regular JSON element
- extract the ID from the JSON.
For step 1, under the “Get items” action just added, add a new Data Operations – Select action. We are going to use this to select just the ID field and delete the rest. In the From textbox, choose the Value variable returned by the Get Items action. In the Map field, enter a key called “ID” and set the value to be the ID variable from the “Get Items” action.

For step 2, under the “Select” action, add a Data Operations – Join action. This action allows you to munge an array into a string using a delimiter – much like what we did in PowerApps to send data to Flow. Set the From text box to be the output of the Select action. The “Join with” delimiter can actually be anything, as the array will always have 1 item. Why? In the Get Items action above, we set the Maximum Get Count to 1. We will always get back a single item array.

The net effect of this step will be the removal of the array. I.e., from:
[ { “ID”: 48 } ]
to
{ “ID”:48 }
For step 3, under the “Join” action, add a Data Operations – Parse JSON action. This action will process the JSON file and each element found will be available to subsequent actions. The easiest way to understand this action is to just do it and see the effect. First, set the Content textbox to the output from the Join action.

Now we need to tell this action which elements that we are interested in. We already know that we only have 1 variable called ID because of the Select action we set up earlier that has stripped everything else out. So to tell this action we are expecting an ID, click the “use sample payload…” link and paste some sample JSON in our expected format…
{
“ID”:48
}
If all goes to plan, a Schema has been generated based on that sample data that will now allow us to grab the actual ID value.


Okay, so we are done with the Get Item ID scope, so collapse it as follows…

Finally, under the “Get Item ID” scope, add a SharePoint – Update Item action. Add the URL of your site collection and then specify the document library where the photos were uploaded to. If this has worked, the additional metadata columns should now be visible as shown in the red box below. Now set the specific item we want to update by setting the ID parameter to the ID variable from the Parse JSON step.

Now assign the metadata to the library columns. Set Latitude to the output variable from the Get Latitude step, Longitude to the output variable from the Get Longitude step and Temperature to the output variable from the Get Temperature step as shown below.

Now save your flow and cross all fingers and toes…
Testing and conclusion!
Return to PowerApps (in the browser or on your mobile device – not the PowerApps studio app). Enter an audit number and take some photos… Wohoo! Here they are in the library along with metadata. Looks like I need to put on a jacket when I step outside ![]()


So taking a step back, we have managed to achieve quite a lot here.
- We have wired up a public web service to PowerApps
- We have used PowerApps built-in location data to load weather data each time a photo has been taken
- We have used Flow to push this data into SharePoint and included the location and weather data as parameters.
Now on reflection there are a couple of massive issues that really prevent this from living up to its Citizen Developer potential.
- I had to use a 3rd party service to generate my OpenAPI file and it was not 100%. Why can’t Microsoft provide this service?
- Flow’s poor support for common SharePoint scenarios meant I had to use (non) clever workarounds to achieve my objectives.
Both of these issue were resolvable, which is a good thing, but I think the solutions take this out of the realm of most citizen developers. I had to learn too much JSON, too much Swagger/OpenAPI and delve deep into Flow.
In saying all that, I think Flow is the most immature piece of the puzzle at this stage. The lack of decent SharePoint support is definitely one where if I were a program manager, I would have pushed up the release schedule to address. It currently feels like the developer of the SharePoint actions has never used SharePoint on a day to day basis, and dutifully implemented the web services without lived experience of the typical usage scenarios.
For other citizen developers, I’d certainly be interested in how you went with your own version and variations of this example, so please let me know how you go.
And for Microsoft PowerApps/Flow product team members who (I hope) are reading this, I think you are building something great here. I hope this material is useful to you as well.
Thanks for reading
Paul Culmsee
Once again Thank you and that was one clever way to getting around the limitations.
Hi,
Great article, have been trying to adapt this to use data from a FHIR server (https://open.epic.com/Clinical/FHIR?whereTo=patient)
However the data returns as a bundle which I’m struggling to understand how to use this within PowerApps – any thoughts?
Cheers
Rupert
Situs Judi Nova88
Nova88 is one of the better reliable online
bookies within Indonesia which offers been operating since
2004. More as compared to thousand men and women sign-up as official users each day at Nova88.com
for a single reason only, particularly we remain dedicated to paying members’ profits.
Coupled with the upgraded and more advanced platform betting system.
Through the Maxbet server migrated in order to the Nova88 server, customers will knowledge a much
better gaming experience for maximum general gameplay.