SharePoint for Cisco Fanboys – Part 1
Cisco nerds! This series is just for you! I know that you think you’re way too cool for collaborative portals, especially a Microsoft one at that. Instead you are more interested in delving into the IOS command line, to perform arcane arts such as debugging that OSPF route redistribution into BGP or getting off on planning and implementing a large scale DMVPN solution. Maybe you’re into QOS and VOIP and simply dig all of those DSCP-COS mappings, class and policy maps and the like.
Although packets, cells and frames are your world, *nix is cool, Nagios is your idea of a portal and anything remotely connected to Microsoft fills you with contempt and is beneath you right? 🙂
Well if this is you, I do understand your point of view because I was you once, but after some therapy, I’m now out of rehab and doing just fine!
Having Cisco/general networking expertise will help you with this article, so depending on who you are, the amount of caffeine required to follow this will vary:
CleverWorkArounds Coffee requirement rating (for a CCNP or CCIE): ![]()
CleverWorkArounds Coffee requirement rating (for a non Cisco person or CCNA 🙂 ): ![]()
![]()
![]()
Okay Cisco gurus, if there is anything about SharePoint that you guys need to know about, it is the power of the document library.
Unlike a regular file system, a SharePoint document library has a powerful version control mechanism that can make your life easier, as well as play nice with the rest of your colleagues (whom you despise because they don’t understand or appreciate you 🙂 ).
So I am first going to show you an example of how you can leverage SharePoint to do something quite useful with Cisco gear, and then in the next post of this series I will expand further into general IT infrastructure admin benefits.
The Cisco bit..
(Non Cisco people, your eyes will glaze over – but try anyway!)
Back around 2000/2001 when I was a full time network manager, I wrote a perl script that used SNMP to instruct a router to dump its configuration to a TFTP server. I had a cron job that ran this script daily, and it would tell all of our switches and routers to write their current configuration to TFTP. It was nothing special – many Cisco network professionals do the same thing.
(Before you ask, I *know* there are tools and new methods to do this nowadays, but back then the choices were more limited)
Anyway, here is a snippet of the script in question. I know it’s not great but it did the job…
use Net::SNMP;
($sec, $min, $hour, $mday, $mon, $year, $wday, $yday, $isdst) = localtime;
@Days = (“Sunday”, “Monday”, “Tuesday”, “Wednesday”, “Thursday”, “Friday”, “Saturday”);
$day = $Days[$wday];
# Now call the procedure to do the deed!
&backup_configs(“192.168.16.1″,”RWSNMPcommunity”);
&backup_configs(“192.168.16.2″,”RWSNMPcommunity”);
The above code simply grabbed the date and then called the main function, passing the IP of the router and the SNMP community string for Read/Write access. The routine below, used SNMP SET commands to tell the router the location of the TFTP server, the name of the configuration file being written, and then told the device to execute the request.
sub backup_configs {
($ipaddr, $cs) = @_;
($s, $error) = Net::SNMP->session( -hostname => $ipaddr,
-community => $cs,
-debug => ‘1’ );
$hnh = $s->get_request(“.1.3.6.1.2.1.1.5.0”);
$hostname = $hnh->{“.1.3.6.1.2.1.1.5.0”};
$filename = “\\router-configs\\” . $day . “\\” . $hostname . “.cfg”;
$s->set_request(“.1.3.6.1.4.1.9.9.96.1.1.1.1.2.667”, INTEGER, 1);
# Set the source to startup-config
$s->set_request(“.1.3.6.1.4.1.9.9.96.1.1.1.1.3.667”, INTEGER, 4);
# Set the destination to tftp
$s->set_request(“.1.3.6.1.4.1.9.9.96.1.1.1.1.4.667”, INTEGER, 1);
# Set TFTP IP Address
$s->set_request(“.1.3.6.1.4.1.9.9.96.1.1.1.1.5.667″, IPADDRESS,”192.168.18.5”);
# Set destination file name
$s->set_request(“.1.3.6.1.4.1.9.9.96.1.1.1x.1.6.667″, OCTET_STRING,”$filename”);
# Set it off!
$s->set_request(“.1.3.6.1.4.1.9.9.96.1.1.1.1.14.667”, INTEGER, 1);
$done = false;
$counter = 0;
while ($done eq false) {
$check = $s->get_request(“.1.3.6.1.4.1.9.9.96.1.1.1.1.10.667”);
if ($check->{“.1.3.6.1.4.1.9.9.96.1.1.1.1.10.667”} == 3) {
$done = true;
}
$counter++;
if ($counter > 500) {
$done = true;
}
}
if ($counter > 500) {
print “$date:A problem occured – it looks like the attempt failed\n”;
}
# Clear the config!\n”;
$s->set_request(“.1.3.6.1.4.1.9.9.96.1.1.1.1.14.667”, INTEGER, 6);
#close the snmp session
$s->close;
}
Now, I know there is a lot of ugly SNMP stuff in my above code and many readers are thinking, WTF!? You can safely ignore most of the code. However there is one bit that I do want to bring your attention to.
$hostname = $hnh->{“.1.3.6.1.2.1.1.5.0”};
$filename = “\\router-configs\\” . $day . “\\” . $hostname . “.cfg”;
Looking closely at this, you can see that I am setting the filename based around the name of the Cisco device (retrieved from SNMP) and the day of the week the script is run ($day). This is because when I backed up the configuration of the router, I wanted to keep multiple versions. For simplicity, I opted to keep 7 days worth of configuration dumps. So by using the day of the week in the file path, I ended up with config backups like this.
- router-configs/monday/mycorerouter.cfg
- router-configs/monday/myedgerouter.cfg
- router-configs/tuesday/mycorerouter.cfg
- router-configs/tuesday/myedgerouter.cfg
So, provided the path router-configs/<day of the week> exists on my TFTP box, I end up with a single file for each cisco device in each day of the week directory.
Neat, eh?
Yeah it’s neat, so why integrate TFTP with SharePoint?
Version control and workflow, my skeptical Cisco friends, that’s why! The easiest way to explain is to dive right into an example. So let’s do that right now!
There are a few TFTP servers out there for Windows (yeah we are using Windows – get over it). I used to use WinAgents TFTP server. Unfortunately though in writing this article, the most recent version of WinAgents TFTP does not work with SharePoint the way I want it to (if you run an older version it is fine). I also tried using SolarWinds freeware (registration required) TFTP server as it runs as a windows service. Unfortunately, I had some stability problems with WEBDAV when running as a service (not SolarWinds fault) which I will explain in the next post, so I ended up using TFTPD32 with a few modifications. (TFTPD32 is recommended by Cisco anyway).
What we will do is the relatively simple process of telling the TFTP server to drop files into a SharePoint document library via WEBDAV.
For reference, the TFTP server does not have to be on the same server as SharePoint when using the WEBDAV method.
The TFTPD32 Server Installation is straightforward. Once installed however, there are three additional steps that you need to perform:
- Create or nominate a user account to run the TFTP Service.
- Modify TFTP32 to run as a WIndows Service – using the credentials of a user account that has permissions to the document library that the TFTP server will dump the files to.
- Set the TFTP root directory to the UNC path of the SharePoint document library
I am assuming that you already have a SharePoint or WSS server. On the SharePoint side, we need to create a site and a document library to hold our configuration backups, grant the TFTP server permission to it and then enable version control on that document library.
So in my example, the user account that is going to upload files to SharePoint is called “tftp service“. I will refer to this account frequently in the rest of this post.
Also in this example, the SharePoint site is http://tidemo/tftp and the document library is called “backups“
http://tidemo/tftp/backups
Configuring SharePoint
(SharePoint people, I am covering the basics here – skip if you know it already).
In SharePoint, create a new, blank site to host the TFTP server files. Being a bastion of originality, in the example below I have named the site TFTP.
![clip_image002[5]](http://www.cleverworkarounds.com/wp-content/uploads/2008/01/clip-image0025.jpg)
Now that the site has been created, we create a document library to store the files for the TFTP server. I have called it “Backups” and chosen not to use a default document template.
![clip_image002[7]](http://www.cleverworkarounds.com/wp-content/uploads/2008/01/clip-image0027.jpg)
The next step, having created this document library, is to turn on version control. This is performed by choosing “document library settings” from the “Actions” menu.
![clip_image002[9]](http://www.cleverworkarounds.com/wp-content/uploads/2008/01/clip-image0029.jpg)
![clip_image002[11]](http://www.cleverworkarounds.com/wp-content/uploads/2008/01/clip-image00211.jpg)
In the version settings screen, choose to create major versions.
![clip_image002[13]](http://www.cleverworkarounds.com/wp-content/uploads/2008/01/clip-image00213.jpg)
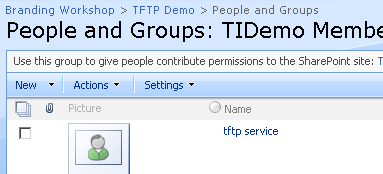
Finally, we need to grant our user “tftp service” write access to this new document library. The simplest way to do this is add “tftp service” to the members’ group of the SharePoint site. This will grant them ‘contribute’ access to the “Backups” document library. (This permission setting is just for demonstration purposes. Adjust permissions according to your specific requirements)
Right! Our doc library is ready! If at this point you open the document library via Windows Explorer as shown below, you will see that the UNC equivalent path for this example document library is \\TIDEMO\TFTP\BACKUPS
![clip_image002[15]](http://www.cleverworkarounds.com/wp-content/uploads/2008/01/clip-image00215.jpg)
If you do not see your standard windows explorer window here and a UNC path, stop here! We need to troubleshoot the windows WEBDAV service. It might pay for you to skip to the “WEBDAV interlude section coming up)
One thing that people often overlook with SharePoint is that document libraries have this “windows explorer” view. What is so significant about this, you ask? It is the fact that you can reach any SharePoint document library via a UNC path. You can even map a drive to a SharePoint library too. Thus the following document library:
http://tidemo/tftp/backups
is accessible via
\\tidemo\tftp\backups
As a result of this functionality, pretty much any application that deals with UNC and mapped drives (such as ROBOCOPY) can happily copy files from your PC to a SharePoint library (with a large caveat I will explain later).
For educational purposes, let’s look at how windows explorer view is done. (If you are not interested, skip to the next heading where we configure SolarWinds TFTP.)
How is this done? A WEBDAV interlude
Now SharePoint does not actually provide support for SMB which is what ‘regular’ shared file systems use. The protocol that SharePoint supports is WEBDAV which stands for “Web-based Distributed Authoring and Versioning”. So, how is it that we can use Windows explorer, mapped drives and UNC paths to get to SharePoint files?
In Windows XP and above, Microsoft supplied a new network provider called the Windows WebDav client. (Yes, XP and above – Windows 2000 is not going to work this way for you). Also, Samba people who are reading this and thinking “ooh I can use smbfs to mount a SharePoint library to *nix”, sorry it ain’t gonna work because it is not SMB.
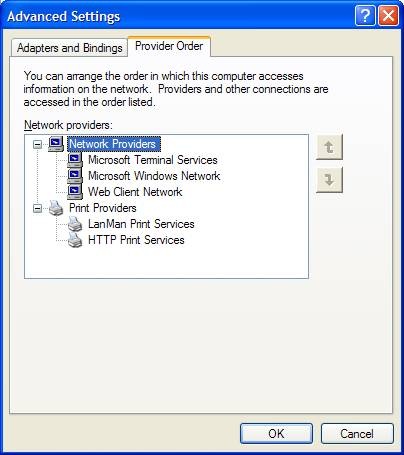
By creating the Web Client Service as one of the built-in network providers, it is automatically queried whenever you make connection attempt to a network resource (i.e. opening Windows explorer and navigating to a mapped drive or UNC path). You can see the provider by following these steps:
- On the Start menu, right-click My Network Places and then click Properties.
- On the top menu bar, click Advanced and then click Advanced Settings.
- Click the Provider Order tab.
You will see a dialog box with your provider order listed. Note that the Web Client Network (WebDAV) is last in the list by default.
Microsoft have a detailed whitepaper on how Windows Explorer view is implemented, and it is well worth a read. (I’ve previously blogged on quirks with it before.)
TFTP to SharePoint
So, now we know that on XP and above, any application that uses the windows networking API (interpret that as refer to a mapped drive or UNC path), can get data into and out of SharePoint. So let’s run the TFTPD32 and set it to use our document library.
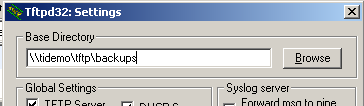
Configuring TFTPD32
First up, grab TFTP32 and install it onto your chosen server. After successful installation run TFTP32.EXE from the installation directory.
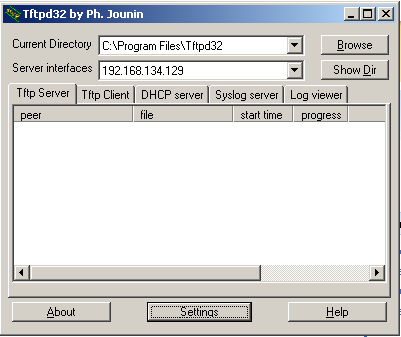
Click OPTIONS and now set the path to the Windows explorer view path (UNC) of your site and document library
That is pretty much it! Now let’s test it!
Unfortunately, I don’t have any spare Cisco gear handy as Uncle Ebay helped me dispose of them once I stopped doing networking. So instead, I will use the built in TFTP.EXE utility built into Windows. This proves that a file can be saved to SharePoint via TFTP.
It works like this.
TFTP <hostname or IP> GET|PUT <filename>
eg
C:\>TFTP 192.168.134.129 PUT myfile.txt
Transfer successful: 43552 bytes in 1 second, 43552 bytes/s
The output of the above command shows “transfer successful”. So let’s go and have a peek in our document library!
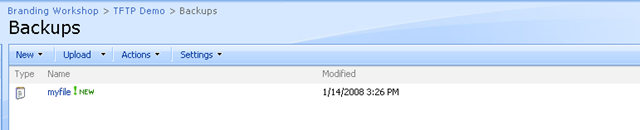
Sweeeet, we have a file called “myfile”.
So let’s go back to TFTP and re-run the command a few times.
C:\>TFTP 192.168.134.129 PUT myfile.txt
Transfer successful: 43552 bytes in 1 second, 43552 bytes/s
[snip many re-executes]
C:\>TFTP 192.168.134.129 PUT myfile.txt
Transfer successful: 43552 bytes in 1 second, 43552 bytes/s
Now let’s take another gander in the document library. Still the one file there. However, let’s now examine the version history for the file and see if there are multiple versions?
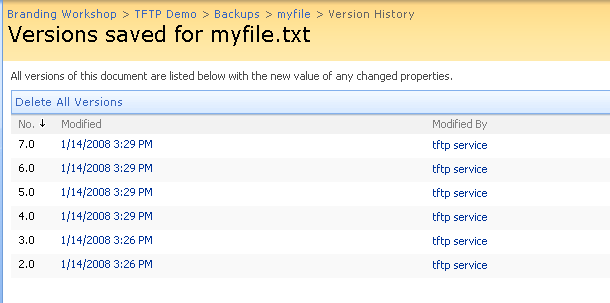
Sweeet, we now see that there are 7 versions stored for this file!
Conclusion (and the catch…)
So imagine that every day, you use the perl script example above to instruct your networking gear to copy their configuration to TFTP. Now you can simply use a standard file name convention (such as <hostname>-config.txt) do not need to worry about folder structure or dates within filename to ensure that multiple versions are maintained. You can go into the version history for a particular router configuration file and retrieve the one that you need.
Of course, all of your other important documents such as your network diagrams, SOE documentation, maintenance and support agreement details can also be placed into SharePoint document libraries and many other benefits are derived in addition to version history, such as search, workflow and easy offline storage.
But that is for the next post 🙂
Now for the catch … and it’s a biggie!
We of course, want to run our TFTP server as a windows service, so that the TFTP server does not have to be manually invoked.
Try as I might, I was unable to get a reliable TFTP service writing to SharePoint document library, when the TFTP server is running as a Windows Service! This majorly sucked and I was an unhappy camper!!
I have concluded that the WEBDAV client in WIn2003 is flakey. In the next post of this series, I will outline the problems that I had and how I eventually was able to come up with a semi-clever workaround to make it all work.
Bye for now!
Paul


January 21st, 2008 at 3:19 pm |
[…] found this great article on google blog search today: Sharepoint for Cisco fanboys. The article details how to use Sharepoint’s version control features to save multiple copies […]
January 24th, 2008 at 1:03 am |
[…] SharePoint for Cisco Fanboys – Part 1 […]
January 26th, 2008 at 9:59 am |
[…] scary! If you are hitting this series of articles for the first time, go back and read part 1 and part 2 before being […]
January 27th, 2008 at 12:28 am |
[…] Part 1 illustrated how it it possible to use SNMP to tell a Cisco IOS device to dump its configuration to TFTP. We talked about the version control feature of SharePoint and why it makes sense to TFTP your configs to a SharePoint document library. We covered the WEBDAV network provider supplied with XP and Win2003 and finished off with a basic example using the TFTP server TFTPD32. […]
January 31st, 2008 at 1:31 am |
[…] Part 1 illustrated how it it possible to use SNMP to tell a Cisco IOS device to dump its configuration to TFTP. We talked about the version control feature of SharePoint and why it makes sense to TFTP your configs to a SharePoint document library. We covered the WEBDAV network provider supplied with XP and Win2003 and finished off with a basic example using the TFTP server TFTPD32. […]
February 2nd, 2008 at 7:31 am |
[…] SharePoint for Cisco Fanboys – Part 1 […]
February 7th, 2008 at 8:22 pm |
Have you heard of or used RANCID? It’s a much much much better option than Sharepoint and provides you with the much needed diffs.
February 7th, 2008 at 10:41 pm |
Yes I have heard of RANCID as many of my cisco colleagues use it (I still work for a Cisco shop). However my point here was not actually to sell SharePoint as a suitable config repository because judged on this alone it is definitely not the right solution. Perhaps jump to part 5 of this blog to see where I am going with this series. I wanted to start out small and specific on one issue and slowly expand the scope
April 19th, 2008 at 10:20 pm |
[…] the business intelligence stakes. Closer to home, in my SharePoint for Cisco nerds series, I had a comment that suggested that RANCID was a much better choice than SharePoint for Cisco configuration […]
April 15th, 2009 at 6:15 pm |
[…] you are using cisco switches you can integrate TFTP into sharepoint CleverWorkarounds
August 9th, 2009 at 3:12 am |
[…] This post was Twitted by tigerplug […]
March 20th, 2012 at 5:17 pm |
[…] found this great article on google blog search today: Sharepoint for Cisco fanboys. The article details how to use Sharepoint’s version control features to save multiple copies […]