Sharepoint for Cisco Fanboys (beyond TFTP) – Part 5
Greetings SharePoint fans and Cisco people who are soon to be SharePoint fans! I’m back with part 5 of this series on leveraging features of MOSS 2007 and WSS 3.0 to help manage Cisco infrastructure.
For those of you who hate programming topics and have no interest in TFTP issues, we may well have finally gotten to a topic that you are interested in! For the rest of you, who have read the first four articles, we now shift our focus from getting Cisco configurations into SharePoint, to doing something useful with them once we have done so.
In this post, we will examine the out of the box capabilities of workflow in SharePoint and delve a little deeper into document libraries and content management. So this is more aimed at Cisco people than it is at SharePoint Pros. SharePoint people, much of the topics I cover in this article you may have seen before.
I personally don’t think this post has a high coffee requirement rating in terms of complexity of concepts, compared to the last two anyhow. However be prepared: it is a long read.
CleverWorkArounds Coffee requirement rating: ![]()
![]()
Here is the quick recap on what we have covered so far:
- Part 1 illustrated how it it possible to use SNMP to tell a Cisco IOS device to dump its configuration to TFTP. We talked about the version control feature of SharePoint and why it makes sense to TFTP your configs to a SharePoint document library. We covered the WEBDAV network provider supplied with XP and Win2003 and finished off with a basic example using the TFTP server TFTPD32.
- Part 2 went into more detail about the issues you can face when using the WEBDAV network provider. It also went into more detail on 3 TFTP server products (WinAgents TFTP, SolarWinds TFTP Server and TFTPD32 and why TFTPD32 ended up being the best choice for this purpose.
- Part 3 then looked at a wonderful open source TFTP server written in C# called TFTPUtil. We modified the source code of this TFTP server to use the SharePoint SDK and upload files to a SharePoint document library.
- Part 4 continued the examination of the TFTPUtil server and another modification of it to use SharePoint web services to upload files.
I think the best way to get stuck into part 5 is via a real-world Cisco scenario. For this scenario, I will (loosely) use one of my roles from a few years back. It was not the biggest or most complex network I’ve managed, but it was quite varied due to the nature of the business they were in.
The scenario
Our scenario company is called CleverWorkArounds Corp and it is a products and services company. This business is involved in digital signage primarily (you know all those LCD screens spamming you with information and advertisements in shopping malls, train stations, cinemas, fancy hotel lobbies, casinos, etc).
Below is an example of large scale digital signage. Look closely…is that a windows error I see? 😀

There are many installations of the product all over the world. Some locations include countries with encryption restrictions or government firewalls. Many of the installations are contracted to be monitored in real-time and in many installs the day to day management is provided by CleverWorkArounds Corp as a managed service.
Including head office in the USA, CleverWorkArounds Corp has 5 offices around the world where the installations are put together and tested before being shipped to site.
The Network
The network infrastructure employed by CleverWorkArounds Corp is Cisco based. The most complex part about it is the VPN connectivity to office and client sites. There is a lot of variation. “Managed Service” type installations typically use CleverWorkArounds Corp supplied network gear on site, in a segmented or isolated network. However many installations are hosted on the client’s infrastructure, often not Cisco, and all CleverWorkArounds Corp has is a VPN connection to the site.
CleverWorkArounds Corp has implemented VLAN’s, wireless and multicast networking at many sites. The security set-up and configuration varies from site to site, as it depends on who owns the infrastructure, security posture of the client and the level of local support on the ground at that site.
Finally, even the VPN technology varies. Most sites are point-to-point IPSEC, but some require CleverWorkArounds Corp to use PPTP or SSL VPN via OpenVPN when firewalls/government restrictions get in the way.
The Issues
The most critical issue with this type of network is security. Not only does CleverWorkArounds Corp have to protect itself from it’s clients, since many client sites are VPN connected with varying levels of security posture, CleverWorkArounds Corp also has to protect client’s from each-other. A relatively complex set of access lists are maintained and authentication to all CleverWorkArounds Corp network devices is via RADIUS and central authentication.
Aside from security, the CleverWorkArounds Corp corporate offices are connected to each-other via GRE tunnels over IPSEC, which allows multicast traffic and as a side effect, dynamic routing protocols. EIGRP is the protocol used. Many ‘lab’ VLAN’s are running at any given time, while new installations are being put together.
On the VPN side, on top of the variation in underlying technology, some Network Address translation is performed where IP address ranges overlap, as many clients like to use the 10.0.0.0 network with a /8 subnet mask (255.0.0.0) and don’t realise how restrictive this can be when doing b2b connectivity.
So What Are We Interested In Here?
From the point of view of the business, all of this has to be up and running, humming along with no service disruption as downtime = lost $. No doubt you have taken out SMARTnet maintenance contracts right? ;-).
So you need to have all the tools and critical information on hand to recover as quickly as possible.
In my career, I’ve been dumped into the deep end a few times, inheriting pathetically maintained/managed infrastructure that is undocumented and a ticking time-bomb. Is this picture familiar? 🙂
Thus I always like to leave a site or infrastructure well documented. However my philosophy here is not to rewrite the manual. I do make some assumptions, including the assumption that the next person taking over at least has some semblance of previous experience and understanding of the products making up the infrastructure.
Therefore I do not attempt to rewrite product manuals. I will write a general network SOE document to go with a layer 2 and layer 3 network diagram. The SOE will cover implementation details of the network design including RADIUS, SNMP, EIGRP, Spanning tree, VPN, VLAN’s, IP Telephony, etc. But the SOE will not explain what each of these technologies are and what they do – that is assumed information.
That document is around 40-60 pages usually and once written, it is fairly easy to maintain because it is not filled with constantly changing operation information. That is kept separately. For example I’ll maintain lists of each client site, including the IP range used, details and serial numbers of devices on site, maintenance agreement numbers, client contact details, passwords, VPN details such as the certificate or shared key. I’ll document what each VLAN is for, SNMP community string, etc.
Finally, in case you did not know already :), I implement my perl script to back up the configurations of all of the IOS devices to TFTP. (And that perl script is well documented in the network SOE I described earlier).
So this is all very nice and standard practice, and we can do this without SharePoint just fine, but let’s go through an simple example of maintaining this information in SharePoint and see the benefits.
SharePoint Revisited
First up, let’s now modify the SharePoint site (http://tidemo/tftp) we were using for the TFTP experimentation. We will add some additional columns and lists. This will allow us to track much more interesting information than just the backups of router configs.
CleverWorkArounds caveat: This is an example and does not reflect reality! It purely serves to illustrate SharePoint’s capabilities. In addition, this is not meant as a complete newbie SharePoint tutorial or this post would get far too big – I have skipped some details here.
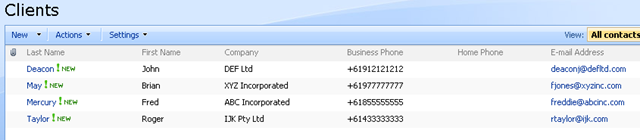
“Clients” list
First up, we have a number of clients and remote sites. So let’s create a contact list to store client and key contact details. From “Site Actions”, choose “Create” and from the list of choices, create a new Contacts list.
We will call this list “Clients” and add some clients in.
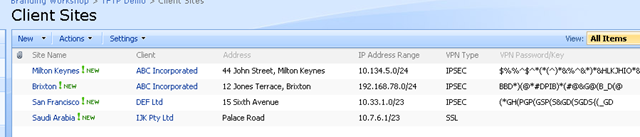
“Client Sites” list
Next up, each client can have one or more sites. For each site, we are interested in not only its physical location, but also the IP Address range used at that site, the VPN type and detail. For this we will create a custom list called “Client Sites” with the following columns
| Name | Type | Scope | Other Information |
| Client | Lookup (Clients) | Site Column | Get information from: Clients In this column: Company |
| Site Name | Text | List | (renamed “Title” column) |
| Address | Text | Site Column | Column already exists by default |
| IP Address Range | Text | List | |
| VPN Type | Choice | List | Values: IPSEC, PPTP and SSL |
| VPN Password/key | Multi Line Text | List |
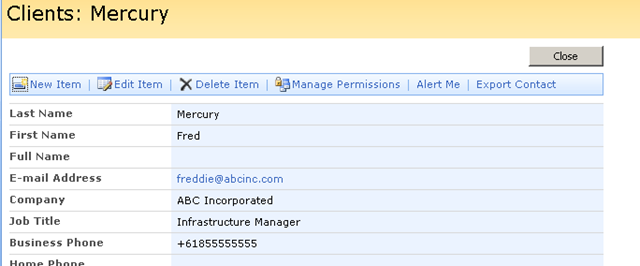
Now we add some sites and assign them to the aforementioned clients. Note that in our example, ABC Incorporated has two sites. Since the Client column is a lookup against the Clients list we previously created, the “Client” column below is linked to its associated entry in the “Clients” list.
“IT Assets” List
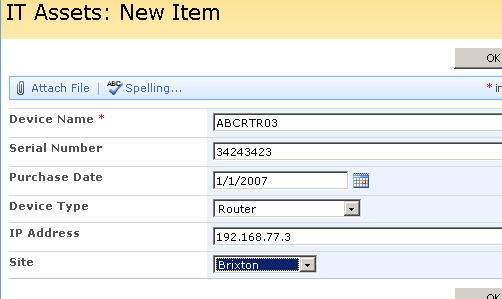
Right! We have site information with some basic information about VPN details.How about we now create an IT Asset/Device list where we record the details about our equipment at these sites. In this list, we are interested in the type of device, its IP Address, serial number, purchase date and warranty.
| Name | Type | Scope | Other Information |
| Site | Lookup (Client Sites) | Site Column | Get information from: Client Sites In this column: Site Name |
| Device Name | Text | List | (renamed “Title” column) |
| IP Address | Text | List | |
| Serial Number | Text | List | |
| Purchase Date | Date/Time | List | |
| Device Type | Choice | List | Choice list includes different network equipment type. Router, Switch and Wireless Access Point |
Below is the configured list and some sample data

Examining the list relationships
So we now have three lists containing contact information, site information and device information. Any column that is of type “lookup” is automatically linked to the source of the lookup. So in the sample above of the device list, clicking on “Milton Keynes”, takes you to the entry in the “Client Sites” list as shown below.
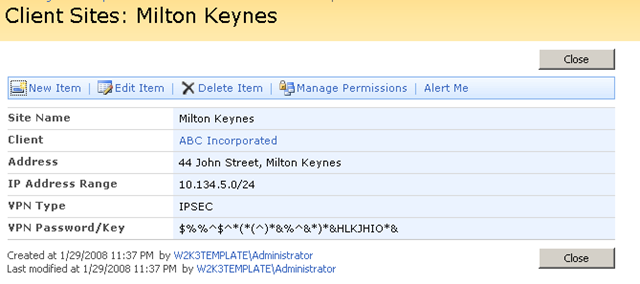
From here, we can example the details of the client for this site, “ABC Incorporated”. Clicking on the client reveals our contact details for that client.
So what have we achieved so far? We have taken some useful information that would usually be stored in different locations (and potentially formats/systems) and linked it together. Being web based, the information is accessible from anywhere on the network. Remember, SharePoint also has a built in recycle bin and full version history if you wish to use it.
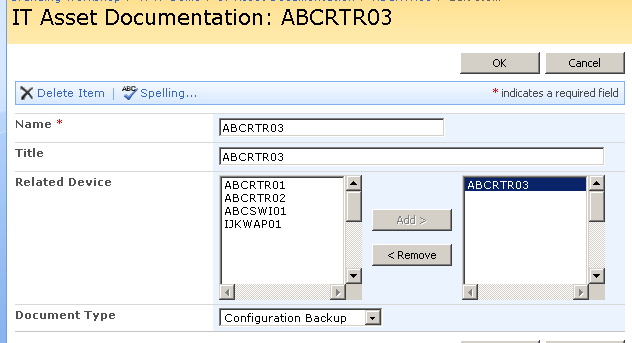
That is all well and good, but we have not linked this yet to our Cisco backups. In addition, we want to add our SOE documentation to be part of this also. So let’s create a new document library called “IT Asset Documentation”, and relate this to the devices.
IT Asset Documentation Library
So this time, we create a document library instead of a list. Here are our columns
| Name | Type | Scope | Other Information |
| Related Device | Lookup (IT Assets) | List | Get information from: IT Assets In this column: Device Name Allow Multiple values: TRUE |
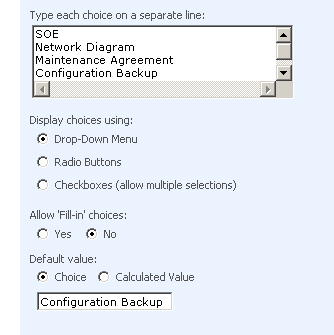
| Document Type | Choice | List | Values: SOE, Network Diagram, Maintenance Agreement, Configuration Backup |
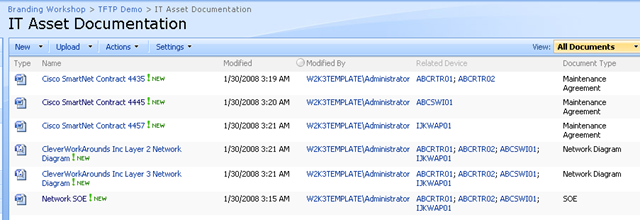
So, now we create or upload our SOE, Network Diagrams and Maintenance Agreements so this document library as shown below.
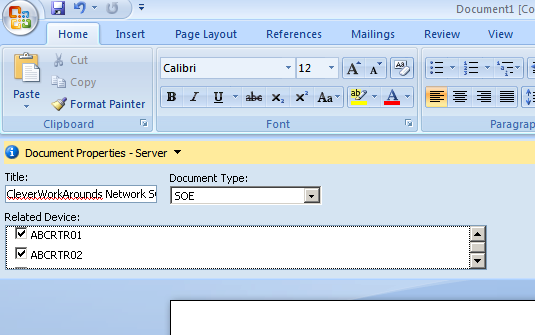
In case you haven’t seen it before, Office 2007 is aware that you are using a SharePoint document library and allows you to set the values of these columns from within the application itself as shown below.
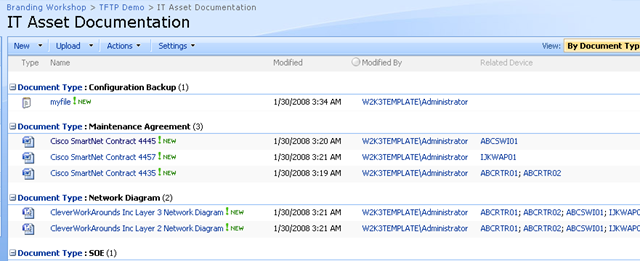
By creating the “Related Device” field, we now have a direct link to the three lists created earlier in this post. In addition, we have the ability to sort, filter and group documents in this library based on the columns we have added. So for example, here is another view of the document library grouped by document type.

For Cisco people reading this, notice how this view now looks a little like folders based on the document type? The importance and usefulness of views should not be underestimated. Unlike folders, views allow you to sort/manage your files much more flexibly than a static, folder structure. A single document library or list can have many views!
Finally, the configuration backups!
So if you were observant earlier, you would have noticed that I created a fourth document type called “Configuration Backup”, that we have not yet used. Let’s now integrate the TFTP server into this new library.
The simplest way that requires no customisation is to set the default document type to be “Configuration Backup”. That way, any file that is TFTP dumped into this library will be assigned that document type. So let’s modify the “Document Type” column and make this change.
It doesn’t really matter which TFTP method you use, so long as it is configured to drop files into this document library. If you use one of the TFTP servers used in part 2, then in this example the WEBDAV UNC version is:
- \\tidemo\tftp\IT Asset Documentation
And the URL for the web service/sdk method (as described in part 3 and part 4) is:
- http://tidemo/tftp/IT%20Asset%20Documentation/
I used the TFTPUtil method with web services and uploaded a file. Below is the document library with the new file. Note the document type!
Improving Integration with Workflow
Let’s now do a really simple workflow example to make this a little slicker. How about when a new configuration file has been TFTP’d into this library we perform these steps:
- Check if the ‘related device’ field is empty
- If it is empty, create a task for the network administrator to add the device details to the “IT Asset” list and link it to the uploaded file.
Since we have version control enabled in this library, the first time a file is uploaded the workflow will fire, and set this task for the network administrator. Once the related item is set, subsequent uploads will trigger the workflow, but it will do nothing because the related device has already been set.
I’ll create this workflow using SharePoint Designer. SharePoint designer workflows are by no means the answer to global warming but they are a great method for rapid workflow development with no programming expertise required.
In SharePoint designer we open our site and create a new workflow from the File Menu…
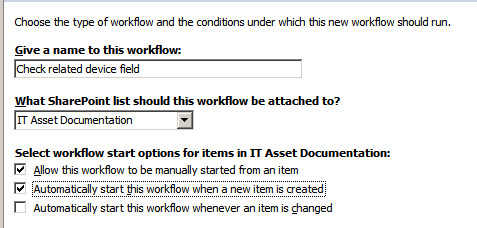
Name the workflow “Check Related-Device Field” or something similar and attach the workflow to the list “IT Asset Documentation”. Make sure the box to “Automatically start this workflow when a new item is created” is ticked.
Click NEXT and we add our first and only workflow step. The first thing to do is add a condition.
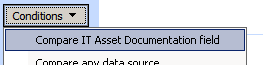
The first condition is always to compare the value of a field in the list the workflow is assigned to “IT Asset Documentation”. Click it, and choose the “Related Devices” field for the “field” parameter. Click the “equals” parameter and choose “is empty”.
![]()
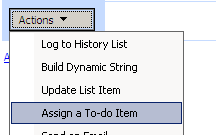
Now we will create our action to assign the task to the network administrator. Click the “Actions” button and choose “Assign a To-do Item”.
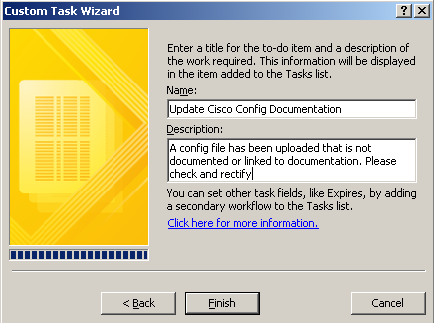
Now in the newly created action, click “a to-do item” and on the next screen create a task name called “Update Cisco Config Documentation” and give it an appropriate description. Then Click “Finish”
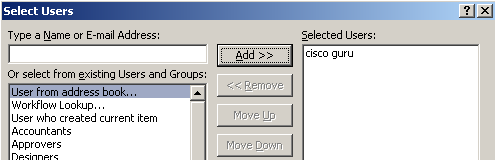
Finally, we assign this to-do to the network administrator by clicking the “these users” link and finding the network administrator in the address book (Active Directory).
So here is the completed action.
![]()
Click “Finish” and we are all set!
Testing it out
So, let’s test by uploading a new file.
C:\>tftp 192.168.134.129 put c:\myfile.txt ABCRTR03
Transfer successful: 43552 bytes in 1 second, 43552 bytes/s
And the document library…
WOHOO! You can see a new column has been created to track our workflow status.

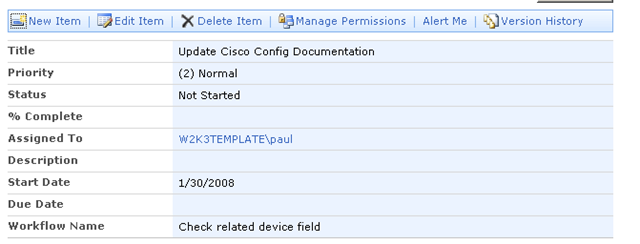
The status is “In Progress”, because it is waiting for a task to be completed. If we examine our SharePoint site, we have a new list, called … wait for it … “Tasks”!!
Let’s take a look at it!

If you click on this task (which also can be viewed and edited in Outlook), we can view this exciting task.
So our network administrator has received this task and has dutifully created a new entry for this router in the “IT Asset” list. They have then updated the “Related Device” column in the “IT Asset Documentation” as shown below
So now our intrepid network admin can edit this task and mark it as complete! Click da button!!

Now that the task has been completed, the workflow has completed and this is reflected in the “IT Asset Documentation” library as shown below. Note the workflow status is “completed”. Cool!

Conclusion
So what have we achieved here? This is a really basic example of improving configuration management, streamlining a process, improving the quality of documentation and enforcing accountability because we now have an audit trail of the task being assigned and completed.
We really are scratching the surface though. We have the tools here to implement much more that just making sure that something is documented. In the next post, we will expand on this site and incorporate a change control mechanism using forms services. We will also start to look at this sort of stuff from a higher level, strategic viewpoint in the context of the ‘greater’ IT infrastructure management.
In conclusion, I hope that you Cisco guys found this post useful and look out for part 6 of this series in the near future.
Cheers
Paul


February 2nd, 2008 at 7:31 am |
[…] Sharepoint for Cisco Fanboys (beyond TFTP) – Part 5 […]
April 14th, 2008 at 11:45 pm |
Found your article while Googling an issue.
Enjoyed it very much. Perhaps you can help with my issue.
I have an application that can not utilize mapped drives and but can use UNC paths. However I would shorten the path to the SharePoint webfolder that I would like to publish into from this application.
Is it possible share out a SharePoint webfolder to shorten the path to a specific document library subfolder?
Example:
from actual UNC path –
\\server\sharepoint_website\document library\subfolder
to shared UNC –
\\server\subfolder
Thanks in advance for any help or suggestions that you can provide.
Scott
November 30th, 2008 at 5:32 pm |
Is there anything SharePoint can’t do? 🙂
December 1st, 2008 at 8:17 am |
Bob, trust me there are many, many things that SharePoint shouldn’t be used for – but thats a whole different series of posts 🙂