A long time ago now I detailed a method of getting photos to SharePoint via a custom connector. For a long time, this was the best way to handle the all-too-common need of uploading media to SharePoint. It was also my most popular Youtube video by far…
Various alternative methods have appeared since I did that video, and one big disadvantage of the old method was licensing implications as custom connectors became a P1 license thing. John Liu worked out an epic hack and for a while I started using the Azure Blob storage connector because it was not premium and did not hit a P1 constraint.
But now, thanks to a new feature in PowerApps, we have an even easier way. We can now use the JSON() function to encode media in Base64 and get Flow to process it.
For example…
1. Add the “Add picture control” to a screen and set the AddMediaButton component to add the photo and a random filename to a collection.
2. Add a button to the screen and create a flow from it using the Action menu.
3. In the freshly minted flow, add a Parse JSON action, and in the content textbox, choose Ask in PowerApps from the data panel and add the following schema…
4. Add a Create File action from SharePoint or OneDrive. In this case I will use SharePoint. From the data panel, set the File Name to Name from the Parse JSON action output. Since this is an array of files, Flow will wrap this action inside an Apply to Each action.
5. For the file content action, add an expression as follows:
decodeDataUri(item()[‘Pic’])
This expression is basically saying “for the selected array of photos, grab the Pic content and turn it back into binary
6. Save the flow and go back to your PowerApp. Choose the button again and link to your newly created Flow via the action menu.
7. Complete the expression on the button as follows…
This is the bit that is converting your photo collection to a form that can be easily sent to Flow…
Finally, take some pics and click your button… if all goes to plan, you will see your photos in SharePoint or OneDrive…
Conclusion
I know that this sort of integration has been a long-time coming and is very welcome. Until such time as SharePoint provides native support for sending files, this method is pretty clean and simple…
This week I have been migrating SharePoint content from one site collection to another using ShareGate and I hit a frustrating issue. After migration, SharePoint worked fine, but PowerApps and Flow were both unable to connect to any SharePoint lists that contained multi-value managed metadata columns. In PowerApps I would get “An error occurred on the server” and a fiddler trace showed me an error 502 (gateway not found). Attempting to use any of the SharePoint in Flow (such as Get Items or Get item) showed a similar message…
Examining the detailed error message was quite telling… here is an example…
can you see part of a term set in the message? What’s going on here?
So it turns out that ShareGate migrates managed metadata columns in such a way that only PowerApps and Flow are impacted. It seems to include an extra hash in a hidden column that each and every managed metadata column has associated with it. Normally one might expect to see this:
Now SharePoint does not seem to care about this, but PowerApps and Flow sure do. Luckily there is a fix if you are comfortable with PowerShell. Using PnP I used the Set-PnpTaxonomyFieldValue cmdlet to reapply the terms to the main column, which updates the hidden column and corrects the corruption. Additionally, to avoid “Modified By” and “Modified” columns being updated with my details when correcting this, I took a copy and reapplied the original values as well. The implication here is this script is run as Site Collection Admin or with Full Control permission…
The trick to this script is that the Set-PnPTaxonomyFieldValue expects a set of terms as PowerShell hash table, but SharePoint returns Managed Metadata as a SharePoint taxonomy object, so a little fudging is in order to update it.
The script I used is below… hope this helps someone…
Pretty much every time I run a project kick-off meeting involving tools like SharePoint or PowerApps, I always ask the group the following question:
“If you had <insert goal here>, how would things be different to now”?
(Replace <insert goal here> with any common IT platitude like “improved collaboration”, “knowledge management”, “big data analytics” or “digital transformation”. )
Now inevitably, someone will say something like “I would have information at my fingertips”. While that may sound like a cliche, these days, it is pretty easy to meet this goal. So easy in fact, that I can do it in around 10 minutes using a SharePoint Document Library, a quick PowerApp and a Flow of only 5 steps. I then get to be a smartass, hand them my phone and say “there you go – at your fingertips… That’ll be $250 thanks”.
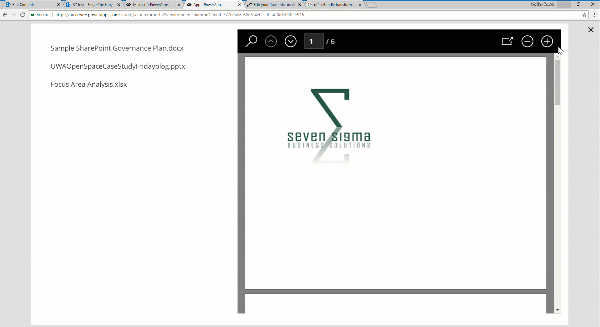
Now if you want to score $250, I have bad news for you. No client has ever actually paid me when I used that line. But nonetheless, if you have been looking for a demo to show just how powerful these tools have become, then one is pretty good… If you check the image below, you can see I have a PowerApp that is browsing a SharePoint document library and irrespective of whether the document is Word, Excel or PowerPoint, is loading it as a PDF into PowerApps for preview. Better still, this solution is very much in the citizen developer realm…
A common use-case for this sort of solution is a field worker who needs to access schematic data like drawings or equipment documentation. I have also deployed something similar for quality management and safety apps. In all cases, users had a need to be able to retrieve documents quickly and easily…
How to build this app
This app consists of a simple PowerApp, a SharePoint doclib and a 5 step Flow.
Step 1: Create a document library in SharePoint – in my case I called my library “FingertipsBaby”…
Step 2: Start PowerApps studio and make a blank tablet app.
Step 3: Connect the document library as a data source using the SharePoint connector. Note, although document libraries are not listed by default, you can definitely connect them. Just scroll to the end of the lists and in the last box, type in the name of your document library…
Step 4: On the left side of the screen, add a blank vertical gallery and linked it to the data source.
Step 5: Add a label to the gallery and set its Text property to ThisItem.’{FilenameWithExtension}’. If you check the image below, you can see my three documents listed from my library. Not pretty I know, but this is a 10 minute demo remember?
Step 6: Go to the Action menu and click the Flow icon. in the Data panel that opens on the right, click Create a new flow. A new tab will open in your browser and log you into flow. A new flow will be created using a PowerApps trigger as shown above. Take the opportunity to give your flow a name, such as “PDF Viewer”
Explanation interlude:
Now at this point I feel some explanation is needed. We are about to use a few recent enhancements to Flow and SharePoint. Kudos needs to go to Brian Edwards who made me aware of a powerful new SharePoint API that among other things, generates thumbnails and PDF’s of documents. Brian already has a blog that explains how to do thumbnails – so consider this article a companion one that does PDF’s.
The key to the whole thing is an API called RenderListDataAsStream. This is a very powerful API that has a truckload of goodness, but for now I will keep it simple. I will pass a SharePoint List Item ID of a document to the API and it will give me back a PDF. The API call looks like this:
In the body of the request, I need to specify the data I’d like returned. The parameter is called RenderOptions and looks like this:
{
“parameters”: {
“RenderOptions” : 4103
}
)
What is the deal with the number? Well, the documentation includes a table of different interesting things you can return, which you can do by adding the Values together.
Label
Description
Value
ContextInfo
Return list context information
1
ListData
Return list data
2
ListSchema
Return list schema
4
EnableMediaTAUrls
Enables URLs pointing to Media TA service, such as .thumbnailUrl, .videoManifestUrl, .pdfConversionUrls.
4096
So we are asking this API not just to bring back the data associated with a list item, but also some additional useful stuff. The last entry is particularly interesting as it mentions a mysterious beast known as the Media TA service which I assume means “translation”. Basically what happens is if we total the numbers listed in the above table (4103), we will end up all the data we need to do PDF conversion.
Now at this stage, I don’t want to do an exhaustive examination of the JSON data returned by this API call, but I will call out a couple more things before we get to flow…
This parameter refers to a URL that will convert the list item to a PDF. All you need to do is access this URL. How easy is that eh? Now all of the stuff in curly braces are tokens but they are also returned as part of the API call, so they can be grabbed from elsewhere in the output. For example, {.mediabaseURL} is a few lines up and in my case is:
So if we find each token in the .pdfConversionUrl and replace them, we basically have converted our document to PDF without needing to store a PDF. The document can stay in its native format!
Back to Work…
Okay so let’s deal with this flow.
Step 7: Add an SharePoint action called Send an HTTP Request to SharePoint to the flow. Set the Site Address to the site that contains your document library and set the Method to POST. Set the URI to _api/web/lists/GetbyTitle(<docLib>)/RenderListDataAsStream?FilterField1=ID&FilterValue1=, where <Doclib> is the name you specified for the document library (for example, mine is _api/web/lists/GetbyTitle(‘FingerTipsBaby’)/RenderListDataAsStream?FilterField1=ID&FilterValue1=). On the end of the URI, click Dynamic Content and choose Ask in PowerApps as shown below:
Step 8: In the Body section, paste the following configuration (watch the quotes when pasting from this article):
{
“parameters”: {
“RenderOptions” : 4103
}
}
\
Step 9: Click the Save and then Test icon in the top right. Choose the option I’ll perform the trigger action and click the Save and Test button. Click the continue button and on the next screen, type in the ID number of one of the documents in your library and click the Run Flow button. Your flow will start and you can click Done. Assuming it worked, you will see a green tick of happiness.
Step 10: Click on the Send an HTTP Request to SharePoint action to expand it. We need to grab the output from the API call for the next action. Find the OUTPUTS section and copy the entire contents to the clipboard….
Step 11: Go back to edit mode and add a Data Operations action called Parse JSON to your flow. This action will allow us to make use of the output of the API call in the subsequent flow step.
Click the Use sample payload to generate schema link and paste your clipboard contents into the window and click the Done button. In the Content field, go to Dynamic content popout and choose Body from the Send an HTTP Request to SharePoint action.
Step 12: Add an Initialize Variable action to your flow. Name the variable PDFURL (or something similar) and set it to a string. Now we come to the most complex bit of the flow where we have to substitute the token we examined in the interlude earlier. Be careful here… this is the most likely place to make an error…
In the Value textbox, click the dynamic content flyout and find .mediaBaseUrl from the Parse JSON action…
Next, add the following text to the Value textbox, taking care not to delete what you just added in the previous step. <edit>Please note the image has a quote that is not meant to be there, so ignore it!</edit>
/transform/pdf?provider=spo&inputFormat=
Now we come to a slightly tricky bit. The next bit of content we need is the file type of the document we are dealing with. Now this is formatted as a single value array, so despite there being only a single value, we need to create an expression to handle it. Click the Expression tab and type in the following:
For the uninitiated, this is known as Workflow Definition Language and is well worth learning…
Next, add the following text to the Value textbox, taking care not to delete what you just added in the previous step.
&cs=
Also be super careful here because at the time of writing, the cursor in this textbox can randomly move and wipe out your edits…
Now in the Value textbox, click the dynamic content flyout and find .callerStack from the Parse JSON action…
Next, add the following text to the Value textbox, taking care not to delete what you just added in the previous step.
&docid=
Now we come to another array that needs to be handled. This is the URL of the document we are dealing with. Click the Expression tab and type in the following:
Okay we are almost done… Add an ampersand ( & ) to the Value textbox, and then click the dynamic content flyout and find .driveAccessToken from the Parse JSON action…
Step 13: Add a the PowerApps – Respond to PowerApps action to the flow. Click the Add an output icon and choose Text from the list of output types. Name the output PDFURL and set the value to the variable you created in step 12 (PDFURL).
Ok we completed the flow. Save it and give it a quick review. It should look something like this…
Step 14: Back in your PowerApp, now, select the label gallery you created in step 5. From the Action menu, choose Flow and you should see your newly created flow listed. Click on it to add it to your PowerApp. Once added, the label will partially fill in the OnSelect property to run your flow.
Step 15: Complete the flow invocation by adding a reference to the ID of the document from the gallery by using the following function:
Set(PDF,PDFViewer.Run(ThisItem.ID))
This function will set a variable called PDF to the output from our newly minted flow. When you click on a file in the gallery, the flow will get called. In fact you can try this out before we move on. Press the play icon to test your app and click one of the files. Then go back into edit mode and click the Variables icon from the View menu. You should see a global variable called PDF that has a data type of record. Clicking the variable will bring up further details and if you click on the record icon, you will see the output returned from flow.
If you get this far, that’s great because you are almost home….
Step 16: From the Insert menu, Add a PDF Viewer from the Controls menu. Place it to the right of the gallery and set the Document property to PDF.pdfurl. (if you look closely at the above image you can see that PowerApps has decided that the output of the API is a record with a column name of pdfurl).
Now click on some of the documents… if you did it correctly, you will be seeing PDF’s! Wohoo!
Conclusion
Not bad eh? A 5 step flow has enabled a very powerful use-case and once again showcases how well PowerApps and Flow work together. I should note that there are three recent innovations that have enabled this scenario, namely the recent Send an HTTP request to SharePoint action, the RenderListDataAsStream API and the Respond to PowerApps action.
I need to also give credit to my daughter Ashlee, who actually figured a lot of this out earlier in the week. We will record a video on this fairly soon to accompany this post.
If you got value out of this post please let me know. I’d love to hear of other use-cases of variants on this approach
The ability to generate PDF’s as part of a business process is a common one – mainly driven by compliance. A common way to do this is to create a HTML file and then convert that to PDF.
<TLDR>Go to the conclusion for a summary of the approaches</TLDR>
In Microsoft Flow, there has been options for doing this for a while now. For a start, there are two 3rd party flow actions available that are part of a broad suite of tools for managing and manipulating documents. They are Muhimbi PDF and Plumsail Documents.
Both offerings are simple to set up and use. They also allow some configuration and tuning. At the time I wrote this article, both allow you to specify page size and orientation, and Muhimbi has a couple of extras like letting you make password protected PDF’s. As they are both commercial tools, these will come at a cost which depends on how many PDF’s you produce. But in saying that, the cost is not particularly excessive.
Below I show you both actions in use. Each one is followed by an action to save the PDF into my OneDrive – easy peasy…
But I am cheap Paul!
For those of you who do not have a budget, or are simply cheap-assed, there is also the OneDrive Convert File action. This one works by saving a HTML file to OneDrive (or OneDrive for Business). You then pass that file into the Convert File action and save the resulting PDF. So instead of two steps like the ones above, you have three.
Head over to John Liu’s page for a great example of this technique…
Now there is only one teeny problem with this. Not so long ago Microsoft broke it and as I type these lines, it remains broken but with a commitment to get it fixed…
Now by the time you read this it may well be fixed, but you need to be aware of another limitation with this approach. Unlike Plumsail and Muhimbi, this converter does not honour css page breaks. Therefore your PDF can end up looking pretty ugly as content wraps over pages in ugly ways…
Is there another option? Why bother?
So you might be thinking, okay so just use one of the commercial offerings while Microsoft sorts out a fix? After all, even if it costs you a few backs, you can always go back to the cheap version later.
I indeed attempted this but I had an issue with my Flow that precluded it. I had no problem signing up for both Muhimbi and Plumsail, but when I added the actions to my flow, I was met with this type of error. My flow simply did not like using 3rd party connections it seemed.
Unable to process template language expressions in action ‘Convert_HTML_to_PDF’ inputs at line ‘1’ and column ‘2336’: ‘The template language expression ‘json(decodeBase64(triggerOutputs().headers[‘X-MS-APIM-Tokens’]))[‘$connections’][‘shared_muhimbi’][‘connectionId’]’ cannot be evaluated because property ‘shared_muhimbi’ doesn’t exist, available properties are ‘shared_sharepointonline, shared_onedriveforbusiness’. Please see https://aka.ms/logicexpressions for usage details.’.
Now this error is the subject of an open case with Microsoft so I will update this post when I get an answer. <update> It turns out that for flows with a PowerApps trigger, you need to disconnect and reconnect it to PowerApps to start working</update>. But in the meantime I had a deadline and had to demo PDF creation to a client. So I decided to make an Azure function and call it from flow – after all it sounded like a perfect scenario for that technology right?
Now I won’t cover the Azure function stuff in depth here, except to say I tried a heap of HTML to PDF approaches and not a single one worked properly. Eventually I worked out that Azure functions restrict the use of GDI+ libraries. Quoting from the linked article…
For the sake of radical attack surface area reduction, the sandbox prevents almost all of the Win32k.sys APIs from being called, which practically means that most of User32/GDI32 system calls are blocked. For most applications this is not an issue since most Azure Web Apps do not require access to Windows UI functionality (they are web applications after all).
However one common pattern that is affected is PDF file generation
Eventually though I was able to ascertain that if you provision your azure functions using an app service plan instead of a consumption plan, it will work. The reason for this is the latter runs on dedicated virtual machines.
Of course now you are up for hosting costs for your app plan. Unless you already have an Azure function app provisioned for other purposes, this is no longer free.
Once I got past the Azure function issues with GDI support, I was easily able to find and use a pre-existing HTML to PDF function found here. This uses a tool called wkhtmltopdf which is a pretty powerful PDF generation library. I simply added the necessary files and configuration and was able to test it successfully in minutes.
Finally all I needed to do to call this function was to create a HTTP action in Flow like so…
Yay! I had my PDF’s!! Even better, this approach does not have the page break issues that the built-in one does!
Conclusion (and comparison)
So here is a little table that summarises the approaches…
Method
Cost
Page Breaks
Features
Complexity
OneDrive Convert File Action
Free
No
Basic
Low
Plumsail HTML to PDF action
Not Free
Yes
Medium
Low
Muhimbi HTML to PDF action
Not Free
Yes
Medium+
Low
Azure function
Not Free1
Yes
Advanced
Medium2
1 You will have to pay for the azure function app subscription, but many orgs will have one already so might be very low.
2 I marked this as medium if you are doing basic stuff, but if you want to do stuff like set page size and orientation, you are having to edit code directly so could be classified as High.
Now for my real use-case, I would likely use one of the commercial offerings, but if the organisation was going to do a lot of PDF generation, then the Azure function approach could be quite cost effective. Additionally, expanding the code to deal with additional options might also be justified.
I think the key point is that I was able to quickly work around this issue and deliver good outcomes for my client. So they are not adversely impacted while I wait for the various issues to be resolved.
Hi and welcome to the third article that describes how to make a PowerApps-based activity feed based on SharePoint search results. If Google’s search algorithm has landed you here for the first time, then I suggest going back to parts 1 and 2 for background and context. What we are building can be seen in the picture below highlighted red..
Now there are 5 parts to this solution and in this third post, we are in the home stretch because we have done the first three steps and we are halfway through part 4.
I covered parts 1 and 2 in the first post where we created a Result Source in SharePoint and and tested a PowerShell script that uses it to bring back the latest 20 search results. In the second post, we created and tested an azure function, and just deployed our custom connector as shown below:
Before we rush off to PowerApps to bask in our awesomeness, let’s test our custom connector first. Click the pencil button to edit your freshly minted connector. Using the breadcrumb, navigate to the Test menu.
You will be presented with a Test operation screen and (very likely) a prompt to create a connection. While newbies might find it weird to ask for a connection just after we just made one, it is worth paying close attention to the terminology used. We actually created a custom connector, not a connection. The PowerApps team describe it like this:
Data is stored in a data source, and you bring that data into your app by creating a connection. The connection uses a specific connector to talk to the data source
Therefore, it stands to reason that to test a connector, one has to create a connection. So let’s do that right now by clicking the + New connection button. On the resulting confirmation dialog box, click Create.
Now you will be redirected to the connections screen. This is somewhat counter-intuitive given at first, since we actually wont do anything with the connection from this screen, but if it makes you feel good, feel free to look for a new connection with the same name as your connector as shown below. This means all went to plan…
Using the left side navigation, head back to the custom connections screen. Edit your connector once again, and navigate back to the Test screen. This time the Test Operation screen will show your new connection listed…
Scroll down and you will see an Operations section. The code query string parameter that we worked with in part 2 is listed.
Note: It should be greyed out and not editable. If it is editable, you have likely forgotten to change the visibility parameter when we created the custom connector in part 2.
Click the Test operation button to give it a whirl. After a few seconds, you should see a successful response. Looking in the body of the response, you can see the Json search results produced by your Azure function. Yay!!
Part 5 – Testing in PowerApps
Now that we have created a connection and used it to test our custom connector, it is time to move to PowerApps. To keep things simple, lets build an app from scratch to show this working. In PowerApps studio, create a blank phone app and then follow the steps:
1. From the View menu, choose Data sources and click the Add data source from the Data panel. From the list of connections, find the connection we created moments ago to test the connector. Click it and it will be added to the app.
Note the name of your connector matches the Postman collection we created in part 2 of this series. Make a note of this because we will need it momentarily…
2. From the Insert menu, choose Icons and choose the Reload icon.
Select the refresh icon you just created and choose the OnSelect property. Type in “ClearCollect(Feed,” and then enter the name of the data source you just added (mine is called “CATalogue”). The intellisense in PowerApps will also present the name of your function that you specified back in part 2 when creating the postman collection. In my example it was called “GetMewsFeed”.
Note: If you are presented to provide a code as a parameter to your data connection as shown below, you missed an important step in the custom connector setup. Recall in part 2 I mentioned that the code parameter in the custom connector had to be changed from none to internal. For now, you can add the same code that was generated as part of the Azure function URL, otherwise update the custom connector.
3. Click the new icon to trigger a data refresh and then navigate to Collections from the File menu. You should see a collection called Feed with some of the data returned. If you see a table of data then congratulations! You have successfully queried SharePoint search and returned the data to PowerApps via an Azure function.
The columns that are of interest to us for the purposes of this post are:
Title
ListID
ModifiedBy
LastModifiedTime
OriginalPath
So now that we have gotten some data, let’s now show how we can display it in the form of a data feed.
4. From the Insert menu, choose Gallery and pick a Blank flexible height gallery. In the data panel, choose the Feed collection from the Data source dropdown.
5. Ensure your Gallery is still selected via the left side navigation. Click the pencil icon inside the gallery and then from the Insert menu, choose Label. This label will bind to a column in your data source and you should see something like the second screen below, where data is repeated down the page. If the label control is still selected, the Text property will be set to something like ThisItem.Author.
Modify the Text property of the label to “Updated by ” & ThisItem.ModifiedBy & ” on ” & ThisItem.LastModifiedTime. The result is a line that shows who modified the item in the feed and when they modified it. While you are here, rename this label control and call it something more meaningful. In PowerApps I use Hungarian notation as it makes it easier to understand complex formulas later. Thus I called this one lbWhoWhen. Finally, resize the gallery to fit the screen and drop the font size of the label so everything fits on one line…
6. Add another label to the gallery (remember to use the pencil icon to ensure the new label control is added to the gallery and not the screen). Place it below the label you created in step 5 and set it’s text property to ThisItem.Title. Adjust the font size and position it appropriately. Rename this label to something meaningful (I used lbTitle ).
7. Add an icon to the screen and choose Rectangle from the Shapes section. Resize it so that it looks like a horizontal line (Set the Height property to 1) and change its colour to grey either via the toolbar or via setting the Fill property to “LightGray”. Also rename it to something like Separator.
Preview the app and the feed should start to take shape…
Hopefully you can see by now that we are more or less done, as we are now moving into aesthetics in terms of how our feed is to look. So I will round out this post by showing you a couple of tricks that I think make this feed more interesting…
6a. Pimping your feed (easy)
If you look closely at the sample data I used to build this feed, it includes images as well as list item content. In fact, to remind you of where we started, I mentioned that my daughter wrote an app called CAT-alogue which used three SharePoint lists/libs: There was a list called Cat Directory, a list called CatImageRegister and a library called CatImages.
So let’s make the following enhancements:
If the search results contain a Description field, use that instead of the Title field (the Cat Directory list utilises the built-in SharePoint site column called Description, which happens to be a managed property in SharePoint search)
If the search result is the image library, display the image rather than the file name.
Handling description requires a couple of changes to our Title label. First, we need to set Auto height to On because the description field is multi-line. This is easiest done by toggling it to On via the right-side properties panel when selecting the label as shown below:
Next, change the Text property in the label to If(IsBlank(ThisItem.Description),ThisItem.Title,ThisItem.Description). This tells PowerApps to display the Title field if no description has been crawled. The effect should be immediate…
But this is a flexible height gallery, so let’s take advantage of this. We will now set the position of our separator rectangle to be based on the height of the Title/Description label. Remember this label is now set to auto-height… To do this you will need to take note of the name of your Title/Description label. Mine is called lbTitle.
Set the Y property of your rectangle to: lbTitle.Y + lbTitle.Height + 20. Previewing this change should result in a change to your screen for the better…
6b. Pimping your feed (less easy)
Right! So what we can do about displaying images in the feed? Turns out this is one of those examples that might seem easy, but is actually quite tricky and also not particularly bandwidth efficient either. It also has a lot to do with how you set up your data in SharePoint, so some refresher is needed before we start.
First up, Ashlee’s CAT-alogue app is structured with 3 lists. There is a list called Cat Directory, a list called CatImageRegister and a library called CatImages. The second list is the one that matters here, as each time a photo is taken, the metadata is stored in this list rather than the CatImages library. It then links to the actual photo in CatImages as shown below. Note that the title field for CatImageRegister is the name given to the photo in CatImages.
Why set it up this way you ask? Well for a start, PowerApps cannot connect to libraries yet, and these days, PowerApps is smart enough to be able to retrieve images from a list like this. So let’s take advantage of this…
Also some more useful nuggets of context: another thing we can take advantage of is the built-in SharePoint search property called ListID. Way back in Part 2 when we did the PowerShell script, I included a line that specified some search managed properties to be returned that are not by default. The line was:
Specifically, the property of ListID is what matters here. This property returns the unique ID of each list. Can you see where I am going with this yet?
From the Insert menu, choose Media from the toolbar and insert an Image control into the gallery. Rename it to CatPhoto and resize it and place it under the first label.
Set the Visible property to only display if the list ID of the feed item is the CatImageRegister list. It will be something like: If(ThisItem.ListID=”11d474d0-5725-4ec5-b273-8bb09a3e097e”,true,false). Of course the ID you need to specify depends on our setup. This should now hide the image control when the ListID does not match my CatImageRegister list.
Next, let’s get the image control to display the photo itself. To do this, we will connect to SharePoint using the native PowerApps connector. From the View menu, choose Data Sources and add a SharePoint data source. Choose the SharePoint list that holds a link to your photos (in my case, CatImageRegister).
Now set the Image property of the Image control to something like this: LookUp(CatImageRegister,Title=ThisItem.Title).CatImage. Although things look ugly, you should see the photos…
So what we did here was utilise the PowerApps Lookup function which returns first record in a data source that satisfies a formula. In my case I wanted to bring back the record where the Title field in CatImageRegister matched the Title field for each row in the feed gallery. From here, I specified that I specifically wanted the CatImage property and voila!
Next, we make the feed look less sucky by making the position of the Title/Description label more dynamic. If an image is displayed, we will reposition the Title/Description label to the right of the image. To do this, set the X property of the Title/Description label to: If(CatPhoto.Visible,CatPhoto.X + CatPhoto.Width + 10,0). This tells PowerApps to shift the label to the right of the image control when it is visible and sets the X position to 0 when its not.
Now let’s set the Y position. In this case, if the image control is visible, let’s vertically align the label to the middle of the image control. But if the image control is hidden, let’s set the label to positioned relative to the top label. To do this, set the Y property of the Title/Description label to: If(CatPhoto.Visible,(CatPhoto.Y + CatPhoto.Height) / 2,lbWhoWhen.Y + lbWhoWhen.Height + 10).
Nice… the feed is looking a lot tidier…
Now let’s fix the separator rectangle we created earlier. Here, if the image control is visible, the Y position of the separator should be offset from it, however if the image control is hidden, then it should be based on the Title/Description label. To do this, set the Y property of the separator to: If(CatPhoto.Visible,CatPhoto.Y + CatPhoto.Height + 20, lbTitle.Y + lbTitle.Height + 20).
Preview the app and you should have yourself a nice feed!
Conclusion
At this point, I think we have covered enough to give you a really good feel for how PowerApps an play nicely with SharePoint search and Azure functions. While I fully accept this is an advanced scenario for the typical citizen developer, it is still a very low-code scenario and working knowledge of Azure functions and PowerApps/Flow custom connectors is very handy indeed.
I think it also shows that these platforms are highly flexible. This activity-feed scenario was one of those tricky scenarios that in the past, might have been added to the “too-hard” basket or resulted in custom development work.
Finally, I have recorded a series of videos to accompany these posts. I split the videos up into easy to consume chunks. The first one can be found below:
Hi and welcome to the second article that describes how to make a PowerApps-based activity feed based on SharePoint search results. Although I did this as part of a large real-world client project, because of confidentiality considerations I am utilising one of my daughters PowerApps to illustrate the idea. Her CATalogue app which is shown below, has a feature she called the “Mewsfeed” which displays a list of cat-related activity on a SharePoint site collection, in order of recency…
As a reminder, the solution approach is to have PowerApps call an Azure function via a custom connector. The Azure functions runs PnP PowerShell to execute a search against a SharePoint Result Source. You can read the first post if you want to know more about why I utilised this method.
I covered parts 1 and 2 in the first post where we created a Result Source in SharePoint and and tested a PowerShell script that uses it to bring back the latest 20 search results. Now it is time to do steps 3 and 4. That is, create an Azure function and custom connector so PowerApps can run the script…
3. Creating the Azure function
For the uninitiated, Azure Functions allow you to take your dodgy scripts and turn them into web services. In other words, I can set up PowerApps up to run the search script from part 1 and retrieve the results for display. For this to work, we need a user account to connect to SharePoint. Thus, if you do not have a service account to use, go ahead and create one now, making sure you grant it access to your SharePoint site.
Also, I expect that making an Azure function might be new to some readers. For the sake of brevity, I am not going to exhaustively cover this end-to-end. I will assume you have an Azure subscription, and have created an Azure Function App. The type of function you need is a HTTP trigger running PowerShell as shown below. So give your function an appropriate name and click Create.
In a short time, your function will be provisioned with some skeleton PowerShell code. Take a quick look at this default code because it is useful to understand for the future. Line 2 shows that all of the data posted to this webservice is stored in a variable called $req which is assumed to be Json format. The Get-Content cmdlet reads the content of $req and converts it from Json into a PowerShell object called $requestbody. This is handy knowledge, (despite the fact that for our needs PowerApps will not be sending anything to this function) because it means you can create functions that behave in different ways based on what data you to it send when calling it from PowerApps.
Now that we have seen the default code in a freshly minted function, we have an additional task to complete before we start modifying it. We have to upload the PnP PowerShell cmdlets that among other things, contain the Submit-PnPSearchQuery command that we learnt about in part 1. The easiest way to do this, is to install the PnP PowerShell module to your PC, and then copy the entire installation folder up to your Azure function app. To install PnP PowerShell to your PC or update to the latest build, follow the documented instructions (which usually amounts to typing in “Install-Module SharePointPnPPowerShellOnline” in a PowerShell admin session).
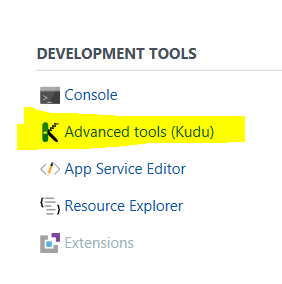
Once PnP PowerShell module are installed to your PC, we need to upload it to the Azure Function App. To do this, I use the Kudu tool that comes built-in to Azure functions. You can find it by clicking on your Azure function app and choosing the Platform Features menu. From here you will find Kudu hiding under the Development Tools section.
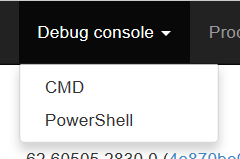
When the Kudu tab loads, click the Debug console menu and create a CMD or PowerShell console (it doesn’t matter which). We are going to use this console to copy up the PnP PowerShell components we just installed locally. Focusing on the top half of the screen, click on site and then wwwroot folders. This is the folder where all of your azure functions are stored (you will see a folder matching the name of the function we just made). What we will do is install the PnP modules here, so it can be used for other PowerShell-based functions that you are sure to develop .
Click the + icon to create a folder here and call it “Modules”. From here, drag and drop the PnP PowerShell install location from your PC to this folder. In my case PnP was installed into C:\Program Files\WindowsPowerShell\Modules\SharePointPnPPowerShellOnline\2.19.1710.1 on my PC. Thus, I copied the 2.19.1710.1 folder and all of its content here.
Once the copy is done, click the folder to confirm the PnP modules are there…
Now let’s turn our attention to the script itself which actually looks like this…
Line 1, via the Import-Module cmdlet, enables us to use the PnP PowerShell cmdlets we just uploaded.
Lines 2-7 are about setting up the credential to log into SharePoint online. This uses the service account I mentioned earlier
Lines 8 and 9 set up and execute the query against the SharePoint Search Result Source created in part 1. Line 8 specifies the fields we want to return in an array which is then specified in line 9 via the “–SelectProperties $returnproperties” parameter. After all, no point wasting bandwidth sending back data to PowerApps that we are not going to use…
Line 10 and 11 format the results into Json, ready to send back to PowerApps.
Handling passwords
An important consideration here is addressing the issue of passwords. This is where the $env:PW comes in on line 3 of my code. You see, when you set up Azure Functions application, you can create your own settings that can drive the behaviour of your functions. In this case, we have made an environment variable called PW which we will store the password to access this site collection. This hides clear text passwords from code, but unfortunately it is a security by obscurity scenario, since anyone with access to the Azure function can review the environment variable and retrieve it. Therefore a better (but not foolproof) solution is to use Azure Key Vault via this method described by Darren Robinson, but this will take us too far afield from an already long article.
In any event, you will find the ability to specify an environment variable under the Applications Settings link in the Platform Features tab. Scroll down until you find the “App Settings” section and add your password in as shown in the second image below. Calling the new setting PW is optional – just make sure you update line 3 of the PowerShell code to whatever name you choose.
Right so it’s now time to test our function. Simply click the Save and run button, and if all goes to plan, you will see a “function completed” message in the logs and a status of 200 OK in the Outputs section of the screen, along with a heap of Json. Don’t proceed further until you are seeing this output. If it does not work here, it certainly will not work in PowerApps!
4. Creating the custom connector
Now we come to the area that is most scary-looking and error-prone, which is to create a file that describes the Azure function in a way that PowerApps can use. In a nutshell, PowerApps needs to be told the type and format of data to expect from our new Azure function.
There are two supported ways to do this. Either generate an OpenAPI file or a Postman Collection. In previous blog posts I have taken the OpenAPI route and used the Open API Spec Generator (specgen) to create the custom connector. This time, for the sake of illustrating the alternative, I will use the Postman method to do it instead. For the uninitiated reading this, Postman is a powerful and versatile tool that helps developers make and debug HTTP requests. Like Fiddler, I recommend anybody that has to work with or debug webservices to keep it handy.
So lets get down to business.. here are the steps to make the collection we need.
1. In your Azure function, find the Get function URL link, click it and copy the URL to clipboard. This is your web service endpoint that PowerApps will talk to.
Note: The structure of an Azure functions URL is important to understand. Take close note of the code parameter as you will need it later when troubleshooting…
https://[appurl].azurewebsites.net/api/[function name]?code=[ a string of characters ]
2. Start Postman, and on the Builder tab, select POST for the HTTP method, enter the request copied URL for the function and set Authorization to No Auth. Click the Send button and wait for the reply…
The response field contains the full response from the API. If all goes to plan, you will see the same Json from your successful test of the PowerShell script earlier. If you get an error, go back to the Azure function and check the log screen to see what happened.
3. Save the request to a collection by clicking Save. On the next screen, give the request a name and description. Take care with this name and description, as the custom connector uses these values for the API operation summary and description which will be used in PowerApps (more on that later). In my example I saved the request as “GetMewsFeed”.
4. Further down the dialog box, click + Create Collection and provide a collection name. Note, also be careful here because the custom connector uses whatever you type here when you call the API. In the example below, I called it “CATalogue”. Click the tickbox and then click the “Save to CATalogue” button (the name of the button obviously depends on your collection name).
5. Unfortunately we have only saved the HTTP request made to our Azure function so far. This is insufficient, because we need the response with the Json search results so that we can create the custom connector that PowerApps needs. To add the response to the collection, find the Save Response button to the right. Click it, give your response a name and save it (I called mine “GetMewsFeedResponse”).
6. Next we clear all headers from the collection. Microsoft states that:
“before you export the collection, remove [any] content type and security headers – these were required to make API requests, but they are handled differently in the custom connector.”
Who am I to argue eh? So to to this, find your way back to the API call, rather than the example we just saved. If you are still in the example screen, you will find your API in the navigation above the example name as shown below. Click it to get back to your API call.
In the Headers tab, hover over each header, and choose the X next to the header to remove it. Choose Save to save the collection again.
7. Now we are ready to export the collection for PowerApps. Choose the ellipsis (. . .) next to the collection, then choose Export. Choose the Collection v1 export format and save the file.
8. Now it is time to import our newly minted Json file into PowerApps to create a custom connector. Sign into PowerApps, navigate to Custom Connectors and click + Create Custom Connector and then choose Import a Postman collection. Choose the file we saved in the previous step, give it an appropriate name and click Continue.
Here you will see the first implication of naming decisions you made in previous steps. You will be presented with a General Information screen, which as can be seen below, shows a description based on the name of the collection that you specified in step 4…
Click the Continue button and you will be taken to the Security tab. We have nothing to modify here, so click Continue to move to the Definition tab, which is where the important stuff is. What you should notice about this screen is the Summary, Description and Operation ID settings matche what you typed in when exporting from Postman in step 3. You have an opportunity here to modify this if you wish…
There is a super-important step here! Note how the above image shows a code parameter in the Query section. This has been inferred from the Azure function URL which we examined in step 1. We need to make a change to this configuration, as well as double check things. In my testing, Postman collections do not always capture the code correctly, so click the ellipsis (…) and choose Edit so we can make sure it is right.
Comparing the Default value for code in the custom connector to the URL from the Azure function portal below, we can see a discrepancy. The former seems to have stripped off a couple of characters, so make sure that the code parameter in the custom connector matches the azure function URL exactly.
Additionally, change the Visibility section from none to internal. If you do not do this, PowerApps will ask users to add the code when they use this data source. In some enterprise scenarios this is a desirable behaviour, but not in this case…
Now that you have made your edits to code, click the Back button. Let’s now verify that we are sending useful data to PowerApps. Find the Response section as shown below and click on the box that containing the number 200.
You will now see what has been done with the Postman collection. All of the Json from the search result has been used to create a payload. Each and every piece of search data that is returned by the PowerShell script is shown. Clicking on the ellipsis for any of them allows you to review the settings and change data type if necessary (eg from a integer to a string).
In my case, we are not going to modify the schema that PowerApps has detected. However, there is a possibility that in your case, you might have to if the data types for the parameters have been incorrectly inferred. So let’s go ahead and create our connector by clicking the Create Connector link.
Assuming all goes to plan, you have a Shiny new connector!
Right! If you have gotten through all that then well done! While all of this might seem a bit foreign and intimidating, rest assured that after doing 1 or 2 of these, the whole process is quite straightforward in terms of building a connector. Most of the hard work is figuring out how to call webservices properly, rather than creating the connector itself.
Phew! I think that is enough for now. In the next and final post, we will test this connector to make sure it works and then add it to a sample PowerApp. Until then, thanks for reading…
In a recent project, I developed a portal for the Project Management function of a global multinational. One of the key design principles we took into the engagement was not to simply make an electronic version of a Project Management manual. Instead, the solution had to be a source of new and timely information that would keep people coming back, as well as actively contributing.
One of the many things done to achieve this goal was to create a PowerApp to compliment the portal. This app, among other things, allows users to submit project tips, lessons learnt, participate in pulse surveys, and receive notifications when particular topics (for example risk management or project controls) have new or updated information. A key feature of the app is an activity feed showing the latest information across the portal. The basic idea is shown in the wireframe below, where under the main navigation represented by the round icons, users can view and click on any new activity that interests them. Activity reports include new or updated content, newly submitted tips, photos, and lessons learnt.
The data for this application is stored in SharePoint, so activity occurs across multiple lists/libraries. Therefore to produce an activity feed, PowerApps needs to talk to SharePoint search. Search, via the concept of a Result Source, allows us to specify exactly what lists and libraries are used in search results. This is important because we also want to exclude some SharePoint content from the feed. After all, if you maintain a list that is used to store and manage configuration data, it’s unlikely that you want blast out changes to that list to all users via an activity feed.
Result Sources also allow us to specify the ranking model on the results, which for an activity feed is usually based on date modified (i.e. recency rather than relevance).
Now I can’t show you the actual solution for confidentiality reasons, but luckily for all of us, my cat-obsessed daughter Ashlee (of fidget spinner fame), created a PowerApp called the CAT-alogue which is shown below. So in this post, I will explain the approach to the activity feed using the CAT-alogue via a feature called the (ahem) “Mewsfeed”…
The Solution
Below is a diagram of the approach I ended up taking.
As you can see, the main components are:
A custom SharePoint Search Result Source
An Azure function (leveraging PnP PowerShell)
A PowerApps custom connector
Now I should say this was not my original approach. I started off assuming that I’d query SharePoint search via Flow, using HTTP actions to talk to the SharePoint Search REST webservice. This approach has worked well for me when I needed to leverage unsupported SharePoint functions in PowerApps or Flow. But there was one major issue that was search specific. That is, when you talk to SharePoint REST API using Flow, you need to register and specify an App Principal for authentication. Now this is supported in SharePoint online search, but has an implication. There is no security trimming of search results. Quoting from the referenced article…
When you are using SharePoint Online search APIs with app-only permissions, you will need to request full permissions to the tenant when you are registering the add-in/app for the tenant. This will grant needed permissions to query information from the Office 365 tenant without security trimming applied.
For some scenarios this might be fine, but in my case, the idea of an app being able to query any/all SharePoint content in the entire tenant was never going to fly. My alternate approach uses the more traditional technique of a dedicated user account to access SharePoint. Thus, if the account only has access to this site, we have the search security trimming we need.
Right! Lets get down to business then. I have broken this into 5 parts across a few articles:
By the way, don’t let the length of this series put you off. I have tried to explain things as best I can with liberal use of screenshots.
1. Setting up SharePoint Search
The first step is to make a SharePoint result source which specifies the content that will be viewed in an activity feed. In my developer tenant, my daughter’s CAT-alogue app uses a list called Cat Directory, a list called CatImageRegister and a library called CatImages. If any activity happens in any of these lists, we want to see it on her app.
I decided to create a Search result source, using the List IDs as the filter. Note that this is not the only approach to take for this result source, but will suffice for my needs. To get the IDs of the lists in question, I used PnP PowerShell. After connecting to my tenant, I used the Get-PnPList command to find all lists with the word “Cat” in their Title like so…
PS C:\Users\paulc> get-pnplist | Where Title -Like "*Cat*"

Title                               Id                                   Url
 -----                               --                                   ---
 Cat Directory                       2b4ee9b8-714e-464d-a8ae-ab379776c826 /Lists/Cat Directory
 CatImageRegister                    11d474d0-5725-4ec5-b273-8bb09a3e097e /Lists/CatImageRegister
 CatImages                           c5b56dac-b7f1-4519-b7e6-ac688ac158dc /CatImages
 Notification List                   3a649e3a-6473-4f73-b856-31740368369c /Notification Pages
 Suggested Content Browser Locations e6e70c65-096b-4733-ad03-c86e25708f05 /PublishedLinks
I strongly suggest you use this method to get to know the awesomeness that is PnP PowerShell if you are new to it. But for the holdouts who think PowerShell is for developers, if you want to get the list ID’s via the SharePoint UI, you just need to go to List Settings and check the URL as shown below.
Once you have assembled your list ID’s, you can create a result source. Go to Site Settings > Site Collection Administration > Search Result Sources and choose to create a New Result Source. Give your result source a name. Ashlee made me call it “Mewsfeed” – honest!
Scroll down and find the Launch Query Builder button. From the Property Filter dropdown, choose –Show all managed properties– and find the ListID property. In the property filter, choose Contains and choose Manual Value from the Select Value dropdown. Specify the ID of one of the lists as shown below:
Repeat these steps for each list ID and click the Test query button to validate you are getting results.
At this point, if you look closely at the search results, you will likely see items that should not be included in an activity feed. In the picture below I’ve demonstrated this by highlighting some results I’d rather not see. To address this, let’s refine the result source to only bring back list items, rather than the list views themselves. From the Property Filter dropdown, choose contentclass property. In the property filter, choose Equals and choose Manual Value from the Select Value dropdown. Set the value to “STS_ListItem_GenericList” as shown below:
Now re-test your results. You should see that the unwanted pages are now excluded from results. Go ahead and save your result source with an appropriate name.
2. Querying the search index via a PnP PowerShell script
Now that we have our result source, we need to write a PowerShell script to query it. First up, we need to get the ID of the result source we just created because it is needed by the PowerShell cmdlet we are going to use. To do so, select the result source and grab the ID from the URL as highlighted below…
The ID has been encoded, so the best step is to use an online decoder to get the ID in the right format. Bing has one built in so just paste the ID into it and click Decode.
Next step is the script which, thanks to the PowerShell PnP project, is really simple since PnP includes a dedicated command that we can use, namely Submit-PnPSearchQuery. If you are using PowerShell interactively, a search can be performed in a couple of lines: E.g.
The first command connects to the tenant and will prompt for credentials.
The second command performs a wilcard search (-Query “*”), returns 20 results (-MaxResults 20) and specifies the result source set up earlier (-SourceId “0bfa50f5-041d-40af-a6e1-8b01124eca69” ). We sort the results via recency (-SortList @{“LastModifiedTime” = “Descending”} and instruct the command to strip out extra detail and bring back just the results (–RelevantResults).
The third command converts the output to Json format and stores it in the $output variable, which is important because this is what we will send back to PowerApps.
To test that this is working as expected, I compared the results of a more simplified search. In the example below I have searched for the term “Jessica” – the name of one of Ashlee’s cats. First, I tested via the Result Source in SharePoint by returning to the query builder, navigating to the Test tab and clicking Show more…
I entered “Jessica” into the search term and found 11 relevant results…
Now in PowerShell we see the same search for “Jessica” and take a peek at the Json. Sure enough, we have the same 11 results as the Result Source test above.
So now that we have confirmed we are executing the correct search, we need to go and make ourselves an Azure function to run the script. We will do this in part 2…
Tonight I had an issue where I was unable to log into one of my client’s PowerApps tenant using PowerApps from the app store. I tried with several android phones and all had the same issue (although iPhones did not). The symptom was that after entering my email address, I was redirected to a loading screen for a short time and then returned to the logon page. While the PowerApps client was not playing ball, I was able to connect to PowerApps site via the Chrome browser on the device.
Now my client uses their own ADFS, so I felt the issue might be related to local configuration or a certificate problem. After doing a little bit of reading, I came across this article, which let me to the SSL analyser tool at ssllabs.com. As the article predicted, when I ran SSL analyser against my client’s ADFS URL, my issue was related to certificate paths.
The article states that is you see “extra download” in your certification paths as shown below, Android will have an issue with it. Quoting from the support article: “Android does not support downloading additional certificates from the authorityInformationAccess field of the certificate. This is true across all Android versions and devices, and for the Chrome browser. Any server authentication certificate that’s marked for extra download based on the authorityInformationAccess field will trigger this error if the entire certificate chain is not passed from Active Directory Federation Services (AD FS).”
Now the article talks about a change to your ADFS configuration to address this issue, but I also wanted to make it clear that this can be addressed (at least for PowerApps) on a per-device basis. In my client’s case, the problematic certificate was an Entrust certificate called Entrust Certification Authority – L1K.
All I did to fix it was using my phone, visited the Entrust root certificates page and clicked on the “Entrust Certificate Authority L1K” link. The certificate was downloaded and when I ran it, I was presented with a screen to give it a display name and confirm it was to be used for “VPN and apps”.
Once I did this. I could log into PowerApps again.
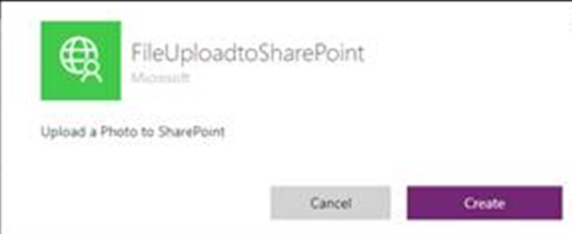
Ever since I posted a video on how to use Flow to upload photos to SharePoint from PowerApps, I get a lot of requests for help with the most mysterious bit – the swagger/openAPI file…
To save you all much pain and suffering, here is a sample file that you can use to get started.
In this post I am going to assume you have watched the video and understand the intent. Here I will simply annotate the file with some notes that will help you customise and extend it for your own purposes.
Note 1: This only works for a HTTP request trigger in Flow
Flow is capable of being called like any other web service. To do so, you have to use the following trigger.
Note that the trigger states clearly “URL will be generated after save”, so the first thing to do is generate that URL…
Once you have done so, it will look like this:
If we break the URL it down, you will see:
A domain something like <location>.logic.azure.com.
A URL path of “/workflows/<instance ID>/triggers/manual/paths/invoke” which that identifies your specific workflow ID. Take note of this as you will need it.
A parameter called api-version with a (at the time of writing) value of “2016-06-01” – eg api-version=2016-06-01
A parameter called sp with an encoded value of “/triggers/manual/run” = eg sp=%2Ftriggers%2Fmanual%2Frun
A parameter called sv with a value of 1.0 – eg &sv=1.0
A parameter called sig with a random string value. eg sig=PeZc-ljtjmJhsz00SD78YrwEohTqlUxpQuc95BQQuwU
In combination, the URL looks as follows with the important bits in bold…
The bits in bold you will need to know, because they need to be added to the OpenAPI file. Why? because this file is what PowerApps uses to construct a HTTP call to your flow.
So let’s look at the Swagger File…
Note 2: Host, basePath and Path
Open the Swagger file and look for the section called “host”… Replace the section labelled [enter Flow URL here] with the URL from the flow Trigger I mentioned above. eg:
prod-23.westus.logic.azure.com or prod-01.australiasoutheast.logic.azure.com
Note: The image below shows the port number shown (443), this no longer works so omit it altogether as shown in my 2 examples above.
From this…
To this…
Now find the section labelled [enterid here]. This is where the workflow ID goes… so from this:
To this..
Note 3: Double check the sv, api-version and sp parameter sections.
All of the parameters expected by the Flow are specified in the OpenAPI file. You will see it in the “parameters” subsection of the “post” section…eg
Now for reference, each parameter section has:
name: The name of the parameter as it appears on the URL
in: specifies whether this parameter is in the query string, header or body. All of the default flow parameters are in the query string.
default: This is the value to check!! If Flow is updated in future it is very likely this parameter will reflect it. Please do not come to me for support if you have not checked this!
required: States that this parameter MUST be passed. PowerApps will not allow you to call this Flow without specifying this parameter
x-ms-visibility: this basically says “use the default value and don’t show the user”. So in effect, the above “required” condition is met, but PowerApps will not ask the user to enter it.
type: is self-explanatory. It tells PowerApps that the parameter is a string.
The sig parameter is like an API key or a password. You need to paste it as the default value in your file like so…
Note: It is possible to set this up in PowerApps so that it has to be entered when a user adds a datasource. However I am not covering that here.
Note 5: Add (and remove) your own parameters…
This swagger file makes the assumption that PowerApps is going to send a file name for the photo, as well as a description, latitude and longitude. Note that all fields are set to required, but none have default values and the x-ms-visibility parameter is not specified, meaning that PowerApps will prompt the user to enter them.
Using the examples as a guide, add or remove parameters as you see fit.
Note 6: Set your function call names appropriately…
Going back to the top of of the file, update the description to suit the task you are performing. Pay special attention to “Title” and “operationId”, as PowerApps uses these. For example, based on the image below, you will be calling a function called PhotoHandler.UploadPhoto() from PowerApps.
At this point you should be able to save your file and register it as a custom connection and call it from PowerApps.
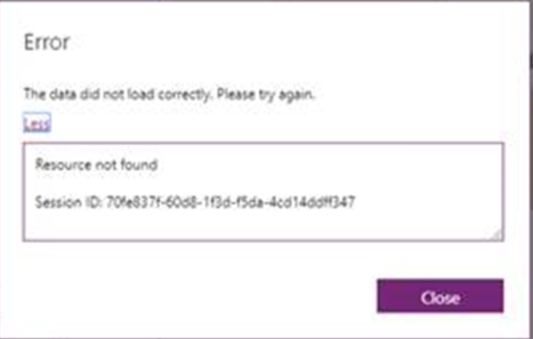
Note 7: Do not use the word “SharePoint” in your custom connector name
Believe it or not, if you name your custom connector with the word “SharePoint” it will confuse PowerApps completely. For example, consider this custom connector:
Now look what happens when you try to use it… you get the message “The data did not load correctly. please try again”, with a sub message of “Resource not found”…
The solution? Name your connector anything, so long as the word SharePoint is not there 🙂
Parting notes…
If you intend to send data back to Flow, you will also have the define the schema for what is returned to Flow in the responses section. I have not added any custom schema in the sample swagger file and discussing it is outside the scope of this article. But in case you are interested, to get you started, below is an example of calling Microsoft’s QNAmaker chatbot service REST API and sending the results back to PowerApps.
I have been recording various videos over time of some advanced PowerApps and Flow concepts/solutions. All of these are either workarounds for current limitations in PowerApps or Flow or work I have done with my daughter, Ashlee. I have listed each here with explanations…
This video outlines a robust and flexible method for uploading photos from PowerApps to SharePoint. At the time of writing, it is the best option despite having to create OpenAPI files.
This video demonstrates a simple receipt tracker that uses the OCR capability of Microsoft cognitive services to find price information from a scanned receipt.
This video shows the high level view on how Flow can be used to set SharePoint permissions, much like an app step that is used in SharePoint Designer. It also demonstrates the idea of breaking up flows into reusable chunks – called service flows.
More nerdy fun with my daughter, who is already an accomplished PowerApps coder as you will soon see. In this video, she build me a sophisticated audit/checklist app using Microsoft PowerApps and Flow. This app demonstrates offline support, calling external API’s and photo handling.
Demonstrating the power of the PowerApps platform for citizen developers, Ashlee won a contest from Microsoft to create a fidget spinner using PowerApps. In this video, Ashlee explains to me how she built the app and shames me for my dodgy high school maths…
p.s don’t miss out the Solar System PowerApps by MVP Daniel Christian, who was inspired by Ashlee’s fidget spinner. Amazing stuff…
I think these videos highlight the flexibility and power of this platform. Let me know if you would like me or Ashlee to record others or expand on them!


![image_thumb[6]_thumb](http://www.cleverworkarounds.com/wp-content/uploads/2018/06/image_thumb6_thumb.png "image_thumb[6]_thumb")
![image_thumb[16]_thumb](http://www.cleverworkarounds.com/wp-content/uploads/2018/06/image_thumb16_thumb.png "image_thumb[16]_thumb")
![image_thumb[19]_thumb](http://www.cleverworkarounds.com/wp-content/uploads/2018/06/image_thumb19_thumb.png "image_thumb[19]_thumb")
![image_thumb[21]_thumb](http://www.cleverworkarounds.com/wp-content/uploads/2018/06/image_thumb21_thumb.png "image_thumb[21]_thumb")
![image_thumb[23]_thumb](http://www.cleverworkarounds.com/wp-content/uploads/2018/06/image_thumb23_thumb.png "image_thumb[23]_thumb")
![image_thumb[28]_thumb](http://www.cleverworkarounds.com/wp-content/uploads/2018/06/image_thumb28_thumb.png "image_thumb[28]_thumb")
![image_thumb[31]_thumb](http://www.cleverworkarounds.com/wp-content/uploads/2018/06/image_thumb31_thumb.png "image_thumb[31]_thumb")
![image_thumb[33]_thumb](http://www.cleverworkarounds.com/wp-content/uploads/2018/06/image_thumb33_thumb.png "image_thumb[33]_thumb")
![image_thumb[35]_thumb](http://www.cleverworkarounds.com/wp-content/uploads/2018/06/image_thumb35_thumb.png "image_thumb[35]_thumb")
![image_thumb[38]_thumb](http://www.cleverworkarounds.com/wp-content/uploads/2018/06/image_thumb38_thumb.png "image_thumb[38]_thumb")
![image_thumb[41]_thumb](http://www.cleverworkarounds.com/wp-content/uploads/2018/06/image_thumb41_thumb.png "image_thumb[41]_thumb")
![image_thumb[43]_thumb](http://www.cleverworkarounds.com/wp-content/uploads/2018/06/image_thumb43_thumb.png "image_thumb[43]_thumb")
![image_thumb[45]_thumb](http://www.cleverworkarounds.com/wp-content/uploads/2018/06/image_thumb45_thumb.png "image_thumb[45]_thumb")
![image_thumb[47]_thumb](http://www.cleverworkarounds.com/wp-content/uploads/2018/06/image_thumb47_thumb.png "image_thumb[47]_thumb")
![image_thumb[50]_thumb](http://www.cleverworkarounds.com/wp-content/uploads/2018/06/image_thumb50_thumb.png "image_thumb[50]_thumb")
![image_thumb[52]_thumb](http://www.cleverworkarounds.com/wp-content/uploads/2018/06/image_thumb52_thumb.png "image_thumb[52]_thumb")
![image_thumb[55]_thumb](http://www.cleverworkarounds.com/wp-content/uploads/2018/06/image_thumb55_thumb.png "image_thumb[55]_thumb")
![image_thumb[57]_thumb](http://www.cleverworkarounds.com/wp-content/uploads/2018/06/image_thumb57_thumb.png "image_thumb[57]_thumb")
![image_thumb[59]_thumb](http://www.cleverworkarounds.com/wp-content/uploads/2018/06/image_thumb59_thumb.png "image_thumb[59]_thumb")
![image_thumb[64]_thumb](http://www.cleverworkarounds.com/wp-content/uploads/2018/06/image_thumb64_thumb.png "image_thumb[64]_thumb")
![image_thumb[66]_thumb](http://www.cleverworkarounds.com/wp-content/uploads/2018/06/image_thumb66_thumb.png "image_thumb[66]_thumb")
![image_thumb[68]_thumb](http://www.cleverworkarounds.com/wp-content/uploads/2018/06/image_thumb68_thumb.png "image_thumb[68]_thumb")
![image_thumb[70]_thumb](http://www.cleverworkarounds.com/wp-content/uploads/2018/06/image_thumb70_thumb.png "image_thumb[70]_thumb")
![image_thumb[72]_thumb](http://www.cleverworkarounds.com/wp-content/uploads/2018/06/image_thumb72_thumb.png "image_thumb[72]_thumb")
![image_thumb[76]_thumb](http://www.cleverworkarounds.com/wp-content/uploads/2018/06/image_thumb76_thumb.png "image_thumb[76]_thumb")
![image_thumb[78]_thumb](http://www.cleverworkarounds.com/wp-content/uploads/2018/06/image_thumb78_thumb.png "image_thumb[78]_thumb")