CleverWorkarounds After much frustration, it seems DEFAULT is the way to go…

October 23, 2017

PowerApps, Flow and Managed Metadata fields–part 4

Hi and welcome to the final post in this series of articles that examined how we can work around an unsupported function in PowerApps and Flow. Along the journey we have learnt about app principals, the SharePoint REST API and written some crazy JSON.

In this final post, we will tie up a few loose ends. Currently the flow hard-codes the term ID from managed metadata when in fact, we want it to be sent from PowerApps. I will also also give you some insight into handling more complex situations, like multiple managed metadata fields as opposed to a single one.

But first, the (giant) weak spot…

As I write this I if any of you, as you read the first 3 posts, realised the weakness to this method. A strong hint was given in the last post. Recall that the JSON to update a managed metadata field required a term GUID…

{
   "__metadata": { "type": "SP.Data.Coffee_x0020_Shop_x0020_RatingsListItem" },
   "Bean":
   { "__metadata": {"type":"SP.Taxonomy.TaxonomyFieldValue"},
     "TermGuid":"0937fbc2-0dfe-439e-a24f-ba6d13897abd",
     "WssId":"-1"
   }
}

Now right now in PowerApps, there is no managed metadata control. This means you cannot browse a term store like you can in SharePoint. Among other things, one likely reason for this is that there is no REST API support for managed metadata. This has been a constant source of frustration for many as you can see in the 761 votes (as I type this) in uservoice.

What’s the implication of this limitation? For a start, there is no way we can build a REST call that will return us all of the terms in a term set. We have to either hard-code the term GUID’s in our application (ugh) or find another way to get the list of terms (ugh again). One thing that should be noted is that sometimes, hard coding terms and GUID’s isn’t as bad as it sounds. For example, you might have a term set for your corporate offices in certain countries. Since those terms are unlikely to change quickly, one can embed their GUID’s into PowerApps without too much concern.

For the first part of this article, we will use this approach and hard-code our term set of coffee beans into our Powerapp. Then we will modify our flow to expect this parameter from PowerApps.

Back to PowerApps…

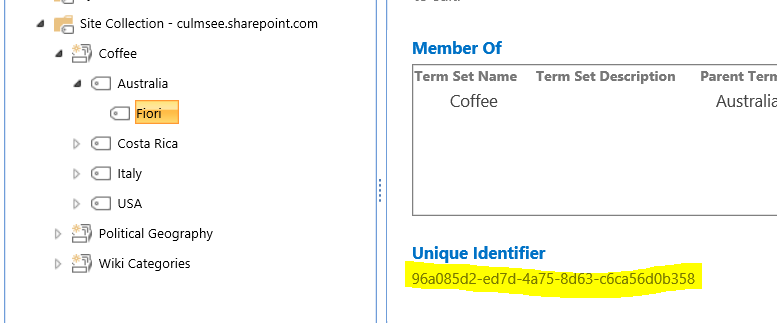
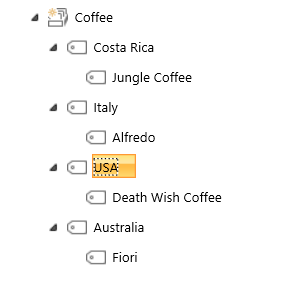
If you go back to the PowerApp we built way back in part 1 and also the term set of coffee beans, they looked like this:
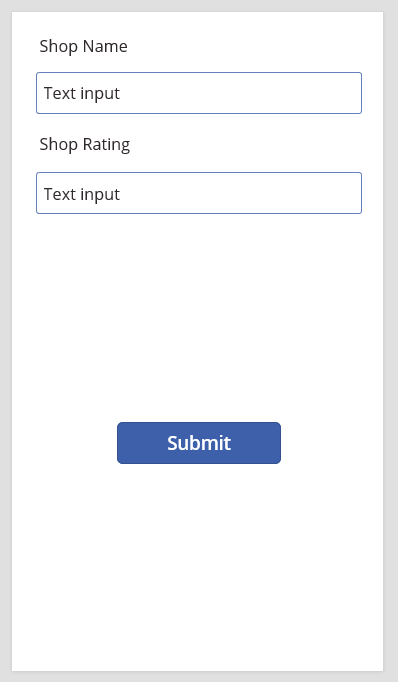
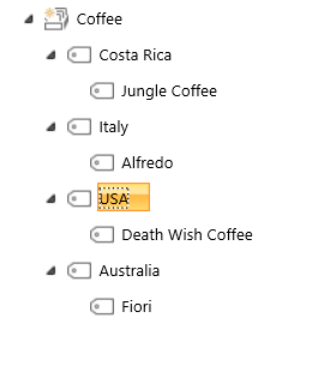
image  image

To hardcode our terms into PowerApps, I am going to use the ClearCollect function to create a collection called BeanDetails. I have grabbed the term label and GUID from managed metadata and constructed this function:

ClearCollect(BeanDetails,
{
   Name:  "Fiori",
   Id:  "96a085d2-ed7d-4a75-8d63-c6ca56d0b358"
},
{
   Name:  "Jungle Coffee",
   Id:  "eb04988d-acc4-4bde-9861-506e90de94c5"
},
{
   Name:  "Alfredo",
   Id:  "38db966f-3b0c-4872-a7d3-982ecd8528dd"
},
{
   Name:  "Death Wish Coffee",
   Id:  "e33c65f9-4202-40d7-89f2-aa1a1016ad9f"
})

Next, I use the OnStart property of the screen and paste the ClearCollect function as shown below.
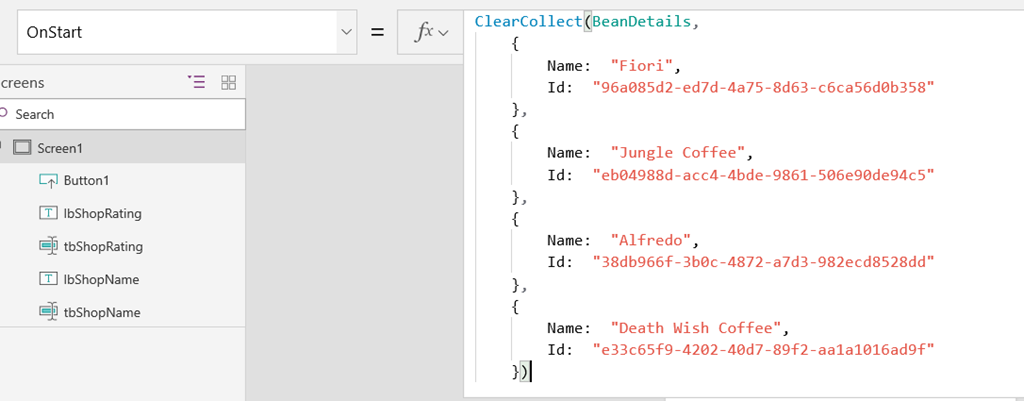
image

Now you will need to save, close and reopen the app for this to take effect. Alternatively add a temporary button and use the above code on the OnSelect property. Either way, you should be able to see your terms and GUID’s when going to Collections from the File menu…
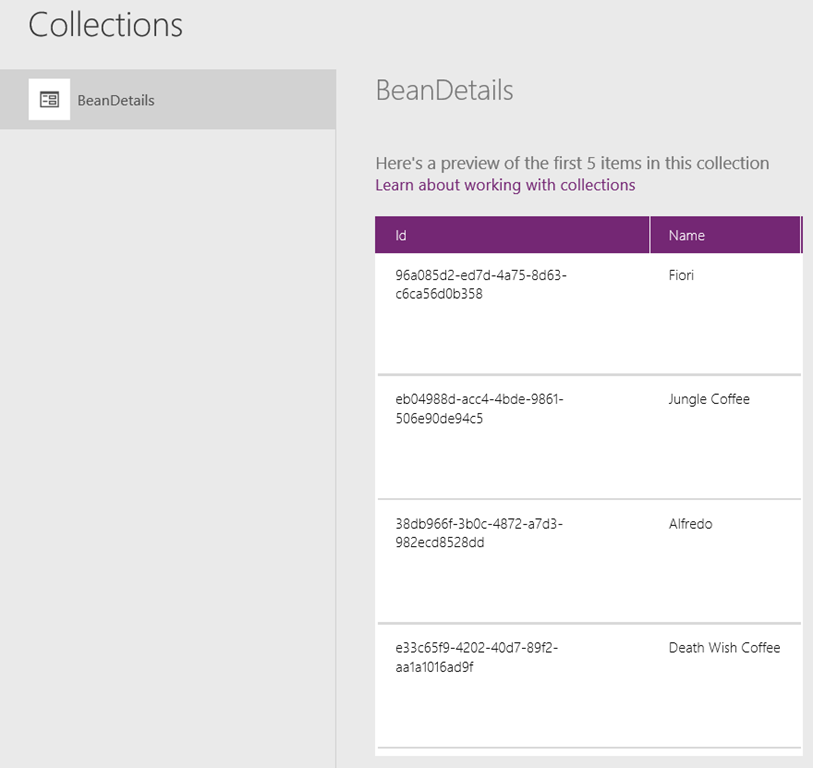
image

Now that we have our term set stored in PowerApps, let’s add a dropdown list to the screen that lists our coffee beans. Choose Insert > Drop Down and set its Items property to BeanDetails.
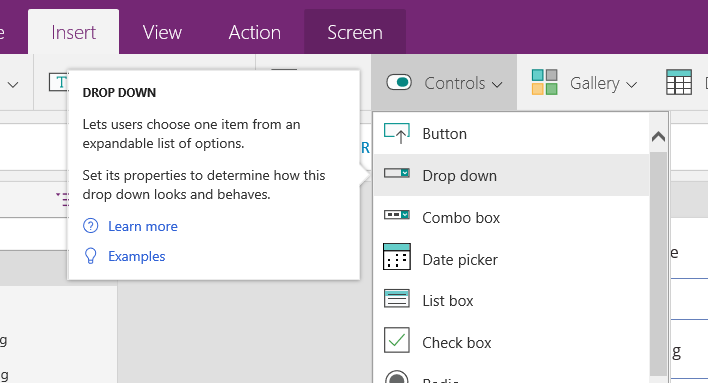

image

image

Now you should be able to see the choice of beans in the dropdown as shown below:
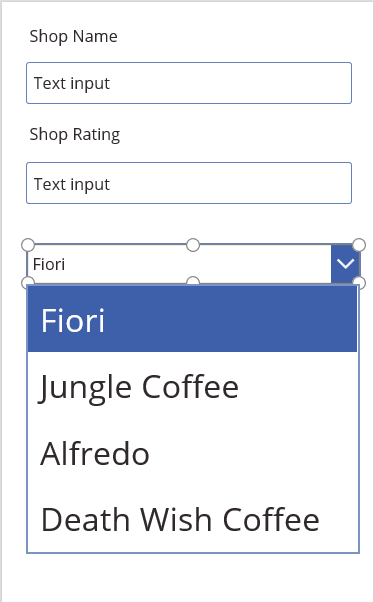
image

Next, we have to go back to Flow and modify it to accept a term GUID as a parameter (if you recall in part 3 the term is currently hard-coded).

Tweaking Flow…

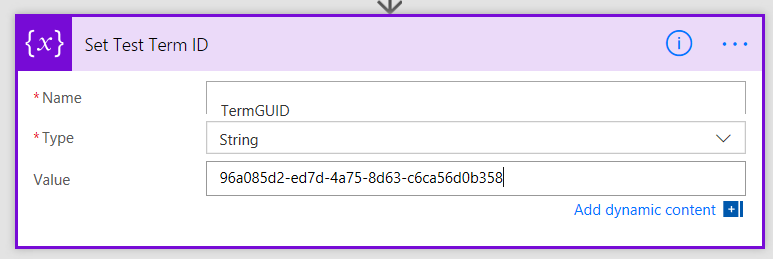
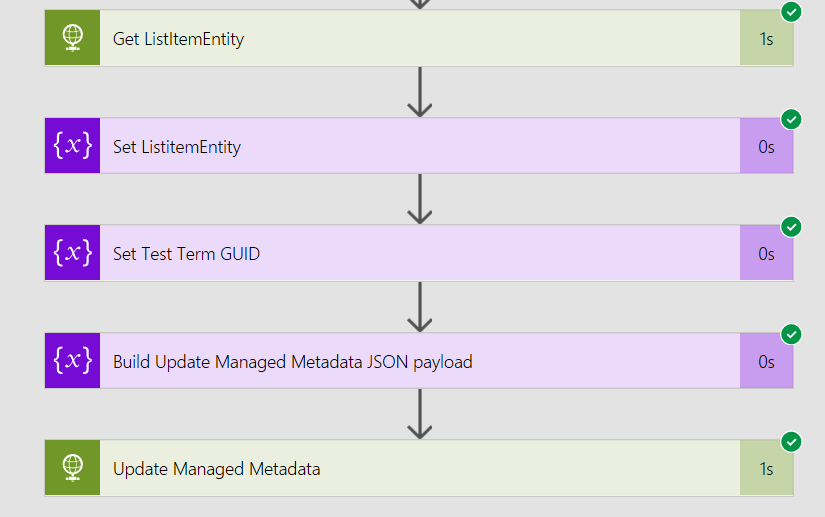
If you have followed our Flow adventure so far, you should have a flow action called Set Test Term GUID that looks something like this:
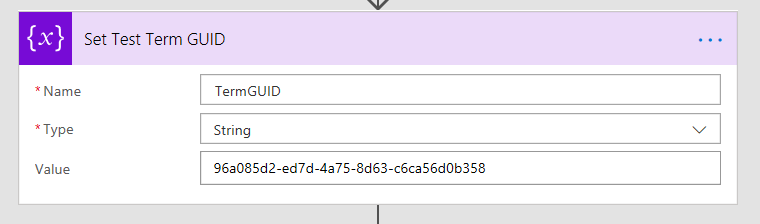
image

First, rename this flow step to Get Term GUID and then delete the GUID that we previously had in the Value field. From the Dynamic Content pane, choose Ask in PowerApps.
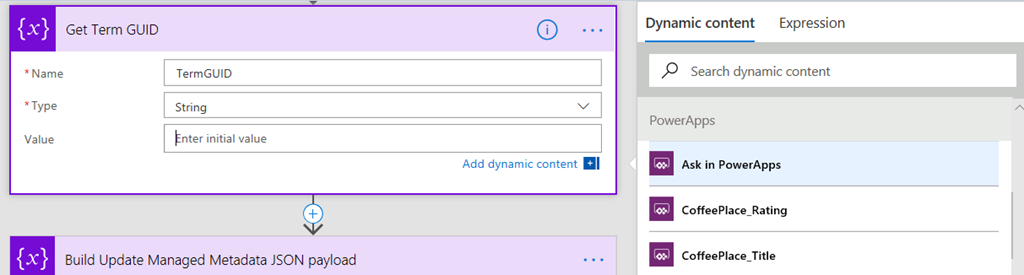
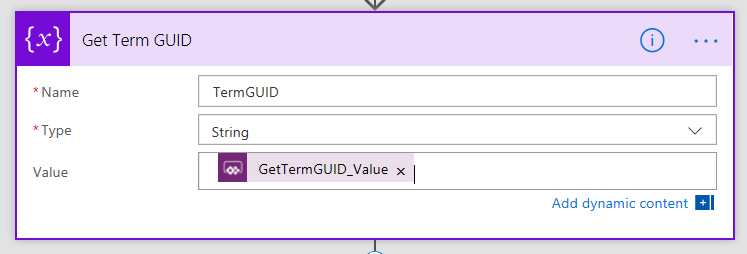
image

image

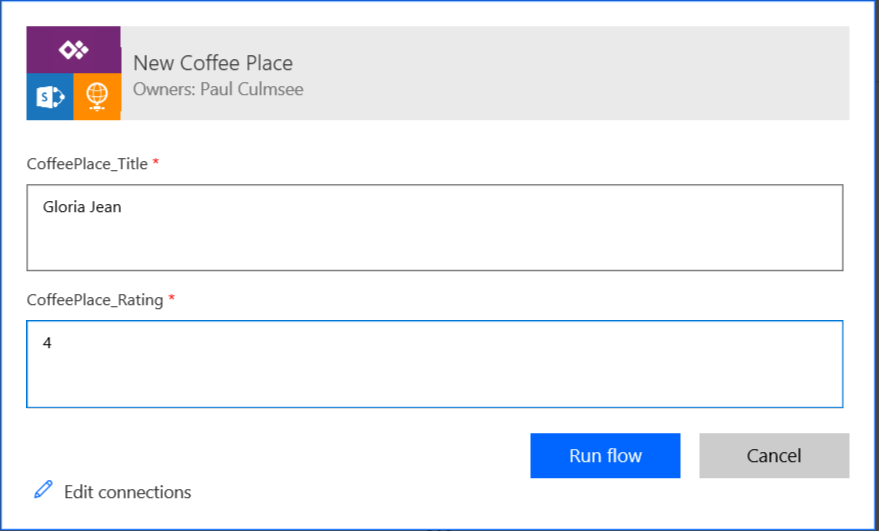
Update your flow and before returning to PowerApps, click the Run Now button. Ensure you are now prompted for three parameters, rather than the original two.

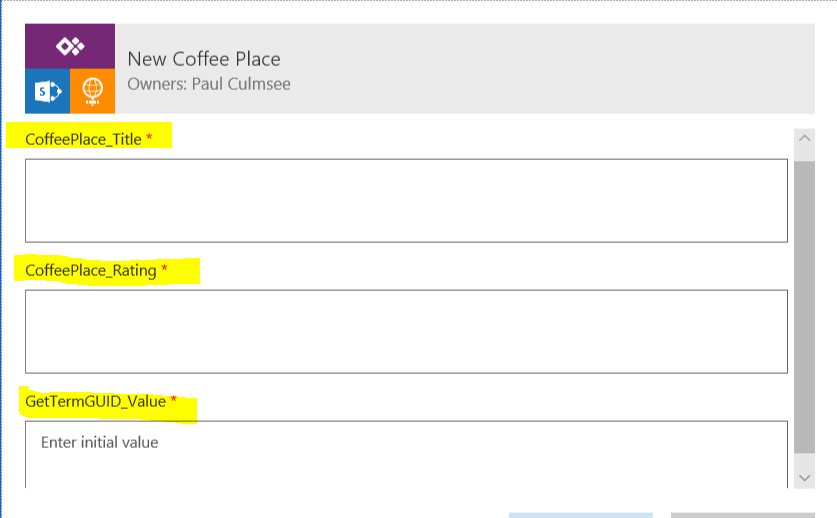
image

image

Back to PowerApps…

Now in PowerApps, we have to delete and flow and re-add it so it finds the new parameter we just added.

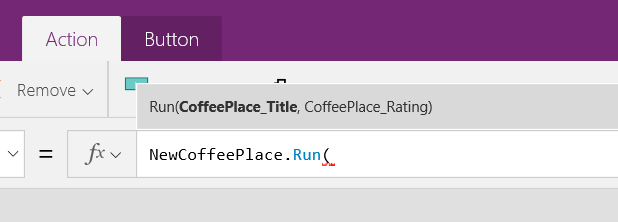
Select the Submit button and review the OnSelect property. It should show the function below…
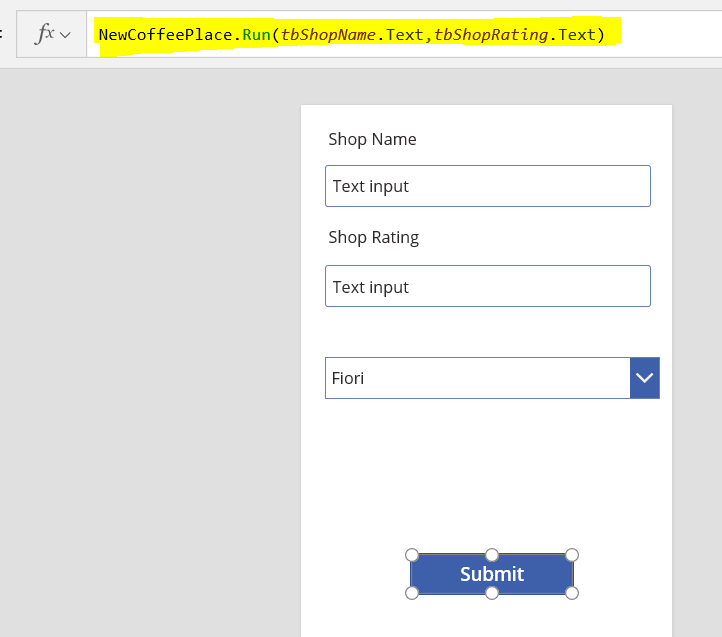
image

Now go to View > Data Sources and remove the NewCoffeePlace data source. You should see an error appear on the Submit button. It will say “Invocation of unknown or unsupported function”. Makes sense right? After all, we just took away its connection to flow.
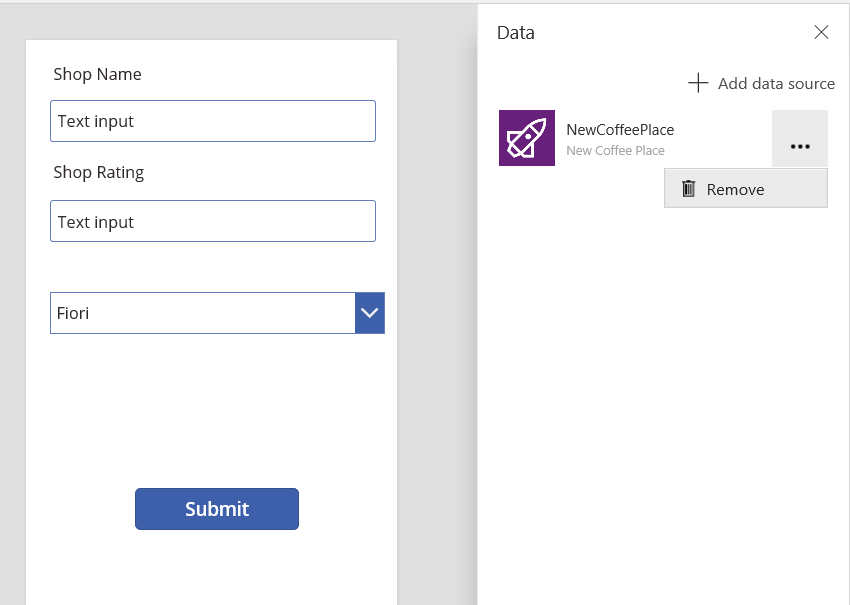

image   image

Once again make sure your Submit button is selected, and select Action > Flows. Choose the flow called New Coffee Place. In a few moments, it will ask you to complete the parameters in the formula bar. If you did this correctly, you should see a prompt for a third parameter – the term GUID.  
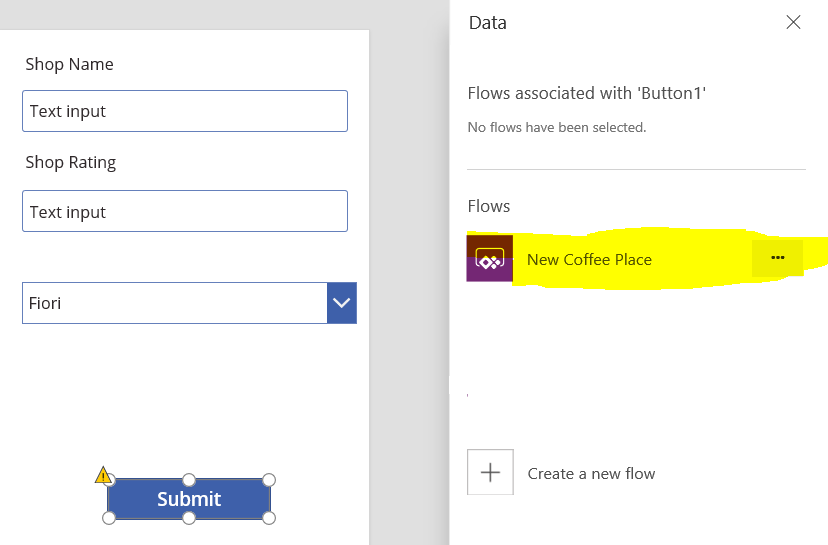
image  image

image

The third parameter will be the GUID that matches the term in the dropdown list. The formula for this is:

image

Now to explain Dropdown1.Selected.Id, remember that we set the Items property of the dropdown to BeanDetails collection, which has two columns, ID and Name. Essentially, by specifying Dropdown1.Selected.Id, whichever bean name is the currently selected one in the dropdown, the GUID will be sent to Flow…
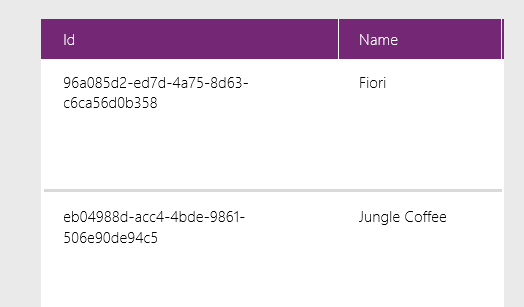
image

Test this by putting the Powerapp into preview and adding a new café. If all things go to plan, you will see your new entry along with the managed metadata term. Yay!!
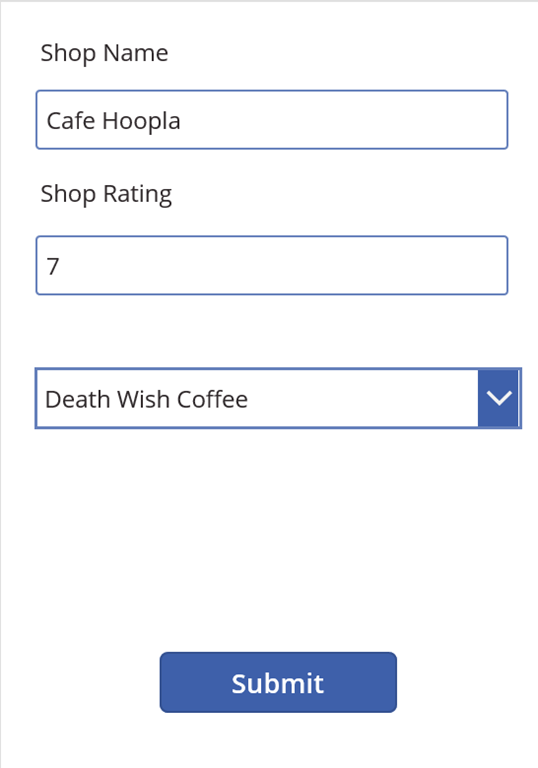
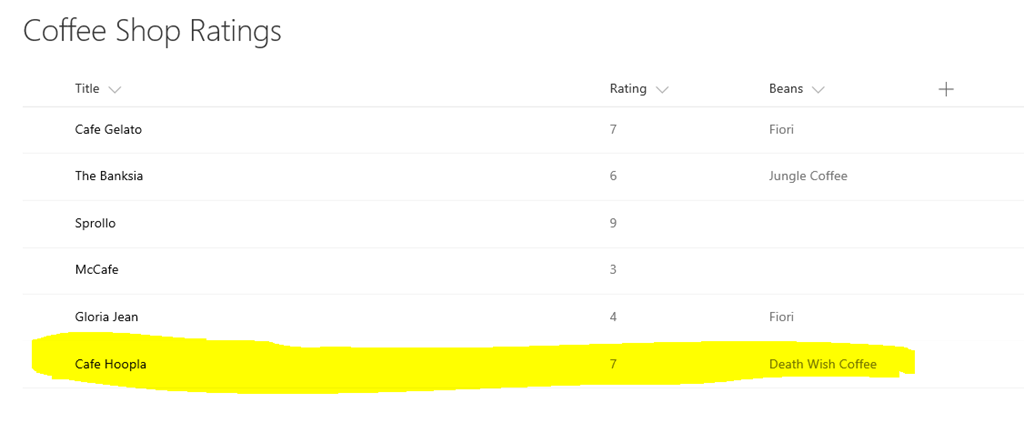
image  image

Hard-coding sucks – surely there a better way?

At this point you might still be hating the fact we had to hard-code the term ID’s into our app. I can sympathise, as it irritates me too. So is there a way to dynamically load the term set into PowerApps? Turns out there is, provided you use an Azure function along with PnP PowerShell.

I won’t cover this in detail here, unless there is sufficient demand, but I will explain the high level overview.

  1. Set up an Azure function using PowerShell
  2. Load PnP PowerShell modules
  3. Write a PowerShell script to connect to your tenant and pull the terms from the term set.
  4. Convert the terms to JSON output
  5. Create a custom connector for PowerApps to consume it.
  6. Add the custom connector to your app, and pull down the latest term set on startup.

Now I wrote another blog post where I went through another example of using Azure functions with PowerApps, and that covers a lot of detail on steps 1, 2, 5 and 6.

In relation to step 3 and 4, here is some PowerShell code sample to do this that you can use as a starting point. Be warned though… you will need to have some understanding of PnP PowerShell to make sense of it!


Import-Module "D:\home\site\wwwroot\modules\2.19.1710.1\SharePointPnPPowerShellOnline.psd1" -Global
$requestBody = Get-Content $req -Raw | ConvertFrom-Json
$name = $requestBody.name
$username = "paul@culmsee.onmicrosoft.com"
$password = $env:PW;
$siteUrl = "https://culmsee.sharepoint.com"
$secpasswd = ConvertTo-SecureString $password -AsPlainText -Force
$creds = New-Object System.Management.Automation.PSCredential ($username, $secpasswd)
Connect-PnPOnline -url $siteUrl -Credentials $creds
$tg = Get-PnPTermGroup -Identity 2830778b-dbfa-4441-bb45-0cbb97b582e7
$ts = Get-PnPTermSet -TermGroup $tg -Identity "Coffee"
$tl = Get-PnPTerm -TermSet $ts -TermGroup $tg -Includes Terms
foreach ($term in $tl) {
   $terms+=$term.terms
}
$output = $terms | Select Name, Id | ConvertTo-Json
Out-File -Encoding Ascii -FilePath $res -inputObject $output

Like I said, if you are interested in knowing more about this, let me know and if there is sufficient demand, I will make a dedicated blog post about it…

Handling multiple managed metadata columns…

I will end this series by showing you how to handle updating multiple managed metadata columns. This is an advanced topic, but is a good test for developing JSON manipulation skills in Flow. Like the previous section I will cover it in a high level only and leave it to you to figure it out for your environment…

So far we have updated a single column, but my real-world project that led to this series actually had 3 columns that were managed metadata. What made this interesting and tricky was that these columns were entirely optional. The complexity is easy to illustrate by looking at what a JSON payload looks like when updating multiple columns. In the example below, I am updating 3 columns called ProjectType, ProjectPhase and ProjectElement respectively…

{
   "__metadata": {
     "type": "SP.Data.ProjectListItem"
     },
   "ProjectType": {
     "__metadata": {
     "type": "SP.Taxonomy.TaxonomyFieldValue"
     },
     "TermGuid": "d4e4494f-34a4-4278-b0ee-7eba372a3f80",
     "WssId": "-1"
   },
   "ProjectPhase": {
     "__metadata": {
     "type": "SP.Taxonomy.TaxonomyFieldValue"
     },
     "TermGuid": "78d647c7-8b92-4ee0-a29d-22346b1af560",
     "WssId": "-1"
   },
   "ProjectElement": {
     "__metadata": {
     "type": "SP.Taxonomy.TaxonomyFieldValue"
   },
     "TermGuid": "6f9f653f-09ec-4771-9063-676d16734b37",
     "WssId": "-1"
   }
}

Contrast the above example with the one below where only one is updated…

{
   "__metadata": {
     "type": "SP.Data.ProjectListItem"
   },
   "ProjectElement": {
     "__metadata": {
     "type": "SP.Taxonomy.TaxonomyFieldValue"
     },
     "TermGuid": "6f9f653f-09ec-4771-9063-676d16734b37",
     "WssId": "-1"
   }
}

So the trick is to build a flexible enough flow that could generate the JSON needed to update 1, 2 or 3 columns. Without knowing whether the column would have a supplied value, meant we have to find a way to handle any combination. The pattern I ended up using was to build the JSON for each of the columns individually before joining them together. Here’s how…

First, I used an Initialize Variable flow action to create the base JSON for each column. The key was to make this conditional, so if the column value was empty, I added an empty string. E.g.
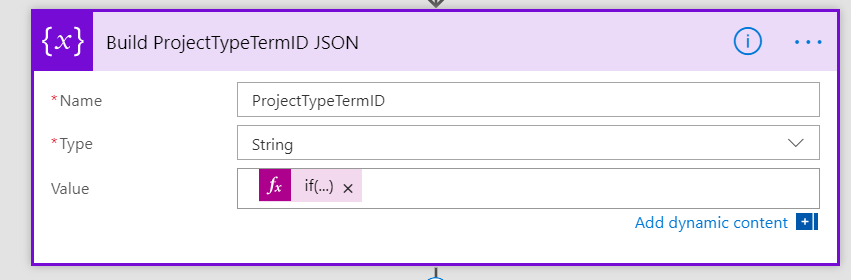
image

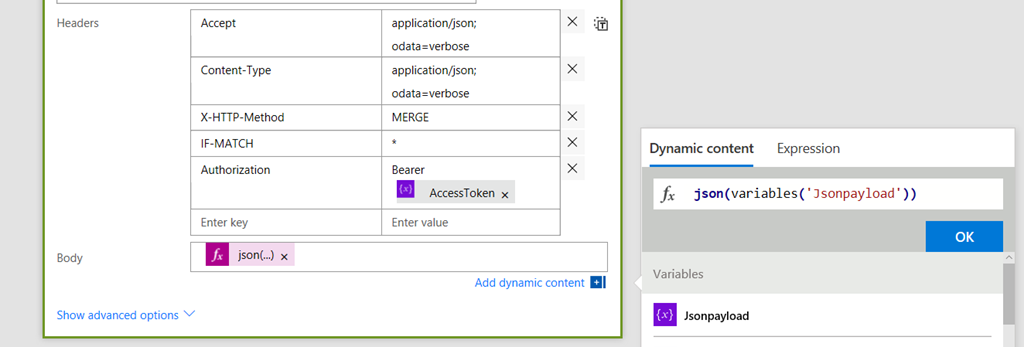
The expression used for the value of this variable was this crazy looking Workflow Definition Language Expression:

if(not(empty(triggerBody()['GetProjectTypeTermID_Value'])), concat('"ProjectType":{"__metadata":{"type":"SP.Taxonomy.TaxonomyFieldValue"},"TermGuid":"',triggerBody()['GetProjectTypeTermID_Value'],'","WssId":"-1"}'),'')

Basically this grabs the term ID for a column (in the above example the columns is called ProjectType). I test if the column value is supplied – which is what the “if(not(empty” bit does. I then then construct the necessary JSON to update that managed metadata column. (Note if you need a refresher on the JSON in this function, review part 3)

I repeat this action for the other columns, and then perform the following steps in Flow to construct the complete JSON…

First I initialize an array variable that I call JsonPayloadArray.
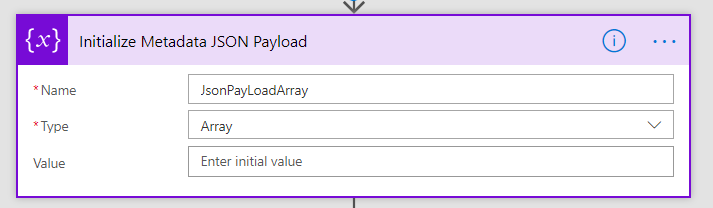
image

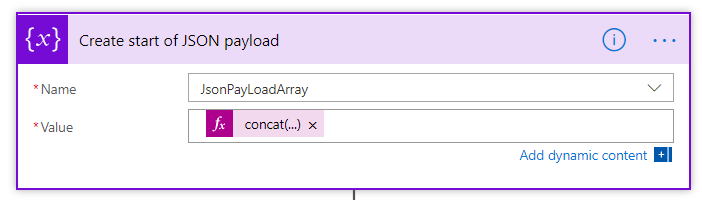
Next I add the outer JSON for a managed metadata update to the array using the Variables – Append to array variable workflow task…

image

image

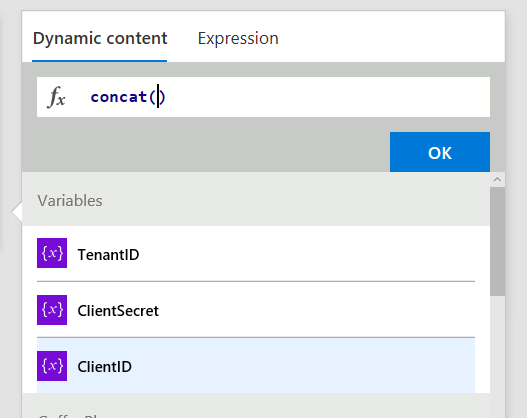
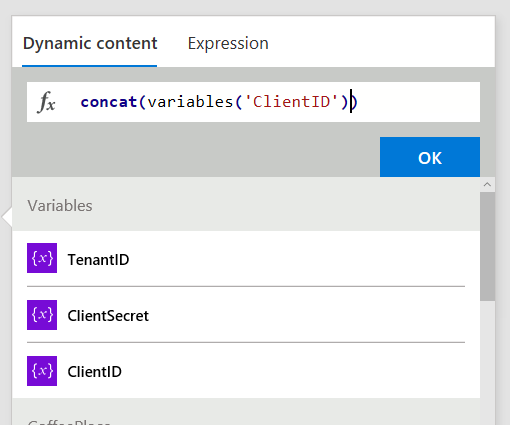
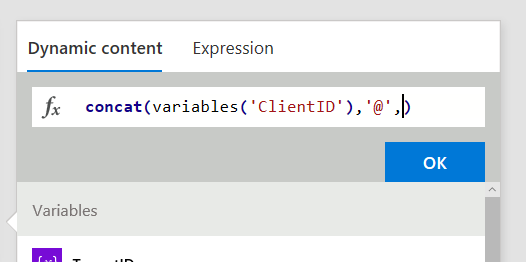
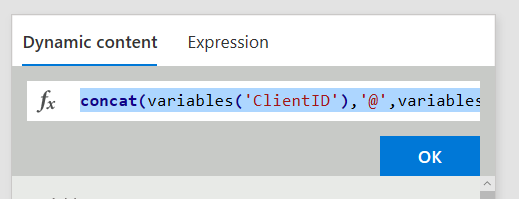
Here I am using the concat() function because I need to use the ListItemEntity variable. Note, if you have forgotten about ListItemEntryFullName property,  re-read part 3.

concat('{ "__metadata": { "type": "',variables('ListItemEntity'),'" }')

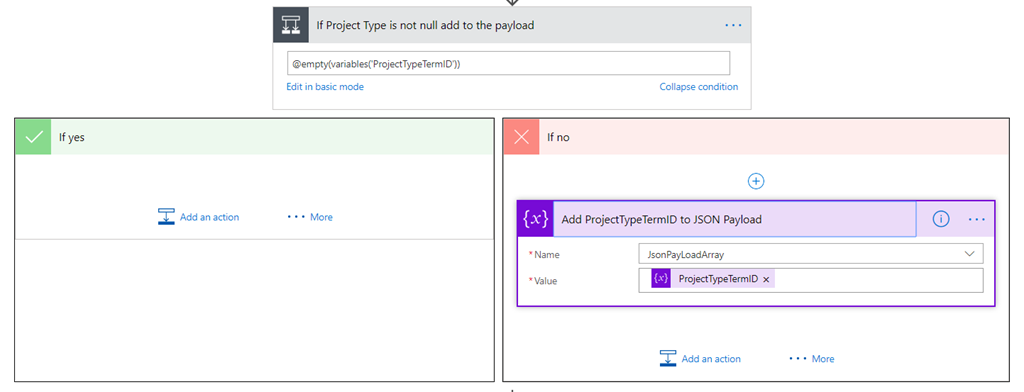
Next, I add the JSON for each column to the array, provided it is not null. I do this by adding a condition for each column.

The first image below shows the three conditions and the second image shows an expanded view of one of them. You can see in the example below, if a ProjectType was supplied, I add the variable initialized in the above steps to the JsonPayloadArray variable….

image

image

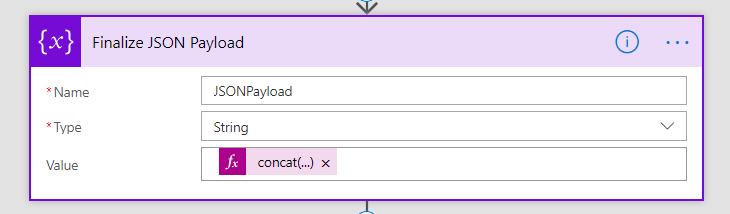
Finally, I use the Join() function to take this array and turn it back into a single string, delimited by commas. This elegantly handles the situation in JSON where the last name/value pair does not have a comma separator.  I do this by initializing a new variable called JsonPayload as a string as follows…
image

concat(join(variables('JsonPayLoadArray'),','),' } ')

Conclusion

This is one of those series that I know only a few people will get some use out of. Hopefully this whole issue of managed metadata will be gone by year-end and these approaches are not necessary. In any event the techniques outlined in these four posts apply to various other scenarios, so learning about JSON manipulation using Flow, or talking to SharePoint via REST/App principals might come in handy for you in other situations.

As for me, this is probably the geekiest series I have written in a long time! I think I better get back to management consulting now!!


Thanks for reading

Paul Culmsee
www.hereticsguidebooks.com

October 20, 2017

October 16, 2017

October 14, 2017

PowerApps, Flow and Managed Metadata fields–part 1

Hi budding PowerApps and Flow users…

One (current) issue affecting both PowerApps and Flow is that neither support Managed Metadata Columns properly. I have a method to get around this issue, but it will take more than one post to explain. Lately I have refrained from writing epic multi-part posts because things change quickly. In fact this issue will likely go away by the end of 2017. <update> Native support for Managed metadata is now available. Be careful when you use this content</update>.

Due to this pace of change, this is very likely the last multi-part blog series I will do. So consider this a last hurrah from a bygone era of Cleverworkarounds Smile

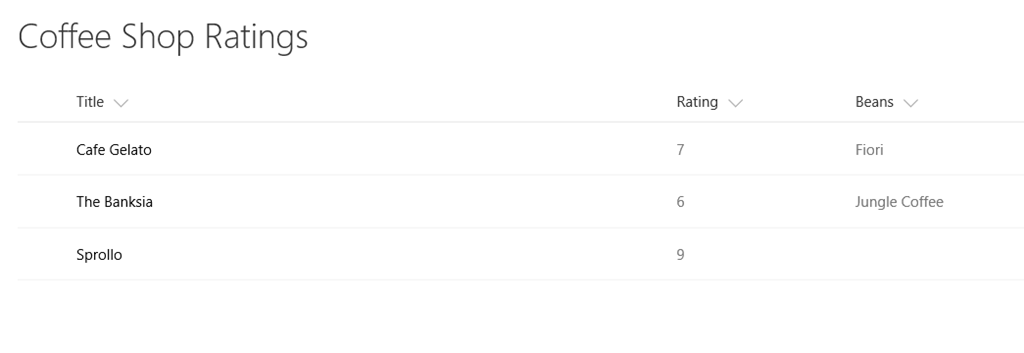
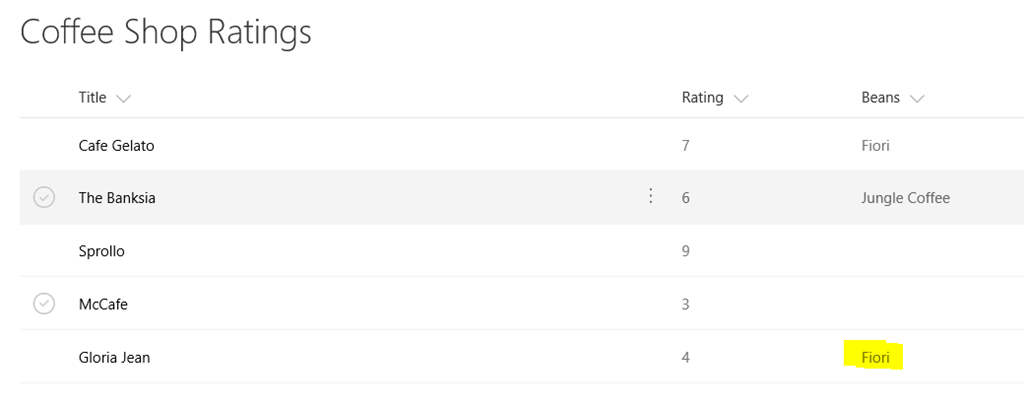
Now let’s get to work. To illustrate the managed metadata issue we currently have to contend with, consider the list below that tracks the most business critical task ever – where the best coffee is near the office…

image

The beans column is actually a managed metadata column, linked to the following term set which has a list of locations and coffee beans from that location. As you can see above, each café sells a certain type of coffee bean…

image

Now that we all understand the vital importance of the data contained in this list, it is obvious that we need an app for it so that our workforce can have locations of the best coffee at their fingertips. So let’s quickly examine the degree to which PowerApps is able to handle this list. I created a blank app and connected it to the above list. I then tested with a gallery, data table, display form and edit form. Here are the results below…

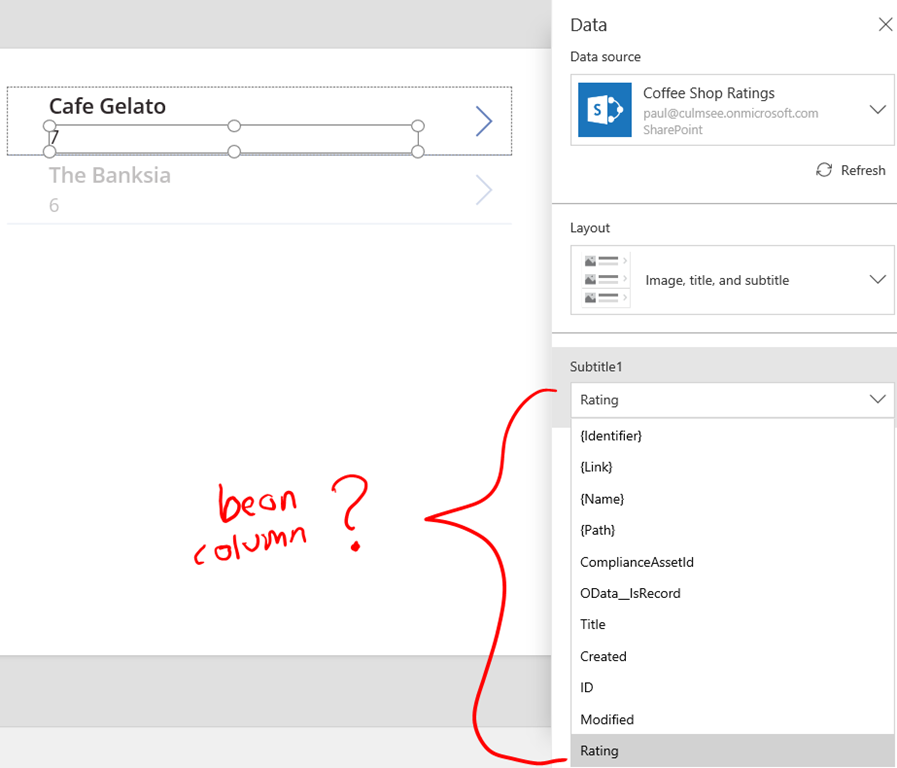
Gallery: Fail

As you can see in the image below, the gallery is bound to the Coffee Shop Ratings list, but in the dropdown highlighted below, the managed metadata “Beans” column is not listed.

image

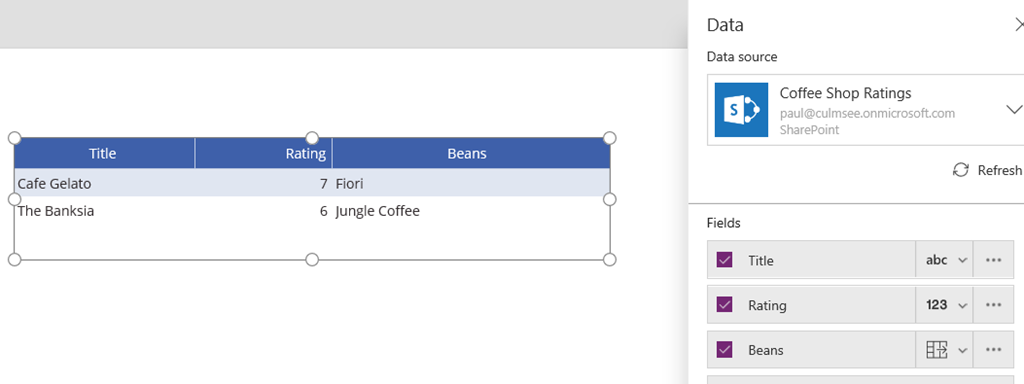
Data table: Pass

The data table does work. You can see below that the Beans column is visible….

image

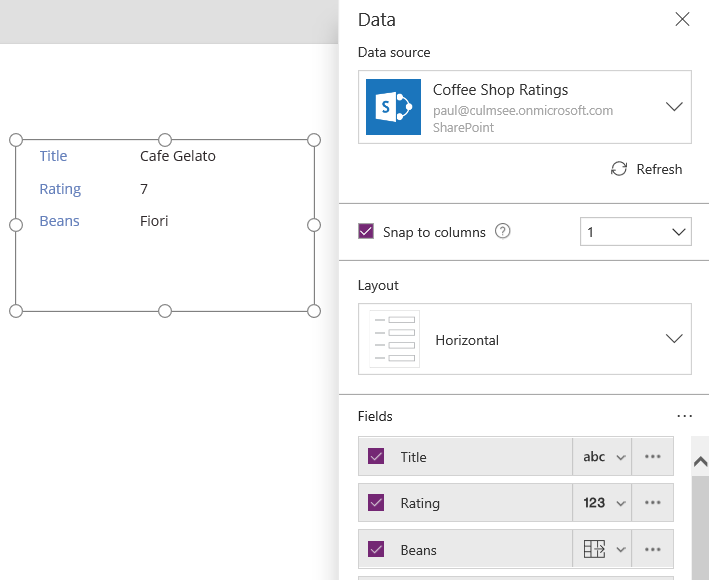
Display Form: Pass

Like the data table, a display form also will display the managed metadata value…

image

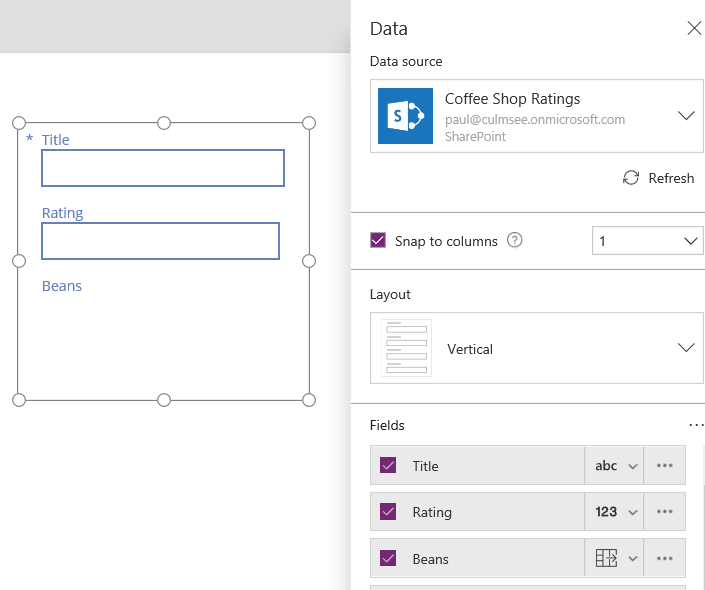
Edit Form: Fail

As you can see below, the edit form sees the Beans column, but will not render it as editable in PowerApps… bummer. Not a great solution if you want your users to add new coffee places to the list via the app.

image

Flow to the rescue?

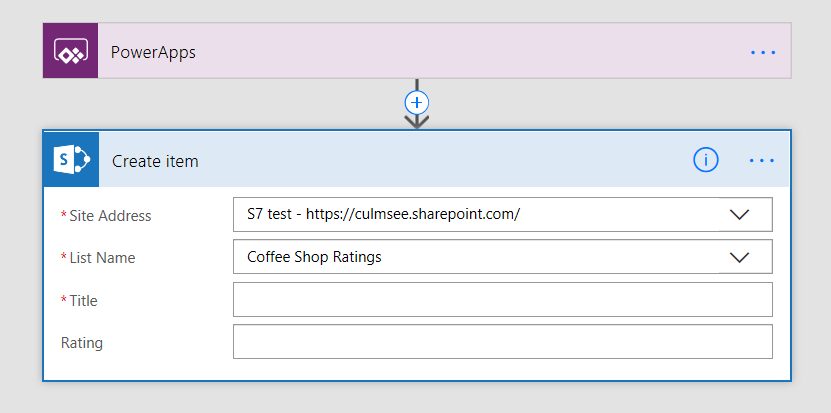
If you have read some of my recent posts, I have found Flow to be very useful to work around various obstacles. For example, I use flow to handle photo uploads from PowerApps to SharePoint. So how does Flow fare with Managed Metadata? Unfortunately this is also a bust at present. The built-in “SharePoint – Create Item” action will not show the managed metadata columns. Notice the Beans column is missing from the image below…

image

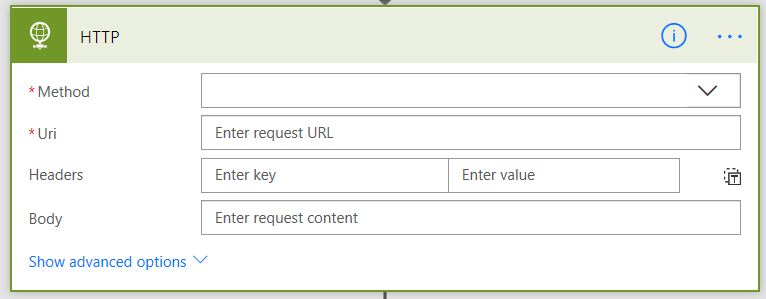
Now all is not lost. Just because the built-in Flow actions do not work, does not mean we cannot achieve our goal. One can also talk to SharePoint via it’s API’s. Flow makes this possible because one of its built-in actions called the HTTP action. This is a super powerful action because you can use it to pretty much make any form of web request you want.

image

So let’s do an experiment and find out how easy it is to support managed metadata via Flow, by talking to SharePoint via API.

But there is one issue we have to contend with first. The SharePoint actions in flow take care of authentication for us, whereas the HTTP action is generic by definition. So how are we going to make an authenticated connection to SharePoint using the HTTP action?

The answer is we are going to use oAuth to request an access token. For the non-developers reading this who’s eyes start to glaze over when terms like oAuth start getting bandied about, let me use an analogy…

An oAuth primer using beer…

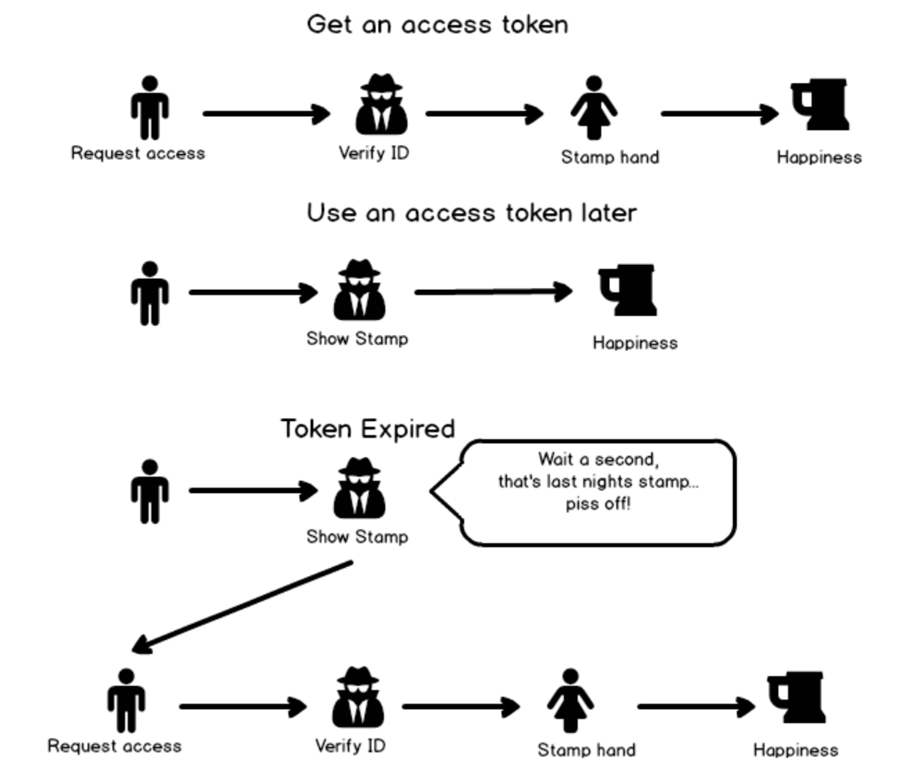
Let’s say that you are going to a nightclub or a bar, and you have to prove that a) you are over the legal age and b) you are wearing suitable attire for the venue. You present your drivers license or other form of ID. The doorman checks your ID, decides if you are good looking enough and permits you to enter. You then walk into the club, pay your entrance fee, and an ink stamp is used to mark your arm. This tells staff that are are legally allowed to be in the club and can enjoy a frothy beer or two. Think of that stamp as your access token. If you walk out of the club for a break, you can skip the line to get back in, because you have already been stamped. You just show them your hand…

So the basic pattern is to get an access token is:

image

Once you have access, no one has to check your ID, instead they just make sure the stamp on your arm is the same as the one they issued you earlier. Eg:

image

Now access tokens don’t last forever. If you turn up the next day, try and skip the line and present your stamp, the doorman will turn you away because today they used the blue stamp and last night they used the green stamp. So you will have no choice but to go to the other line, get your ID checked, and pay up before getting a new blue stamp issued…

image

So let’s now turn our attention to SharePoint and how this works in real life. What I just described above is roughly equivalent to something in oAuth called the Client credentials grant. In short, before we do anything related to managed metadata, we need to get into the club. So we will need to get some identification so we can get our hand stamped. So who issues the ID in the first place?

Enter the app principal

In our analogy above, there was an implicit trust going on. You showed your identification to the doorman, and they trusted that the ID you flashed before him was genuine. In the context of SharePoint, we need to have SharePoint itself issue your ID for it to be deemed trustworthy. After all, even bouncers have problems with fake IDs.

So our flow is going to need to use an app principal (a genuine ID) before it can be issued a “stamp” (or access token). Fortunately for us, the plumbing to do this in SharePoint has been in place since the oft-derided app/app-in model was brought in. I am not going to get too caught up in the details here, because all-round guru Wictor has detailed the process in a few posts. In particular, have a read of this one, and in particular the “Create the App Principal” page…

Here are the basic steps to create an app principal to use in flow:

1. Navigate to your site collection and append /_layouts/15/AppRegNew.aspx

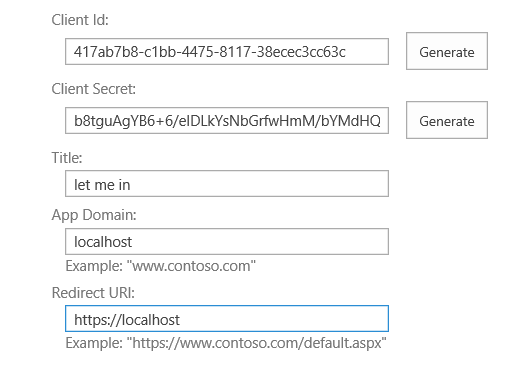
2. Generate an App ID, App secret and enter some other identifying info

image  image

3. Copy the client id and secret to clipboard.

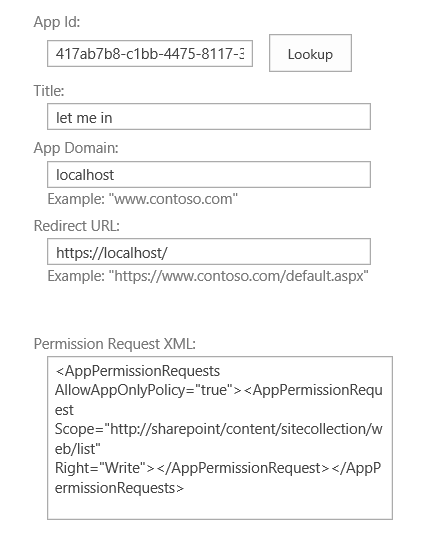
4. Append /_layouts/15/AppInv.aspx to your site collection and grant the permissions needed by this app principal.

image

In our example, we are updating a managed metadata field in a single list, so this app principal is going to be given the ability to write to SharePoint lists. The XML is below, and the schema for other scenarios is here:

<AppPermissionRequests AllowAppOnlyPolicy=”true”>

    <AppPermissionRequest Scope=”http://sharepoint/content/sitecollection/web/list” Right=”Write”>

    </AppPermissionRequest>

</AppPermissionRequests>

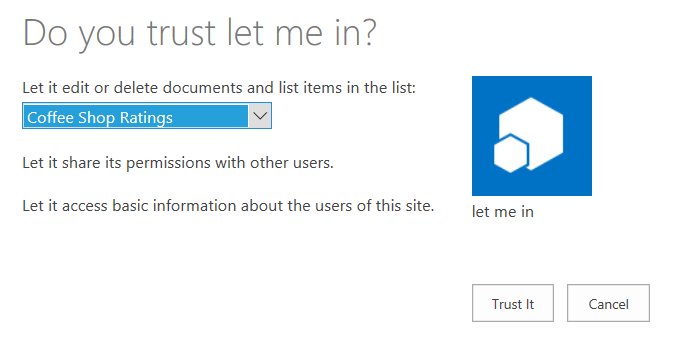
6. Choose the list that the app principal will be working with. In my case it is the coffee shop rating list with the managed metadata column.

image

Although I said I would not get into too much detail, here are some handy notes around this process:

  • The permission XML is very fussy. It will not tolerate spaces between elements
  • This app principal is registered/stored in azure active directory. You need privileged access in Azure AD to do this (site collection admin is not enough)
  • You can also do all of this in PowerShell
  • The app principal is valid for 1 year. So just like your drivers license expires periodically, the same happens here. If you want something longer, do this in PowerShell. (in our case native support for Managed Metadata in PowerApps/Flow is a few months off, so a year is fine
  • The oAuth method we are using doesn’t actually use the App Domain nor the request URL. But other methods do, hence why we have to enter something anyway
  • Microsoft are now steering people to the Graph API, which is a unified API that allows access to all of Office365 services. This will become the approach to take, but Wictor Wilen told me on Twitter that currently you cannot scope an access token down to a particular site collection.

Back to Flow…

Now that we have an app principal with permission to our site collection, it is time to start work on our Flow.

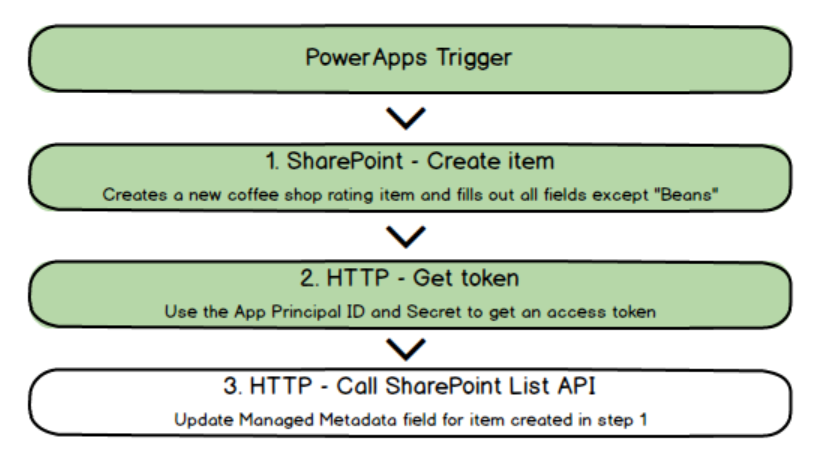
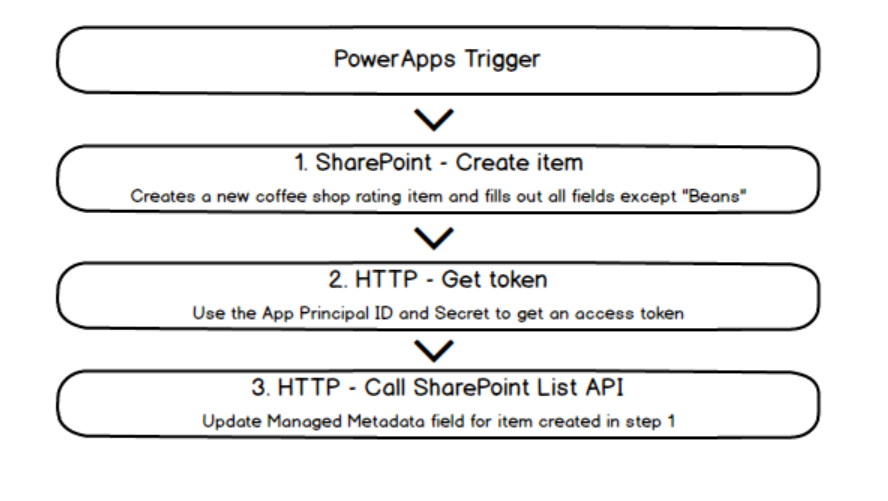
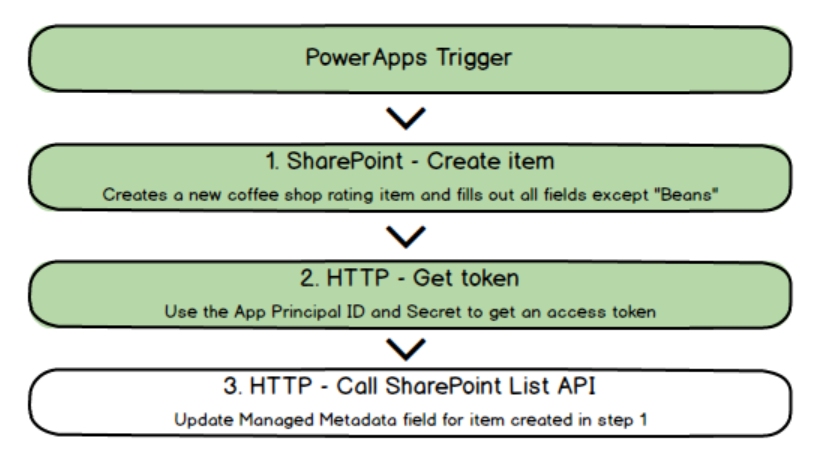
The basic operation for the flow is follows… First, the flow will be triggered by PowerApps, which will send Coffee shop name, rating and Bean. We will create a new entry in the list using the standard SharePoint flow action, before using the HTTP action to get an access token, and then update the newly created item with the coffee bean used by the shop.

image

Now the actual flow is going to look different to what I have outlined above. There are multiple actions involved for each of the steps, and some architectural and security considerations too. So we will adjust our flow as we go…

So let’s end this post by dealing with the trigger and step 1 above, as they are easiest. Part 2 will deal with the access token and part 3 will deal with the updating of the managed metadata column.

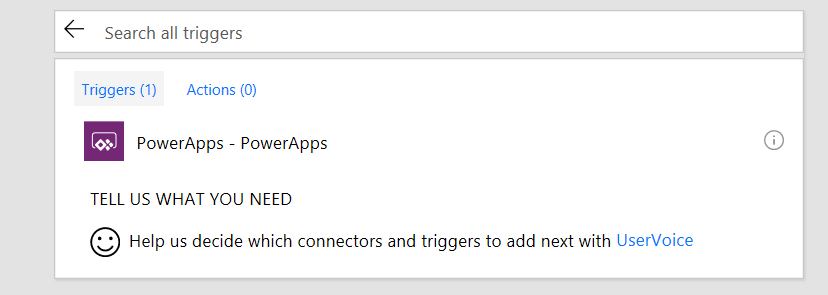
1. Create a new flow and choose the PowerApps trigger…

image

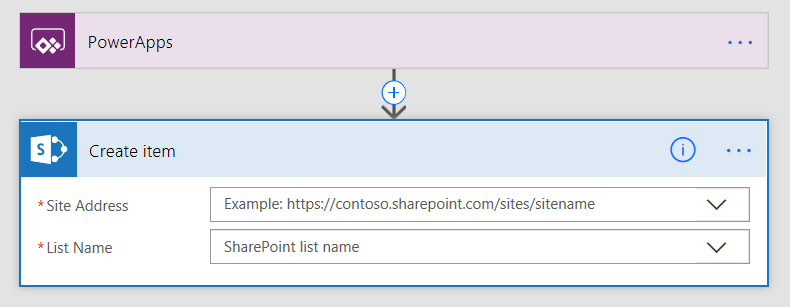
2. Add a SharePoint – Create Item action.

image

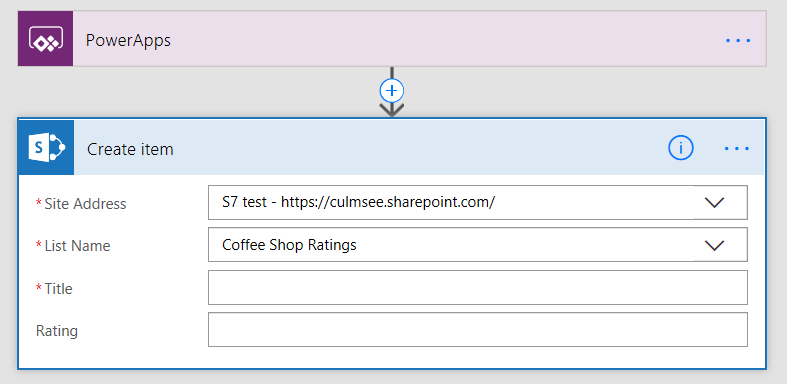
3. Specify the site collection where your list is stored and then the Coffee ratings list. Flow will read the list and display the fields it has found (excusing Beans)

image

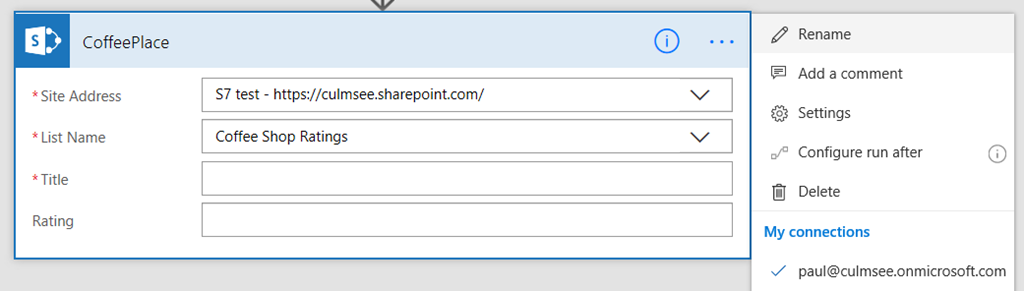
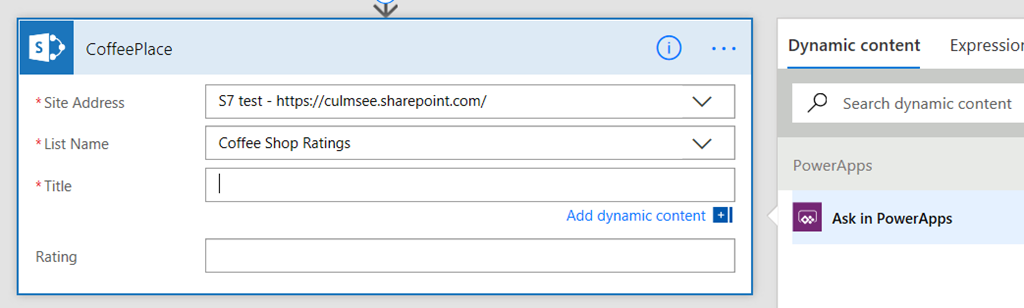
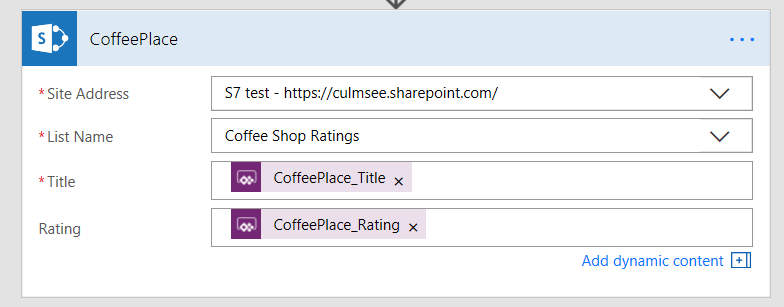
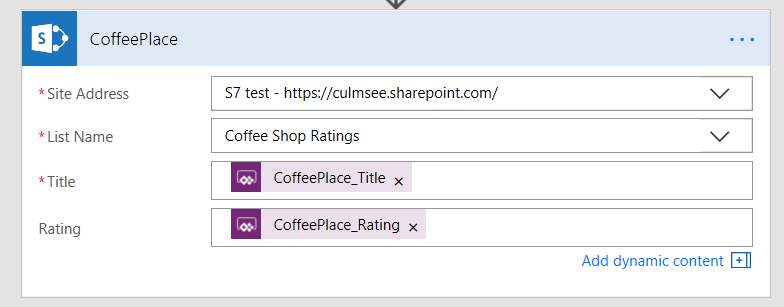
4. Rename the flow to CoffeePlace and for the Title and Rating columns, set it to ask PowerApps for the data

image

image

image

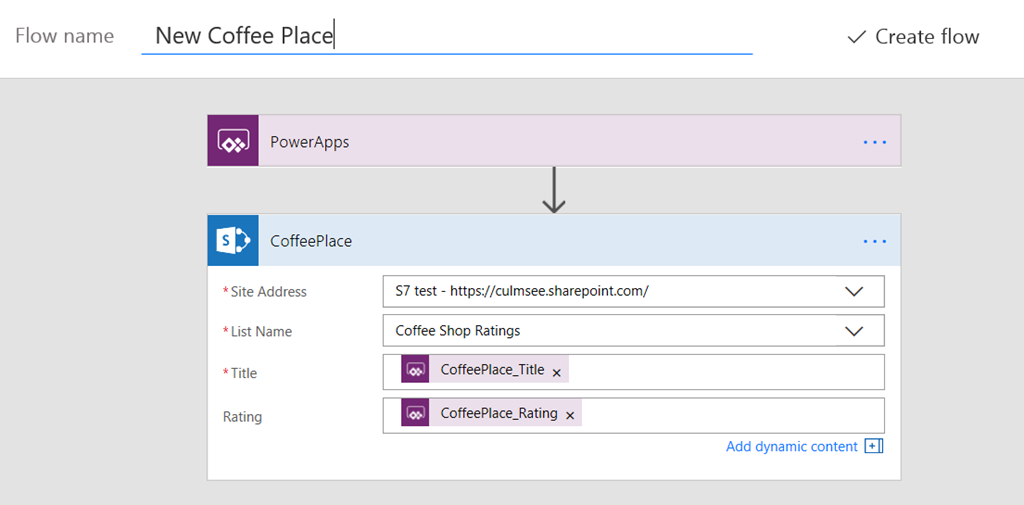
5. Save the flow and give it an appropriate name…

image

image

Build a PowerApp…

Now let’s go to PowerApps and build a basic app to add a new coffee place.

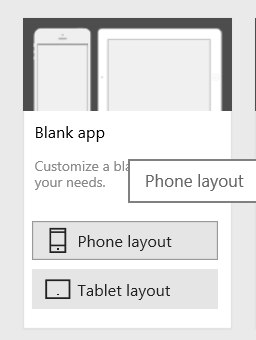
1. In PowerApps create a new blank app using the phone layout

image
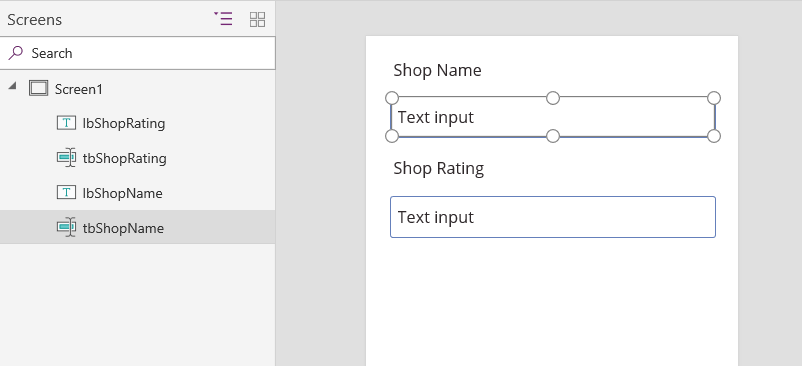
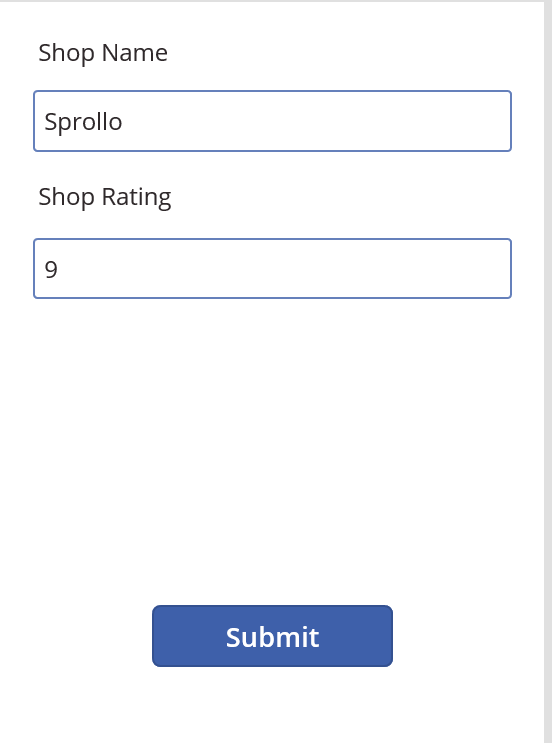
2. Insert 2 text boxes and 2 labels as shown below… note that I have named my controls to be more meaningful. I suggest you do the same…

image

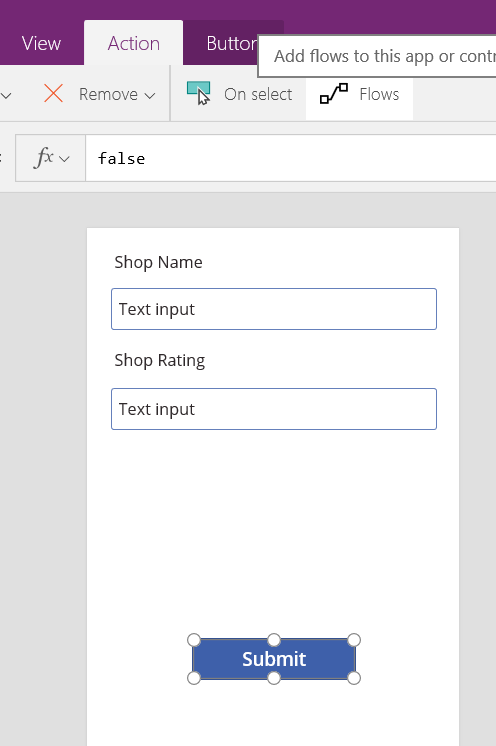
3. Add a button to the bottom the app and label it “Submit”

image
4. Select the button, and from the actions menu, choose “Flows”

image

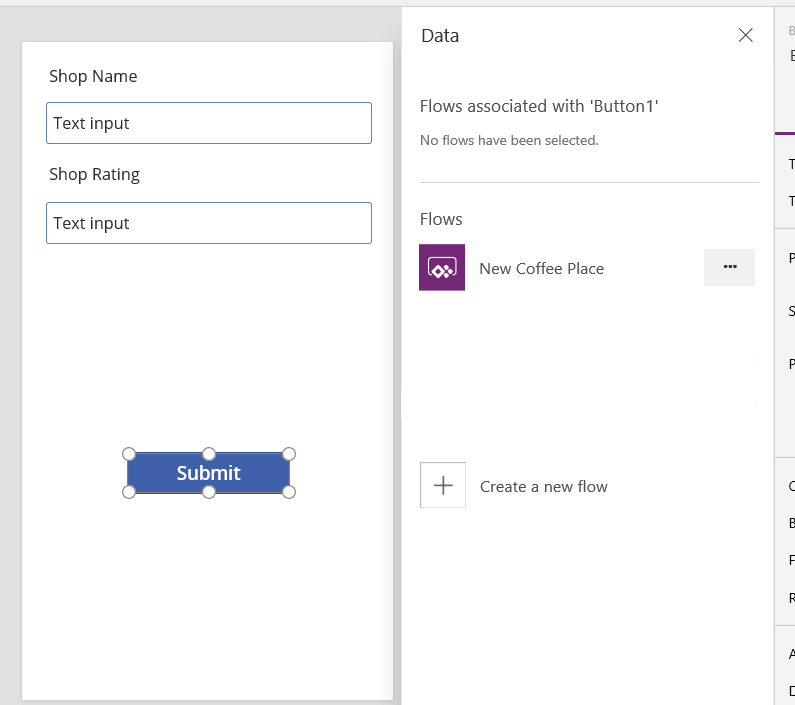
5. A panel will open to the right of your app screen, and you should see the flow we made earlier. Basically PowerApps will show any flows that you have access to, that use a PowerApps trigger

image

6. Choose your Flow, and PowerApps will add a submit action to the button that calls the flow. Any “Ask in PowerApps” parameters will be displayed in the function as shown below. Now hopefully you can see why I made you rename your Create Item action when building the flow! The image on the right is the flow action where we told it to ask PowerApps. Note the names in both images…

image  image

7. Fill in the parameters by choosing the text boxes we added in step 2. Now you will see why I recommend naming them…

image

8. Save your flow and then preview it… Enter a shop name, rating and click the button. Check your SharePoint list and you should see the new entry…

image  image

Conclusion…

Awesome! If you have gotten this far, we have all of our raw ingredients set up. We have an app principal, a PowerApp and a flow. In the next post, we will focus on getting our access token, so we can update the managed metadata field.

Thanks for reading…

Paul Culmsee

September 29, 2017

It’s not a proxy, it’s a Floxy! A way to display SharePoint PDFs in PowerApps

Filed under: Flow,PowerApps,SharePoint,Web Services,Web Services — admin @ 7:15 am

Hiya

I will say up-front that I used to be a security guy, so what I am about to share with you makes part of me feel dirty. With that said, I think this method is worth sharing because I get to call it a Floxy, and we all know that coming up with cool names trumps all other considerations!.

So what am I talking about? Let’s use an example…

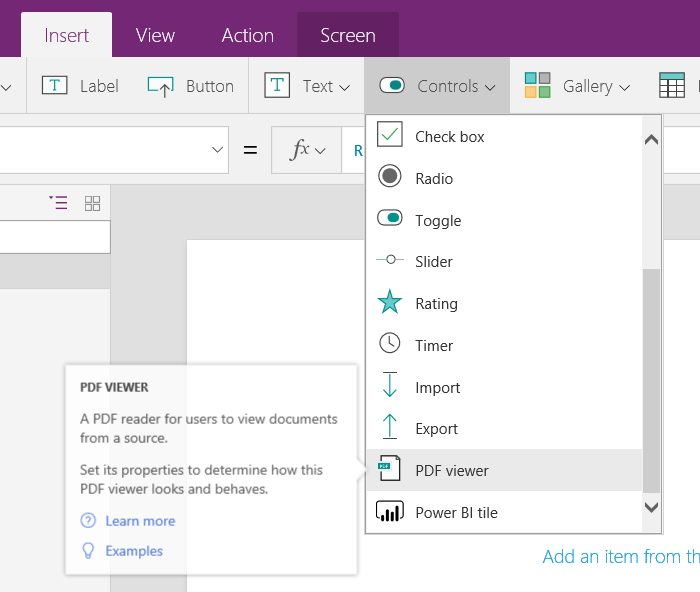
In PowerApps, one can display a gallery of PDFs quite easily. Just drop it onto a screen and feed it a URL by setting the Document property. Here is an example PDF from a journal article I wrote with Kailash Awati…

image  image

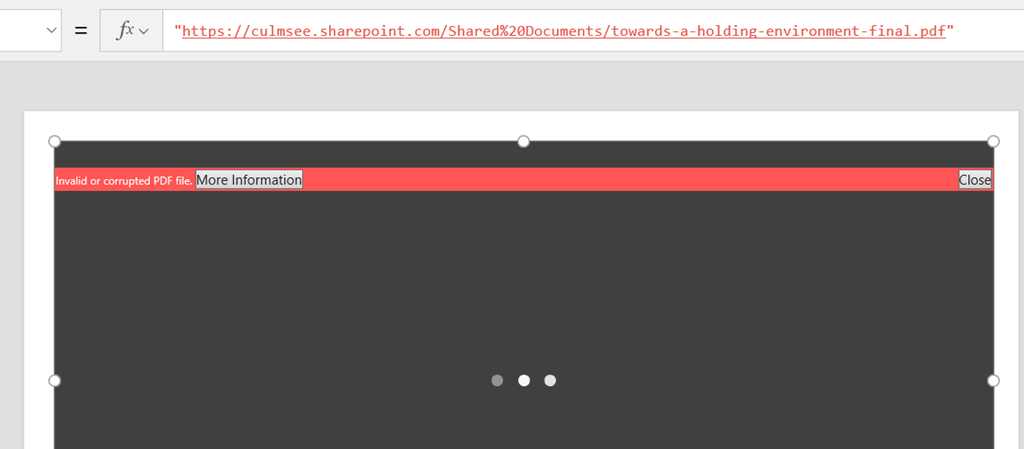
Okay so that was easy… but what happens if you put these images inside SharePoint? In the next screen, I have saved the same PDFs as shown above to a SharePoint document library and entered its link into the PDF control in PowerApps. Now look at what happens…

image

So what’s going on here?

In a nutshell, when PowerApps tries to access the SharePoint URL, it does so anonymously. Now that’s all well and dandy on a public URL like the first example, but isn’t going to do much good with SharePoint, which requires authentication. It’s a pity really, since there are many use-cases where it would be wonderful to browse SharePoint libraries for PDFs. Think of remote workers calling up drawings or schematics as an example.

So is there a (clever) workaround? Sure is!

Flow to the rescue…

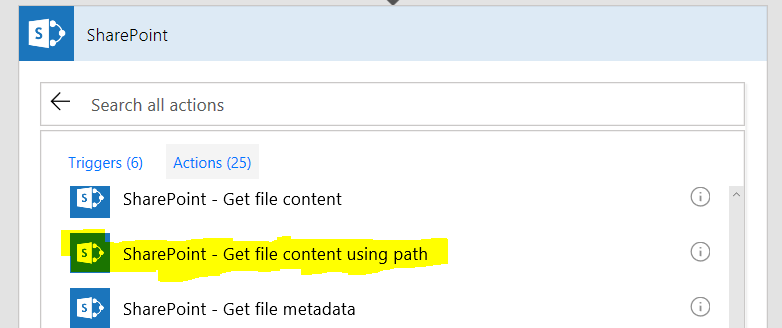
Microsoft flow happens to have a SharePoint action called “Get file content using path”.

image

Basically you feed this action two things: 1) a site collection and 2) the path to a file residing in a document library. In return for your efforts flow will bring back the content of that file. Since, all SharePoint flow actions are authenticated, if we can find a way to pass a URL from PowerApps to flow, and have flow return the file content back to PowerApps we could in effect, get around this authentication issue.

Turns out this is pretty easy. Here are the steps…

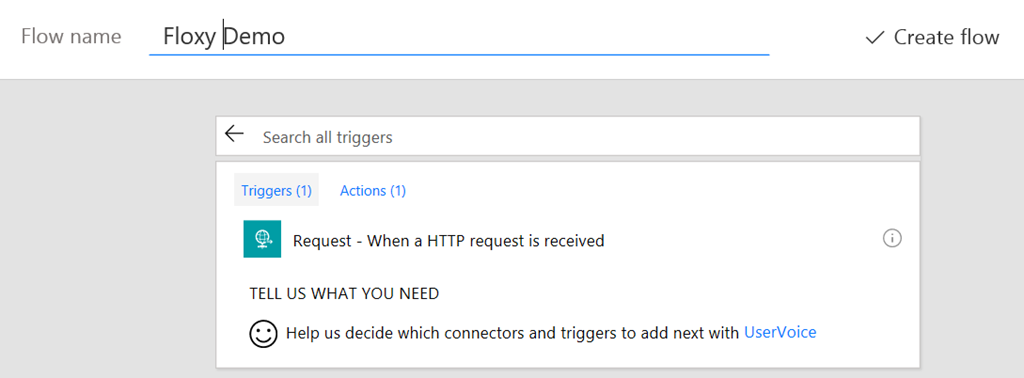
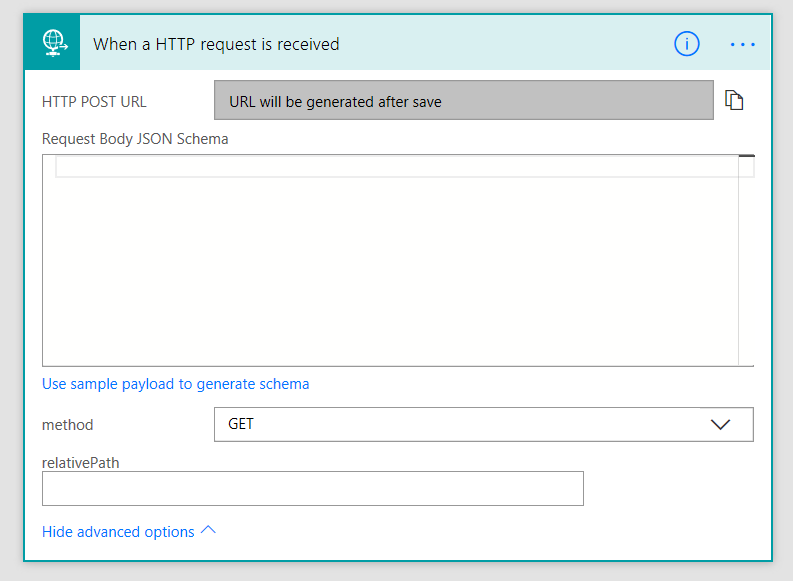
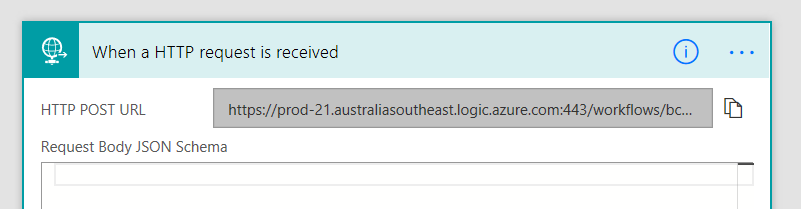
1. Create a new blank flow using the Request trigger. We are going to make this flow into a webservice and PowerApps is going to call it, passing the reference to the required file.

image

Now the important but is to click “Show Advanced Options” and to change the method to a GET.

image

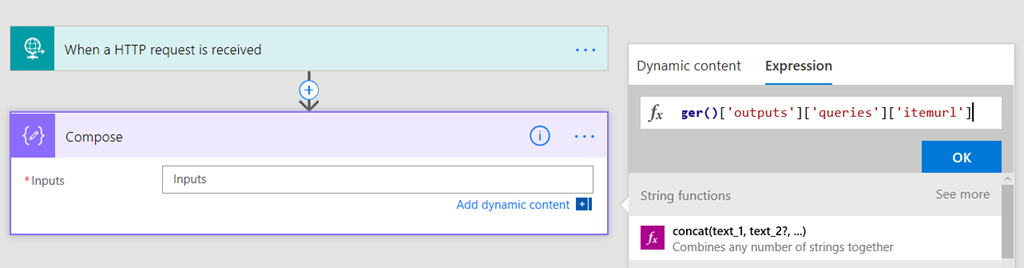
2. Add a compose action using the expression ‘trigger()[‘outputs’][‘queries’][‘itemurl’]’ (no quotes). What this does is tell flow to look for a parameter called itemURL from the workflow trigger (step 1). Specifically, we are telling it to look for itemurl in the query string from the HTTP request made by PowerApps.

image

While you are there, rename the action to “Get PDF Path”.

image

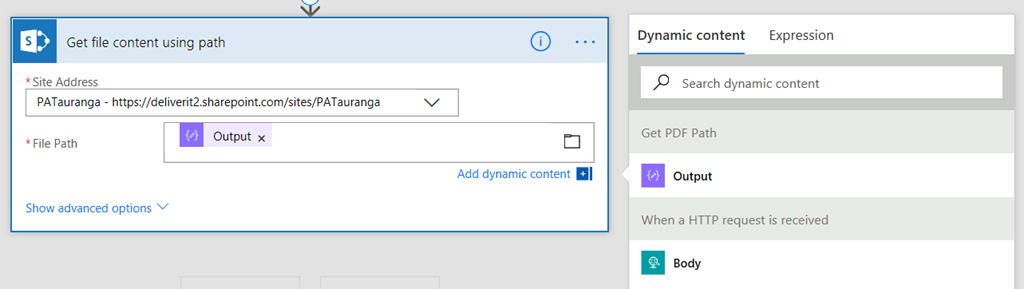
3. Add a SharePoint – Get File Content Using Path action. Specify the site collection you want to work with and then set the “File Path” parameter to be the output of step 2 (Get PDF path).

image

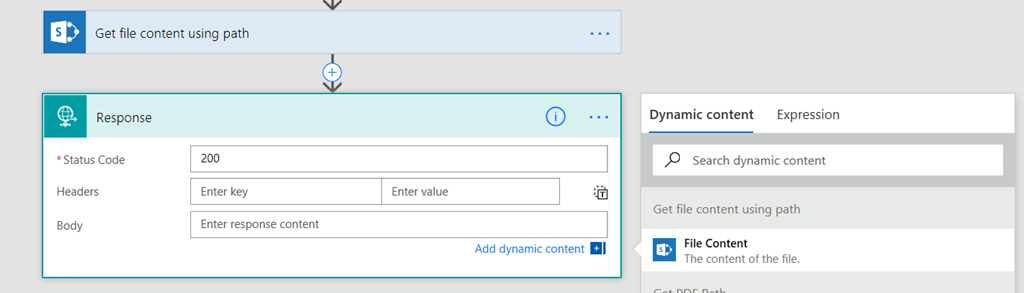
4. Add a request – response action. In the “Body” parameter, add the File Content from step 3.

image

Now create this flow and re-open it. The Request trigger will have a URL generated. Click the icon to copy this URL to clipboard. We are going to need it in PowerApps.

image

Right you are done with Flow. Now go back to PowerApps and change the Document property for the PDF viewer to the URL you just copied, but make one change, namely adding an itemurl parameter. eg:

  • from: http://bigflowurl
  • to http://bigflowurl&itemurl=/Shared Documents/<name of your PDF file>

Going back to my original PDF it becomes:

“https://[flow host].[location].logic.azure.com:443/workflows/[workflow ID]/triggers/manual/paths/invoke?api-version=2016-06-01&sp=%2Ftriggers%2Fmanual%2Frun&sv=1.0&sig=[sig]&itemurl=/shared documents/towards-a-holding-environment-final.pdf

So let’s test in PowerApps… wohoo!

image

Conclusion and caution…

Okay so we were able to solve a problem fairly easily by using Flow to perform the authenticated connection to PowerApps. In fact, with a little imagination you can extend this idea out further like my video below where I make a document library/pdf browser.

As I mention in the video, Flow has in effect become a proxy – or a floxy Smile. But the issue is now you have a URL that has the ability to access items in the site collection anonymously and potentially expose things you do not want to.  After all, you could give that URL to anybody and if they change the file specified, then you are exposed.

So my strong suggestion is to think carefully about this and take steps to mitigate any risk. For example, add some checks into your flow if you only have one document library that you want to be able to pull files from. Perhaps leverage the differences in the HTTP request between a browser and PowerApps and check the trigger headers (as an example the “User-Agent” for PowerApps is different to what a browser will report). After all, you have to be authenticated to use PowerApps so the real risk is hitting the flow URL from non-PowerApps sources.

Now one other consideration with this… it will run a lot of Flows, so keep an eye on your monthly flow run limits. Also really importantly, things move fast in this space, so the gap addressed by this method may go away really soon. For example: you do not need to use a floxy with images anymore.

Like I said at the start, there is a part of me that feels a little dirty about this method because it allows an unauthenticated URL access to authenticated content, but then again with appropriate controls it should be ok.

Hope this helps you and thanks for reading…


Paul Culmsee

September 22, 2017

A lesser-known, but really important update to PowerApps

Filed under: PowerApps,SharePoint — admin @ 6:07 pm

This week, the PowerApps team released a great update to PowerApps that should make any InfoPath person very happy. PowerApps now supports the use of rules that allow you to easily modify the behaviour of an app based on criteria that you specify. Previously this had to be done using variables and was one of those aspects to PowerApps that felt “developery”.

This is a great new feature and I will record some videos on this in the not-too-distant future…

But there is another update to PowerApps that seems to have slipped under the radar. This one is really huge for anybody who wants to leverage rich media in SharePoint…Up until now, there was a problem with authenticated connections when using controls like the Image or PDF controls. Consider this list:

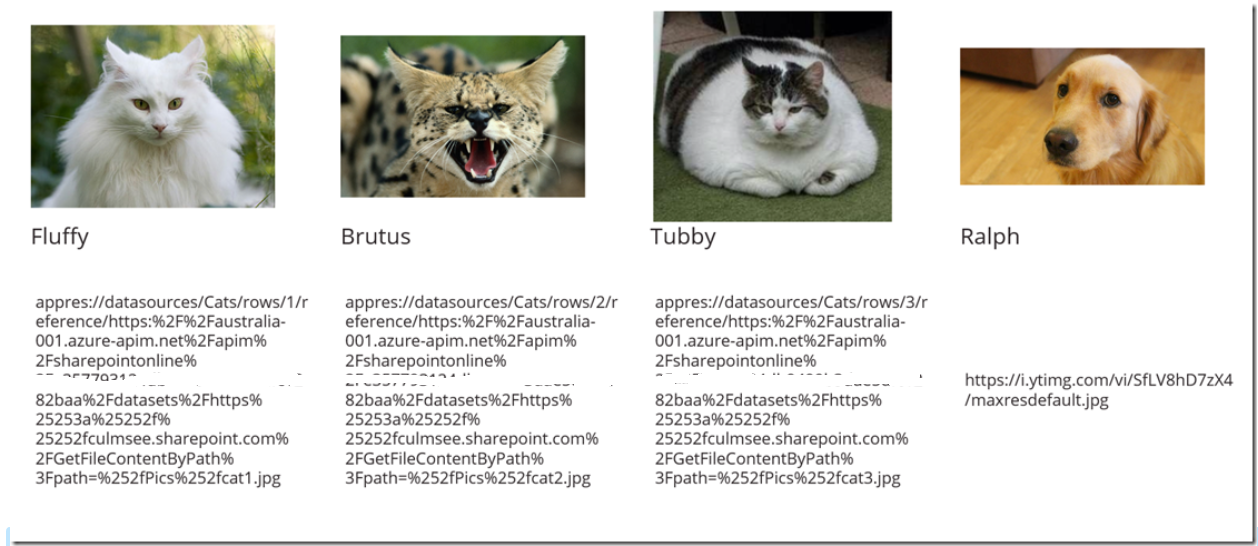
image

In this example, we have a Title column and a hyperlink column called CatPhoto. Up until recently, if you were to try and display this content in PowerApps, only anonymous URL’s would work. In the example above, the first 3 cat photos are in a SharePoint document library called Pics, and the resulting URL is an internal one (eg: https://culmsee.sharepoint.com/Pics/cat1.jpg). The 4th image in the list above is Ralph, who apart from being a dog, is an external image – eg: https://i.ytimg.com/vi/SfLV8hD7zX4/maxresdefault.jpg.

Previously, if you pulled this list into PowerApps and tried to display this in a gallery, you would only see Ralph. PowerApps would try and access the SharePoint URL’s without credentials and fail.

<Edit: If your original SharePoint column storing the URL is set to display URL and not picture, the issue remains!! If you are affected by this you can try my Floxy method>

But now if we pull the above list into PowerApps we now have awesomeness!!!

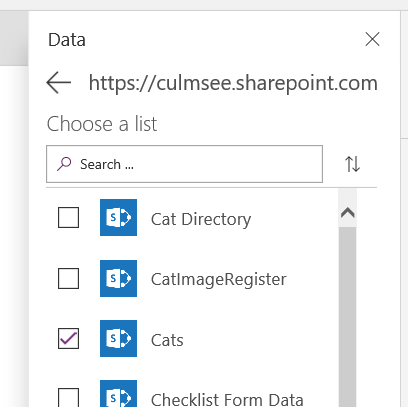
1. Add a SharePoint data source and connect to the list of cats

image

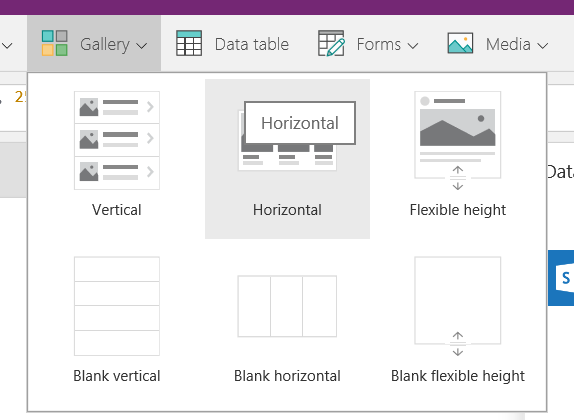
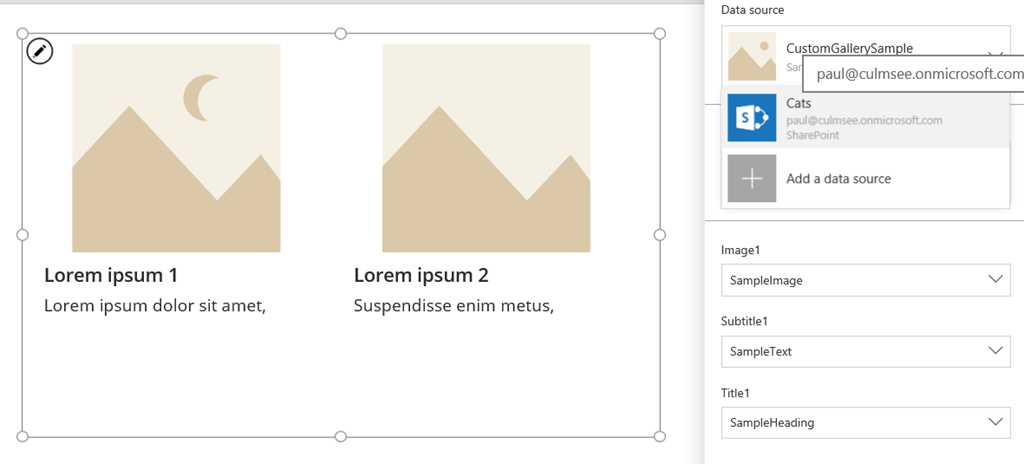
2. Add a horizontal gallery and set the data source to SharePoint.

image  image

3. Sit back and enjoy the awesomeness!

image

Now how did the PowerApps team pull this off? The easiest way to tell is to add a label to the gallery and have a look at the CatPhoto column. Previously it was the URL of the image as it is stored in SharePoint, but now it is very different…

Looking at the above image, Ralph’s URL still looks normal, but the SharePoint URL’s have been rewritten. Passing through a decoder and we can start to ascertain what’s going on..

appres://datasources/Cats/rows/1/reference/https://australia-001.azure-apim.net/apim/sharepointonline/[snip a GUID]/datasets/https://culmsee.sharepoint.com/GetFileContentByPath?path=/Pics/cat1.jpg

The closest thing to this URL format I have been before in PowerApps is when you upload media. It also uses the appres:// URL prefix too.

My guess of the above is:

Application Resources (appres://) –> Data Source (datasources/Cats/Rows/1) –> Datasource webservice endpoint (reference/https://australia-001.azure-apim.net/apim/sharepointonline/[snip a GUID) –> data source parameters (https://culmsee.sharepoint.com/GetFileContentByPath?path=/Pics/cat1.jpg).

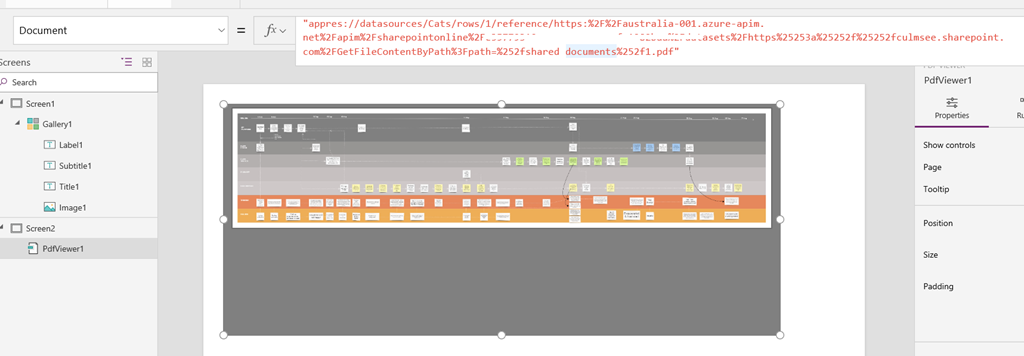
Now I experimented by manually changing the item in the path parameter for the GetFileContentByPath call. This worked fine… I was able to specify a PDF in the Shared Documents library and set that as the content source for the PDF control as shown below…

image

Conclusion

This is a brilliant enhancement to PowerApps and will open up many use-cases, given that SharePoint is the de-facto content store for most organisations. Furthermore, if you utilise my technique of using Flow to facilitate photo uploads into SharePoint, now we have closed the loop. We can take and upload photos, and subsequently browse, tag or mark them up.

Watch this space for some demo apps that take advantage of this new functionality!

Paul

August 25, 2017

Incredible! Download a PowerApp that determines your IQ from a selfie…

Hiya

Some of you might have seen my post where I explained how how my daughter, Ashlee (18), won a competition from Microsoft to develop a fidget spinner app. Well if you think that was impressive, check this out…

image

Inspired by the positive feedback from the community, Ashlee decided to up her game and investigated some of the various online services that PowerApps and Flow can connect to. The net result is an app which has capabilities that are quite extroadinary. By connecting to Microsoft Cognitive Services in Azure, Ashlee has created an app that will determine your IQ from your facial structure. In other words, you download this app, take a selfie, and via cloud-based machine learning that has processed millions of photos, you can find out your IQ without doing a traditional IQ test!

Even better, Ashlee has kindly donated it to the community as a learning tool, so you can not only learn about these ground-breaking techniques, but you can download/share it with your colleagues too.

So far this app has been used in various global organisations including Microsoft. It has also been demonstrated to rapturous applause at the recent Digital Workplace Conference in Sydney.


So DO NOT MISS OUT on this, especially when using this app is a simple set of easy-to-follow steps!


Ready… Steady…


Wait… I forgot to mention, this app is optimised for phones, and utilises Microsoft speech recognition, so be sure to turn up the volume so you can hear the instructions…


Right are you ready?


Oh… don’t forget… you need an Office365 subscription for this so make sure PowerApps is enabled on your tenant…


Okay, so do the following right now!


1. Download and install PowerApps studio onto your PC.

2. Download Ashlee’s Guess your IQ MSAPP (rename the file extension from .zip to .msapp) and open it in PowerApps Studio

3. In PowerApps studio, save a copy of the App to your tenant (“the cloud”) via the File menu

image

4. Now install PowerApps on your IOS or Android Phone (you will find it in the app store and its free)

5. Run PowerApps on your phone and sign in with the same user account you used in step 3

6. Select the app called Guess Your IQ. It might take a little while to load, but don’t worry – there is a lot of awesome functionality.

7. Enter your name when prompted…

image

8. Now use your phone camera to take a selfie…

image

9. Click the “Find my IQ” button and watch the magic of machine learning…

image  image

10. Seriously, you WILL NOT BELEIVE what happens next!… but you have to try for yourself!


Make sure you let me know what your IQ is! Smile


Paul Culmsee

www.hereticsguidebooks.com

August 14, 2017

How My Daughter Won a PowerApps Contest With a Fidget Spinner

Filed under: Application Development,Award,Flow,PowerShell — admin @ 10:14 pm

Hi all

<TD: DR>My daughter, with no coding experience, won a contest put by the PowerApps team and we recorded a video on how she did it which you can find below</TD: DR>

This little story starts with a tweet, put out by Audrie Gordon, who on August 7, asked the PowerApps community to make a fidget spinner.

image

As it happened, I had been teaching PowerApps to my 18 year-old daughter, Ashlee, for a couple of weeks prior to this. Now, Ash has always been good at mathematics and it was her favourite subject at school, but aside from that she has never coded anything in her life, never showed any interest in it, and is currently in her first year of a Psychology degree. Being a biased dad, I always suspected that she had a mind for coding. In saying this however, even I underestimated her progress. To put it bluntly, her speed at picking up PowerApps, Flow and WebServices has been nothing short of phenomenal. I previously uploaded a video about one of her apps that we built together, but with this new challenge, I had absolutely no idea how to do it myself.

It was around 10pm my time (GMT+8) when I showed Audrie’s tweet to Ashlee, who took a look at the video and promptly announced “I can do it better…”

So the challenge was on, and Ashlee spent the next 90 minutes writing her basic solution. As a parent and IT professional it was fun to watch as she went through the typical trials and tribulations of writing code, except I was hearing it through someone who a) was only 18 and b) had never coded before and did not know the terminology. I wish I had recorded the audio to be honest Smile

Then came the breakthrough moment, where she danced a little “I am awesome” jig like real developers are prone to do when their code works. She got the base concept working, which I tweeted out so she could claims dibs on the prize. But Ash was not done, and spent an additional couple of hours making the fidget spinner look authentic in pretty pink as shown in the animated GIF below…

Spinner

By this time it was close to 1am, so she tweeted her solution and went to bed. Next morning we were pleasantly surprised. She won the contest!

image

But that was not all, she impressed not only the community but various Microsoft people including Darshan Desai – Group Program Manager for PowerApps who commented that not many in the PowerApps team could have come up with this solution….

image

Now Ashlee and I recorded a video yesterday where she took me through the solution step-by-step. If you want to learn some neat PowerApps tricks, brush up on your trigonometry and watch my awful math get exposed, then here it is in all its glory Smile

Here are some of the other tweets she received. So you still think I am a biased dad? Smile

imageimage  image  image   image

I feel the PowerApps team should also be proud that a teenager was able to build an app on their platform so quickly. In fact, many kids could benefit from learning PowerApps and perhaps Microsoft should look at its utility in schools.

Thanks for reading

Paul Culmsee
 

August 7, 2017

Advanced PowerApps Awesomeness in Sydney

Logo The Digital Workplace Conference Australia

Hiya

First up, if you are not aware, the Digital Workplace Conference is about to land in Sydney. I strongly recommend you attend this conference. In my opinion there has never been a more fascinating time to be involved in the world of Office365/SharePoint and Azure and some top people are going to be speaking.

I have spent the better part of the last two years working with cloud first organisations, and frankly I’m amazed at what is available in the base edition of Office365. I suspect many organisations are not particularly aware of the capabilities available to be exploited – which brings me onto my topic.

In case you are not aware, I am a bit of a fan of PowerApps. I see it having huge potential for citizen developers and more technically-minded folk alike. Most recently I have been teaching it to my daughter, who at 18 years of age, is busy studying her first year of psychology at university. For someone with no formal programming experience, she has come a long way, as this video demonstrates. In this video, we cover a real-world scenario and make use of a lot of tricks to get a nice, solid solution.

So why am I telling you this? Well I am presenting at the Digital Workplace Conference in Sydney this month, and my session is called “A Certificate in Advanced PowerApps Awesomeness” and I will be covering some of the tricks behind what we did in this video, as well as a couple of other apps that Ashlee wrote. I will be sharing various pearls of wisdom from Ashlee, who presents a fun perspective on Microsoft products. Ever seen those “kids react to?” videos on YouTube?  Well, watching Ashlee work on PowerApps is kind of like that Smile

Therefore I will share some Ashlee-penned pearls of 18 year old wisdom such as…

“Do not put spaces in the name of your SharePoint libraries, because PowerApps can’t handle it and will have a huge hissy fit”

So I hope to see you in Sydney, where I will delve into this beast known as PowerApps and show you what an 18 year old with no formal experience can do with the platform.

I’ll cover PowerApps deeper than the typical demos, but at the same time business-oriented folks shouldn’t be too off-put by it.

Hope to see you there!


Paul Culmsee
July 14, 2017

The (currently) best way to update SharePoint document metadata using Flow

Filed under: Flow,PowerApps,REST,SharePoint,Web Services — admin @ 11:52 am

Hi all

<update>This method looks to be superseded. Please read this post and only use this method if you have trouble</update>

Anyone new to Flow, who has come from a SharePoint Designer Workflow background, will automatically assume that Flow has out of the box support for not only uploading documents to a SharePoint library, but to set metadata on it. Unfortunately this is not the case. Currently Flow has limitations with SharePoint integration that makes many common real-world scenarios difficult to achieve, including:

  • The SharePoint : Create File action provides no way to update library metadata when uploading a file, nor does it return the item ID of the newly created file
  • The SharePoint: Create Item action provides access to metadata but only works on lists
  • The SharePoint: Update Item action works on document libraries, but requires the item ID of the document to do so. Since Create File does not provide it, we have no reference to the newly created file

Basically this means it’s hard to upload a file to SharePoint via flow and then set metadata on it.

Given this is such a common scenario, I initially used a dodgy workaround. Basically the method was to:

  1. Use Create File action to upload a file
  2. Use the Get Items action to bring back the metadata for the most recently created file in the library
  3. Grab the ID from step 2
  4. Use the Update Item action to set the metadata on the recently uploaded file.

The big problem with this issue is there is no guarantee that step 2 will actually get the file from step 1. For example, if a lot of files were uploaded to a library at once, step 2 would easily grab the wrong file. The implication is this approach has data integrity concerns and does not scale.

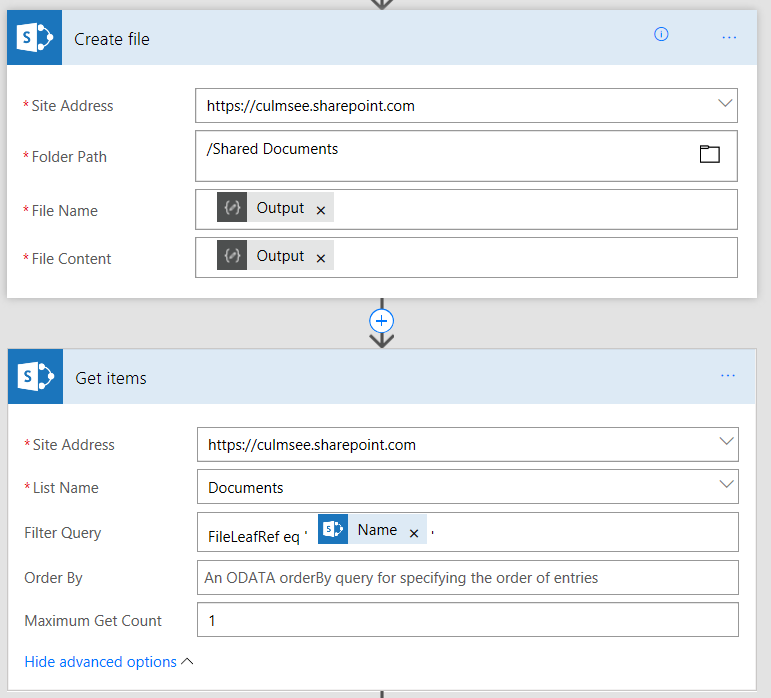
This morning I finally found a method that is much better than my dodgy method. The basic approach is the same except step for 2. What we do now is to use the Get Items action to return the item matching a supplied file name, like so…

image

As you can see above, we are uploading a file to SharePoint and then passing the file name to a filter query of “FileLeafRef eq [Filename]” in the Get Items action.

Now behind the scenes, what blindsided me to this rather obvious approach was the web service that Flow uses to do this. You see, traditionally this would work fine with a REST call in SharePoint:

https://culmsee.sharepoint.com/_vti_bin/ListData.svc/Documents?filter=Name eq ’somefile.jpg’

Note that “Name” can be used to filter results based on file name. But when you look at the debug output of the Get Items action in Flow, you see it hitting a very different endpoint.

https://culmsee.sharepoint.com/_api/SP.APIHubConnector.GetListItems(listName=’Documents’,queryOptions=@q)?@q=%27%2524filter%3dFileLeafRef%2520eq%2520%252somefile.jpg%2527%26%25%27

(and decoded to make it a bit more readable…)

https://culmsee.sharepoint.com/_api/SP.APIHubConnector.GetListItems(listName=’Documents’,queryOptions=@q)?@q=’$filter=Name eq ‘somefile.jpg’

Now if you try this in Flow, you will get an error that column ‘Name’ does not exist. So this web service behaves differently to the SharePoint list web service that I know. Luckily there is a workaround… changing Name to FileLeafRef works Smile

This back in the Get Items action, the filter “FileLeafRef eq ‘[File name]’ will work and always return the correct ID as shown in the sequence below that adds in step 4.

image

Now note the plural in the action: “Get Items”. That means that by design, it assumes more than 1 result will be returned. Even though we are matching on a unique ID, the implication is that the data will comes back as a JSON array. Flow will pick up on this and automagically add an “Apply to Each” section around your “Update Item” action.

By the way if you are thinking that file name is not unique if there are folders in the document library, fear not because this method also works… In this case we use FileRef (which includes folder path) and compare it to Path, which is returned by the Create Item action…

Hope this helps sometime…

Paul Culmsee
www.hereticsguidebooks.com

« Newer PostsOlder Posts »

Powered by WordPress