SharePoint Branding Part 6 – A "solution" to all issues?
There has been a bit of a gap in this series between part 5 and 6 – and fortunately for the both of us, I think this is the penultimate post in my series on SharePoint branding. While it has been an interesting exercise for me, I must confess each successive article is getting harder to write as my interest is shifting 🙂 So many sub-disciplines within MOSS – I think I might delve into WCM soon :-).
To recap for those of you hitting this page first, I suggest you go back and read this series in order.
- Part 1 dealt with the publishing feature, and some general masterpage/CSS concepts and some quirks (core.css and application.master) that have to be worked around.
- Part 2 delved into the methods to work around the application.master and core.css issue
- Part 3 delved further into the methods to work around the application.master and core.css issue and the option that solved a specific problem for me
- Part 4 then changed tack and introduced how to package up your clever branding via features
- Part 5 expanded on features and also noted a couple of major bugs that can catch you out if you aren’t aware of them
Now, we will finish off on features and move onto solutions. As you will see, aside from playing a very important part in SharePoint deployment/governance process, solutions actually solve one of the bugs I mentioned in part 5 – the one where deactivating and reactivating a branding feature does not always update the components. (More on that later).
In addition, whilst our feature is not too bad, it is not uber clever yet! As described in the previous article, a site collection administrator still has to manually perform some tasks after activating the feature. This may be totally fine, but generally, you would only activate a branding feature, if you meant to use it.
So presently, we have to pick the our master page from the master page list, as well as apply the right theme based CSS file as shown in the two images below.
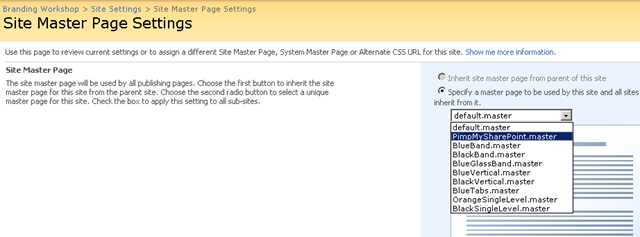
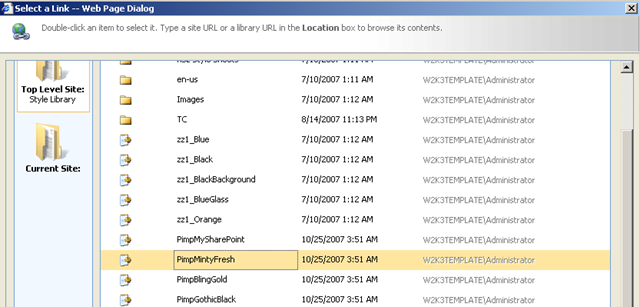
We know how much of a strain those 2 steps must be to those bleating, underworked and overpaid site administrators, but fear not, lazy ones! We do have the means to do this automagically!
Feature Receiver Assembly
SharePoint features have the facility where you can write custom code that is triggered when certain events happen to features. It is a class called SPFeatureReceiver and when used, it traps events that are raised after Feature installation, uninstallation, activation, or deactivation action has been performed.
We are going to write some code that waits for the feature to be activated, and then set the master page for the site collection to pimpmysharepoint.master. While we are at it, we will do the CSS override too.
At this point if you are not a programmer, your eyes may glaze over at the stuff below. If you are happy to believe me that you can make the master page default to pimpmysharepoint.master then feel free to skip to the next section.
For the rest of you…
In our Feature.XML file, we add a new parameter in the <feature> XML element called “ReceiverAssembly“. It specifies the assembly holding the feature. Another parameter called ReceiverClass specifies the class within the aforementioned assembly. The XML element looks something like
ReceiverAssembly=”CleverWorkarounds.PimpMySharePoint, Version=1.0.0.0, Culture=neutral, PublicKeyToken=c4r56efbb122b266″
ReceiverClass =”CleverWorkarounds.PimpMySharePoint.SetDefaultMasterPage” >
This now tells the feature that when the feature is installed, activated, deactivated or uninstalled, call the above assembly DLL and look in the CleverWorkarounds.PimpMySharePoint.SetDefaultMasterPage class.
Let’s look at that class source code.
namespace CleverWorkarounds.PimpMySharePoint
{
public class SetDefaultMasterPage : Microsoft.SharePoint.SPFeatureReceiver

    {

        public override void FeatureActivated (SPFeatureReceiverProperties properties)

        {

            SPWeb MyCurrentWeb = properties.Feature.Parent as SPWeb;

            MyCurrentWeb.MasterUrl = “/_catalogs/masterpage/pimpmysharepoint.master”;

            MyCurrentWeb.CustomMasterUrl = “/_catalogs/masterpage/pimpmysharepoint.master”;

            MyCurrentWeb.AlternateCSSURL = “/Style Library/pimpmintyfresh.css”;

            MyCurrentWeb.Update();

       }

    }
}
The namespace line (namespace CleverWorkarounds.PimpMySharePoint) matches the first part of the “ReceiverAssembly” parameter in the FEATURE.XML file. The class line (public class SetDefaultMasterPage : Microsoft.SharePoint.SPFeatureReceiver ) corresponds to the ReceiverClass parameter in the FEATURE.XML
Now SharePoint can find the DLL and the class to use.
Inside the class, it expects to find some code for each event. In the example above, we are only looking at the “FeatureActivated” event. So this assembly will only do something on feature activation, not install/uninstall/deactivation.
Looking at the activated event, it’s pretty easy to see what is happening.
SPWeb MyCurrentWeb = properties.Feature.Parent as SPWeb;
MyCurrentWeb.MasterUrl = “/_catalogs/masterpage/pimpmysharepoint.master”;
MyCurrentWeb.CustomMasterUrl = “/_catalogs/masterpage/pimpmysharepoint.master”;
MyCurrentWeb.AlternateCSSURL = “/Style Library/pimpmintyfresh.css”;
MyCurrentWeb.Update();
This code gets the current site collection the feature has been activated on, and sets the master page to pimpmysharepoint.master and sets the default CSS override..
Here is the full FEATURE.XML that incorporates the featuredependency directive we talked about in the last post, along with the receiverclass.
<Feature Id=”01c34560-6561-11dc-8314-0800200c9a66″
Title=”Pimp my SharePoint”
Description=”This is a feature that adds a new sexy CSS”
Version=”1.0.0.0″
Scope=”Site”
ReceiverAssembly=”CleverWorkarounds.PimpMySharePoint, Version=1.0.0.0, Culture=neutral, PublicKeyToken=c4r56efbb122b266″
ReceiverClass =”CleverWorkarounds.PimpMySharePoint.SetDefaultMasterPage”
xmlns=”http://schemas.microsoft.com/sharepoint/”>
<ActivationDependencies>
<ActivationDependency FeatureId=”F6924D36-2FA8-4f0b-B16D-06B7250180FA”/>
</ActivationDependencies>
<ElementManifests>
<ElementManifest Location=”ProvisionedFiles.xml”/>
</ElementManifests>
</Feature>
So ,now the feature is much more clever. As clever as a branding feature needs to be. Of course, if the feature is deactivated, you should also write code against the deactivating event and reset all the customisations back to defaults, but for my purpose, this is clever!
CleverWorkAround Rating – Sweeeeeet
Uh-Oh, but what about the assembly DLL?
Hang on a second! It’s all well and good to have a feature refer to an assembly DLL that you have written to do clever things, but what if that DLL isn’t there? Shall we be like Mythbusters and try anyway? 😛
C:\>stsadm -o installfeature -name pimpmysharepoint
Operation completed successfully.
 Damn, that myth is totally busted :-).
Ah well, let’s activate the feature since ‘activation’ was the only event we actually trapped for!
 YEAH BABY! A big, feral error runtime error! Now that is what I call a mythbusters moment!
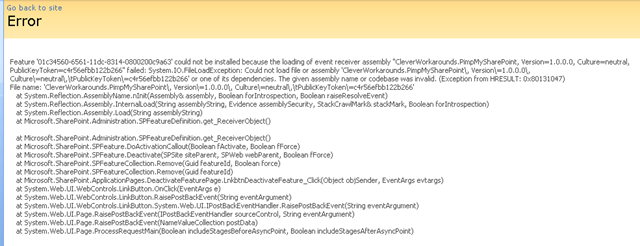
And for those lovely search engine spiders, here it is in plain text (in teeny tiny font because you probably don’t care that much about it anyway 🙂 Anyway, the first line confirms it. “Feature x could not be installed because the loading of the event receiver assembly x failed”.
Feature ’01c34560-6561-11dc-8314-0800200c9a63′ could not be installed because the loading of event receiver assembly “CleverWorkarounds.PimpMySharePoint, Version=1.0.0.0, Culture=neutral, PublicKeyToken=c4r56efbb122b266” failed: System.IO.FileLoadException: Could not load file or assembly ‘CleverWorkarounds.PimpMySharePoint\, Version\=1.0.0.0\, Culture\=neutral\,\tPublicKeyToken\=c4r56efbb122b266’ or one of its dependencies. The given assembly name or codebase was invalid. (Exception from HRESULT: 0x80131047)
File name: ‘CleverWorkarounds.PimpMySharePoint\, Version\=1.0.0.0\, Culture\=neutral\,\tPublicKeyToken\=c4r56efbb122b266’
at System.Reflection.AssemblyName.nInit(Assembly& assembly, Boolean forIntrospection, Boolean raiseResolveEvent)
at System.Reflection.Assembly.InternalLoad(String assemblyString, Evidence assemblySecurity, StackCrawlMark& stackMark, Boolean forIntrospection)
at System.Reflection.Assembly.Load(String assemblyString)
at Microsoft.SharePoint.Administration.SPFeatureDefinition.get_ReceiverObject()
at Microsoft.SharePoint.Administration.SPFeatureDefinition.get_ReceiverObject()
at Microsoft.SharePoint.SPFeature.DoActivationCallout(Boolean fActivate, Boolean fForce)
at Microsoft.SharePoint.SPFeature.Deactivate(SPSite siteParent, SPWeb webParent, Boolean fForce)
at Microsoft.SharePoint.SPFeatureCollection.Remove(Guid featureId, Boolean force)
at Microsoft.SharePoint.SPFeatureCollection.Remove(Guid featureId)
at Microsoft.SharePoint.ApplicationPages.DeactivateFeaturePage.LnkbtnDeactivateFeature_Click(Object objSender, EventArgs evtargs)
at System.Web.UI.WebControls.LinkButton.OnClick(EventArgs e)
at System.Web.UI.WebControls.LinkButton.RaisePostBackEvent(String eventArgument)
at System.Web.UI.WebControls.LinkButton.System.Web.UI.IPostBackEventHandler.RaisePostBackEvent(String eventArgument)
at System.Web.UI.Page.RaisePostBackEvent(IPostBackEventHandler sourceControl, String eventArgument)
at System.Web.UI.Page.RaisePostBackEvent(NameValueCollection postData)
at System.Web.UI.Page.ProcessRequestMain(Boolean includeStagesBeforeAsyncPoint, Boolean includeStagesAfterAsyncPoint)
So, it should now be obvious that the DLL holding your event receiver class should be deployed to your web front end servers, either in the GAC, or in the BIN folder of each web app under INETPUB.
But how lame is that? You go to all that trouble to make a auto-installing feature and then you need to manually do this bit??? Isn’t that a little counter intuitive?
Fear not readers, you now know why SharePoint “Solutions” are the things that REALLY matter!
SharePoint Solutions – The plain english description
Back in this early post, I defined SharePoint Features as “a method to add/customise many areas of SharePoint”. Well, guess what, so are solutions as well! So what is the difference between the two?
Well, to answer that, let’s consider some of the things that you cannot do in a feature.
- You cannot deploy an assembly to the GAC
- You cannot edit the web.config of a web application
- You cannot install a feature to all web front end servers in a farm at once
The latter is an important one. One of my clients has a 5 server farm with 3 WFE servers. If say, I have to update a webpart, I have to put the assembly into the GAC on all three servers. I then have to edit web.config on the web applications to mark the control as safe.
This is not only tedious but risky. Mistakes can be made, leaving WFE servers in an inconsistent state. (Hands up who has killed a web application because of a mistake in web.config. I bet all of you!)
If we have to roll back to a previous version, we have to do it manually on all three WFE servers. Also, what if we have several related features to install at once? That’s a lot of manual work and I am cheap and lazy!
So, MSDN says this about solutions: “The Microsoft Windows SharePoint Services solution framework provides a way to bundle all of the components for extending Windows SharePoint Services in a new file, called a solution file. A solution file is a cabinet or .CAB-based format with a .wsp extension. A solution is a deployable, reusable package that can contain a set of features, site definitions, and assemblies that you can apply to a site, and can also enable or disable individually. You can use the solution file to deploy the contents of a Web Part package, including assemblies, class resources, .dwp files, and other package components”
Therefore, to really be clever with the deployment of our clever branding, we now need to take our feature, and add it to a solution, that also copies the feature receiver assembly (DLL) into the GAC. In addition, the solution will do this consistently to all WFE servers, ensuring that they are consistent. If any one of them has a problem, we can roll back the solution deployment, fix the issue, and then re-deploy the solution.
CleverWorkAround Rating: Mandatory! If it is not a solution, I ain’t putting it in!!
Okay so how do I build my solution then?
Well, I have to say, when MOSS07/WSS3 came out, this was a truly ugly process. In the last year, plenty of clever people have written tools to make the job easier. Let’s examine the one I use: WSPBUILDER
I won’t fully detail the product – hey that’s what the wspbuilder site is for. But I will explain how to use it for the purpose of this branding exercise.
So assuming you have WspBuilder installed, we have two things to install.
- The “CleverWorkarounds.PimpMySharePoint.DLL” eventreceiver assembly.
- The PIMPMYSHAREPOINT feature
To create the solution, you can follow these basic steps (although real SharePoint developers will snigger at this, as I am not integrating this into a visual studio project).:
- In the folder where WspBuilder was installed (I’ll assume C:\Program Files\WSPBuilder for now), create the following folder structure if it does not exist:
- 12\Template\Features (eg C:\Program Files\WSPBuilder\12\Template\Features)
- Copy the PIMPMYFEATURE folder into the above folder, resulting in C:\Program Files\WSPBuilder\12\Template\Features\PimpMySharePoint
- In the folder where WspBuilder was installed (I’ll assume C:\Program Files\WSPBuilder), create the GAC folder if it does not exist:
- C:\Program Files\WSPBuilder\GAC
- Copy the CleverWorkarounds.PimpMySharePoint.DLL assembly to the C:\Program Files\WSPBuilder\GAC folder
- Open a command prompt, and CD to the location of wspbuilder
- cd \program files\wspbuilder
- Type wspbuilder at the prompt and press Enter
- c:\program files\wspbuilder>wspbuilder
- The wspbuilder program will package up your components and create three files.
- wspbuilder.wsp
- manifest.xml
- solutionid.txt
For those of you who are really interested, the WSP file name will default to the name of the folder where WSPBUILDER.EXE resides. I strongly suggest renaming this to a meaningful name or running wspbuilder from an appropriately named folder. For our purposes, I renamed it to pimpmysharepoint.wsp.
Right! Now we have our magical WSP file. We need to add this solution to the SharePoint farm ‘solution store’, and then deploy this solution.
Deploying the solution and testing
To add the solution to the store, we use the STSADM command. But first, let’s clean up so we can test this.
Firstly, delete or rename the pimpmysharepoint feature in the C:\Program Files\Common Files\Microsoft Shared\web server extensions\12\TEMPLATE\FEATURES folder. We want to see that the solution adds it back when deployed.
Also check the C:\WINDOWS\ASSEMBLY and ensure your assembly is not in the GAC. If it is, remove it.
So, back to STSADM. Below is the syntax..
C:\Program Files\WSPBuilder>stsadm -o addsolution -filename pimpmysharepoint.wsp
Operation completed successfully.
C:\Program Files\WSPBuilder>
Okay, now what? Well.. we now deploy this feature.
Deployment can be performed via STSADM or SharePoint Central Administration. I actually prefer central administration because it tells me more and leaves less to chance. (I tend to type badly and make spelling errors 🙂
In Central Administration, navigate to Operations -> Solutions Management under “Global Configuration”
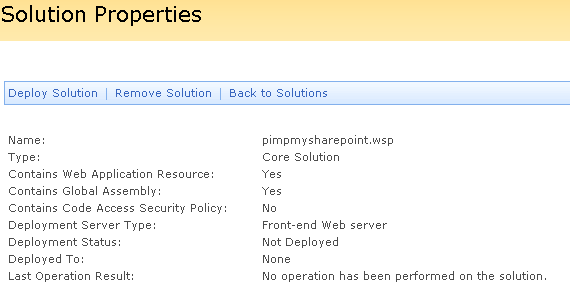
Well how about that! There is our pimpmysharepoint.wsp file. Note that its status is “not deployed”.
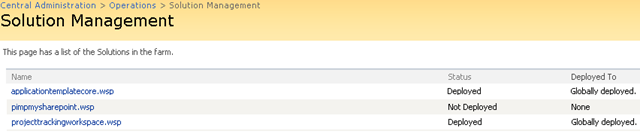
I guess the only thing to do is to deploy it then! 🙂
Clicking the pimpmysharepoint.wsp link presents us with the solution deployment screen. Here we can see a summary of the solution. One of the key thing that we can see is that our solution contains an assembly DLL (“contains global assembly” is YES)
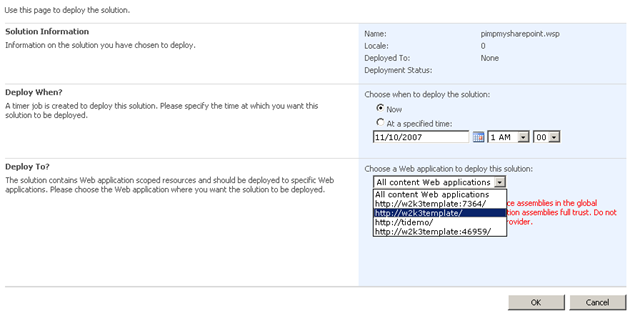
Click “Deploy Solution”. The next screen is the most important one of all. We are provided with a means to deploy this solution at a later time (perhaps on a weekend or other quiet time). The other really interesting thing is because this solution is of type “web front end server” (see previous image), we have the choice of which web application to deploy this solution to.
This is really important! Just because we have a solution added to the farm solution store, does not mean that we want to pimpmysharepoint feature installed on every web application.
I personally prefer to specify the web application the feature is for, rather than deploy to all of them. For a start, if you deploy to all, you are including the central administration site itself, as well as the SSP sites. I think 95% of the time they don’t need it. I’d rather keep such an important web application nice and vanilla).
For what its worth, depending on the solution components and scope, you can pick all or one web application to deploy to. If you have more than one web application that needs this feature, you can come back into this screen again via the solution management section in central admin. From there you are able to choose another web application.
Regardless of this, the assembly only gets loaded into the GAC once! It will do a version check if it finds one already there.
Click OK and if all goes to plan, the solution is deployed!
Let’s go and check!
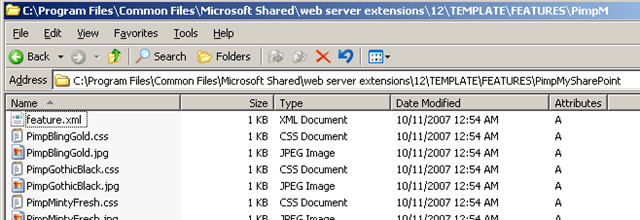
First up, examine C:\Program Files\Common Files\Microsoft Shared\web server extensions\12\TEMPLATE\FEATURES folder. Is there a PIMPMYSHAREPOINT folder? Yes indeedie!
Secondly, is our DLL in the GAC? Yep..

So things seems to be looking good!
Note! If we had several WFE servers, in this case, the feature and assembly would be been installed on all WFE servers for the solution to successfully be deployed. From a governance point of view, this is a significant time saver and ensures all WFE servers are consistent. If say, the deployment of the solution failed for one WFE server, you will be notified of the failure.
Upgrades and rollback
But it gets even better. Solutions can be upgraded. So you have new master page content and optimise the code in your feature receiver event handler. Simply recreate the WSP file using WSPBuilder. Then you can replace the existing solution with your updated one.
The beauty of this is that an upgraded solution will update the feature, install the newer assembly on all WFE servers. In addition, if something goes wrong, SharePoint will automatically roll back to the pre-upgrade solution as well!
A solution is upgraded when a newer WSP file is created. The STSADM -o upgradesolution command is used to do the upgrade. For example.
C:\Program Files\WSPBuilder>stsadm -o upgradesolution -name pimpmysharepoint.wsp -filename pimpmysharepoint-v2.wsp
Want to retract a deployed solution from a site? That’s easy too. You can do it via the solution management admin screen in central administration or use the STSADM -o retractsolution command. You can retract a solution from one or all web applications as well.
In our sample, retracting a solution from a web application will remove the feature from the feature list. You will no longer be able to activate it.
Finally, you can completely remove the solution as well. This will do a complete cleanup. The PIMPMYSHAREPOINT feature folder will be deleted from C:\Program Files\Common Files\Microsoft Shared\web server extensions\12\TEMPLATE\FEATURES and the cleverworkarounds.pimpmysharepoint assembly will be removed from the GAC.
But wait! there’s more!
If I haven’t convinced you enough already, I will give you one more reason. In part 5 of this series, I outlined the stupidly annoying issue where the deactivation and reactivation of a branding feature will not work properly. Specifically, feature files will not be overwritten when they have been modified via publishing a new version of files within the site collection galleries. “Seems that as soon as a new version has been published, any updates via a feature will not overwrite. The feature gives no indication that this has occurred either!”
But guess what! When you upgrade a solution via STSADM -o upgradesolution, this issue does not occur. All updates to features that are packaged into a solution get properly distributed to any site collection that has the pimpmysharepoint branding feature activated!
Why the behaviour is different when deactivating and activating a feature is anybody’s guess, but it works for me!
Summing Up
My aim in this article was to educate and convince you that solution’s the best way to install features. Notwithstanding the fix for my annoying feature bug, the ability to push out updates across multiple servers consistently, and ease of upgrades and retracting make your complex environment just that little bit more manageable.
So if a 3rd party tells you “oh just put this updated DLL into the GAC”, politely tell them that if it is not packaged into a solution, you are not going to do it! 🙂 Might sound tough, but there is pretty good reasoning behind this attitude. My last post of this branding series will expand on this sort of thing when I cover the governance of SharePoint branding, based on all we have learned so far.
For now though, I hope you found this post useful!


November 12th, 2007 at 9:53 pm |
[…] SharePoint Branding Part 6 – A “solution” to all issues? […]
February 2nd, 2008 at 2:03 pm |
[…] flatly refuse to accept any significant customisation/code changes unless they are packaged up as a solution that is activated via features. Some developers hate this and feel I am being […]
April 5th, 2008 at 5:29 am |
Hello
first of all thanks for this awesome series of posts it helped me tremendously
if i may add a little comment… while implementing the feature event receiver i faced an error with this portion of the code:
SPWeb MyCurrentWeb = properties.Feature.Parent as SPWeb;
public class SetDefaultMasterPage : Microsoft.SharePoint.SPFeatureReceiver{
public override void FeatureActivated (SPFeatureReceiverProperties properties)
{
SPWeb MyCurrentWeb = properties.Feature.Parent as SPWeb;
MyCurrentWeb.MasterUrl = “/_catalogs/masterpage/pimpmysharepoint.master”;
MyCurrentWeb.CustomMasterUrl = “/_catalogs/masterpage/pimpmysharepoint.master”;
MyCurrentWeb.AlternateCSSURL = “/Style Library/pimpmintyfresh.css”;
MyCurrentWeb.Update();
}
}
see properties.Feature.Parent is in fact a SPSite in my scenarion and not a SPWeb, my feature being deployed globally at the site collection level. so here’s my alternate code to deploy the changes to all the sites:
public override void FeatureActivated(SPFeatureReceiverProperties properties)

        {

            SPSite MySite = (SPSite)properties.Feature.Parent;

            SPWebCollection MyWebSites = MySite.AllWebs;
foreach (SPWeb MyCurrentWeb in MyWebSites)
{
MyCurrentWeb.MasterUrl = "/_catalogs/masterpage/cogan.master";
MyCurrentWeb.CustomMasterUrl = "/_catalogs/masterpage/cogan.master";
MyCurrentWeb.AlternateCssUrl = "/Style Library/cogan.css";
MyCurrentWeb.Update();
}
}
‘hope it helps .. and once again thanks a lot for this very helpful post.
cheers from canada
April 16th, 2008 at 9:04 pm |
Hi there!
Great Page, great articles. I truly enjoy your way of writing.
Just a small “upgrade” to your solution:
If you want to set the new Master for all Webs in your site (including the subwebs
of the subwebs and so on) you may need this method:
        public override void FeatureActivated(SPFeatureReceiverProperties properties)

        {

            SPSite MySite = (SPSite)properties.Feature.Parent;

            SPWebCollection MyWebSites = MySite.AllWebs;
foreach (SPWeb MyCurrentWeb in MyWebSites)
{
SetMaster(MyCurrentWeb);
}
}
private void SetMaster(SPWeb MyWeb)
{
MyWeb.MasterUrl = “/_catalogs/masterpage/YourMaster.master”;
MyWeb.CustomMasterUrl = “/_catalogs/masterpage/YourMaster.master”;
MyWeb.AlternateCssUrl = “/Style Library/YourCSS.css”;
MyWeb.Update();
if (MyWeb.Webs.Count > 0)
{
foreach (SPWeb SubWeb in MyWeb.Webs)
SetMaster(SubWeb);
}
}
As you can see it contains a small recursive function that runs through the
whole site.
Hope it helps.
Greets from Germany
Manfred
April 17th, 2008 at 1:15 am |
Hi again!
Another small update:
When deploying the solution I posted earlier, everything went fine until I checked
the subwebs… I forgot that the folder “Style Library” is located in the root site
of the SPSite and is not virtual for the subwebs. So here’s a better solution:
public override void FeatureActivated(SPFeatureReceiverProperties properties)
{
SPSite MySite = (SPSite)properties.Feature.Parent;
SPWebCollection MyWebSites = MySite.AllWebs;
foreach (SPWeb MyCurrentWeb in MyWebSites)
{
SetMaster(MyCurrentWeb, MySite);
}
}
private void SetMaster(SPWeb MyWeb, SPSite MySite)
{
MyWeb.MasterUrl = "/_catalogs/masterpage/YourMaster.master";
MyWeb.CustomMasterUrl = "/_catalogs/masterpage/YourMaster.master";
MyWeb.AlternateCssUrl = MySite.Url+"/Style Library/YourCSS.css";
MyWeb.Update();
if (MyWeb.Webs.Count > 0)
{
foreach (SPWeb SubWeb in MyWeb.Webs)
SetMaster(SubWeb, MySite);
}
}
Have fun!
May 5th, 2008 at 8:43 pm |
Hope you people are very excited in using the recursive function and
forgetting to close the SPWeb and SPSite objects. As per your recursive there
is a huge memory leakage… ha ha there comes the point… how would you handle
that Mister… well I am facing the problem with the memory leaks and sharepoint logs
is filling up … check that and let me know with the appropriate solution…
Many Thanks,
Brijesh.
June 5th, 2008 at 8:23 am |
[…] Links: [Part 1, Part 2, Part 3, Part 4, Part 5, Part 6, Part 7] Published Jun 04 2008, 11:23 PM by […]
June 18th, 2008 at 9:57 am |
this is hands down the best one stop shopping place for learning how to use features/solutions for branding I have EVER seen. Most of this I experinced myself before reading it – very nice to see I am not the only one who had to stumble through it pice by piece. Nice job documenting it for future reference! This is definitely a bookmarker for those times you need to refresh your memory on the details. Lots of little clarifications that I needed as well. Your writing style is very entertaining.
thanks!
June 24th, 2008 at 5:31 pm |
the code doesn´t work for me :/
//CleverWorkarounds.nov.dll
using System;
using System.Collections.Generic;
using Microsoft.SharePoint;
namespace CleverWorkarounds.nov
{
public class SetDefaultMasterPage : Microsoft.SharePoint.SPFeatureReceiver //line 7
{
public override void FeatureActivated (SPFeatureReceiverProperties properties)
{
SPWeb MyCurrentWeb = properties.Feature.Parent as SPWeb;
MyCurrentWeb.MasterUrl = “/_catalogs/masterpage/nov.master”;
MyCurrentWeb.CustomMasterUrl = “/_catalogs/masterpage/nov.master”;
MyCurrentWeb.AlternateCSSURL = “/Style Library/nov.css”;
MyCurrentWeb.Update();
}
}
}
i get the error code CS0534 in line 7
can somebody help me, plz?
August 31st, 2008 at 7:54 pm |
[…] Links: [Part 1, Part 2, Part 3, Part 4, Part 5, Part 6, Part […]
October 2nd, 2008 at 8:48 am |
to Brijesh H Patil —
try putting your spweb object into a using scope
here is a good article to explain
http://www.krokhmal.com/2006/10/05/MemoryLeaksUsingSPSObjectModel.aspx
October 31st, 2008 at 4:35 am |
Thanks for the articles dude. Article 6 close the deal for me, dude this was priceless training. I’m the
brand master on my job. Sharepoint Rocks!
August 29th, 2009 at 3:09 am |
Ah if only it was quite so simple. A good series of articles, though a long way to say solutions is the answer. Anyway I happen to work for one of those big corporates and we have dozens of site collections covering multiple divisions etc, you get the picture. So my requirement is that I dont actually care what master page your site uses as long as it inherits the masterpage from the site collection. Note Inherit not copy. So your solution helps but because it requires a filename I cant really use it.
However you and anyone else in the same ballgame might want to check out this posting
http://msdn.microsoft.com/en-us/magazine/cc700347.aspx
This cracked it for me. Basically whats interesting from my part is this code in the receiver that gets activated everytime a site gets created
// fired whenever a new site is created
public override void FeatureActivated(SPFeatureReceiverProperties properties) {
SPWeb ChildSite = (SPWeb)properties.Feature.Parent;
SPWeb TopLevelSite = ChildSite.Site.RootWeb;
ChildSite.MasterUrl = TopLevelSite.MasterUrl;
ChildSite.CustomMasterUrl = TopLevelSite.CustomMasterUrl;
ChildSite.AlternateCssUrl = TopLevelSite.AlternateCssUrl;
ChildSite.SiteLogoUrl = TopLevelSite.SiteLogoUrl;
ChildSite.Update();
}
So basically it makes a team site or non publishing site refer to the top level masterpage and css if you wish. Read the whole article as there is a solution for replacing the application master too so you dont need to use up your space for the custom css file to apply your look and feel to all pages.
So i can deploy any masterpage into a site collection and a new site will pick it up. An exsiting site can have it cascaded.