SharePoint Branding Part 4 – Packaging up your masterpiece into a Feature
Welcome to the fourth article in my series on SharePoint branding. Sorry for the time it’s taken to get this one out, but a certain game called “The Legend of Zelda: Hourglass Phantom” on NDS got in the way. I finished it yesterday and only had to cheat via google once :-). Anyway it’s out of my system now so I can get back to this.
After 3 epic articles on all that painful CSS and master page stuff (part one, two and three), we now focus on what you have to do to get your branding masterpiece deployed to the SharePoint farm the clever way. In this next set of articles, we will look at where things should go, and then how to get it there the right way.
Now web designers, put down that hairspray because I am talking to you! Don’t switch off just because we are shifting our focus to the packaging and deployment of your branding work. Just because you have produced a master page, CSS files and images does not mean your job is over. In my SharePoint world, you are expected at the very least, to also package your work into a feature so it can be deployed the clever way.
Technical geeks, stop sniggering because you are just as bad as the designers if not worse! Despite all your whining about process and documentation and how cowboy-like web designers are, you rarely do any documentation yourself and will happily make production changes with no change control or proper testing! :-P.
IT Managers… hmm… Why don’t you just go back to playing solitaire because I’m going to use some big words in this post.
Right! Let’s go.
Now I’ve already covered some of this stuff in my previous two articles on SharePoint features. We will recap some of this here, but I recommend for a full background, read the features post and the feature example post.
The CleverWorkarounds definition of SharePoint “Features” is that they provide a easy, consistent method to add/customise SharePoint. Once a feature has been installed to a SharePoint farm, it is available to be activated for specific sites or site collections. In the first article of this branding series, I showed how the “SharePoint Server Publishing Infrastructure” feature installs several master pages, among other things such as the style library. If you followed the advice in the first three articles on branding, it is exceedingly likely that you have your own customized master page, several CSS files and probably a few other associated files like images. You will also likely require the publishing feature to be activated for your branding to work.
So it makes sense, does it not, to package up and deploy your branding in the same manner as the publishing feature. Consistency is good!
So we will create a new feature that when activated for a site collection, adds our new master page, CSS and other supporting files to the master page gallery. From there, a site administrator can choose to use your marvelous custom master page by choosing it from the look and feel under “Site Administration”
The Custom Master Page
In this post, I am going to use a mythical custom master page called PIMPMYSHAREPOINT.MASTER. This master page is based around my hybrid branding technique as described in article 3. If you have not read this article yet, I suggest you go back and do so.
Anyway, this master page contains a custom reference to a CSS file called PIMPMYSHAREPOINT.CSS. Additionally, there are some other theme oriented CSS files that can be used for different skinning of sites. (In other words, site administrators have the choice of 3 color schemes to go with this master page).
- PimpMintyFresh.CSS
- PimpBlingGold.CSS
- PimpGothicBlack.CSS
There are also several image files that go with each of these CSS files. To make this example easier, we will just use 1 image file for each of the skinning CSS files.
- PimpMintyFreshBack.JPG
- PimpBlingGold.JPG
- PimpGothicBlack.JPG
So, along with PIMPMYSHAREPOINT.MASTER, we have 7 files here in total.
So where do I put the files?
Short answer, same place as the publishing feature uses for its master pages and styles. If that’s all you’re looking for, skip the next three headings, otherwise let’s dive a little deeper as to why they go here.
I really want to know – where does the master page go?
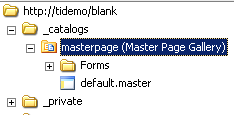
So we have our files, now we have to put them onto a site. Master page files obviously go in the master page gallery, but which one? A site collection has a master page gallery, but so does each and every individual site created inside that site collection. I can illustrate this by creating a site collection and a sub-site and then examining both of them in SharePoint designer. You will see that both the top level site of the site collection as well as the sub-site have individual _catalog/masterpage document libraries.
Below is the content of the master page gallery for the sub-site “blank” of the site collection “tidemo”. Note, there is not a lot in the master page gallery 🙂
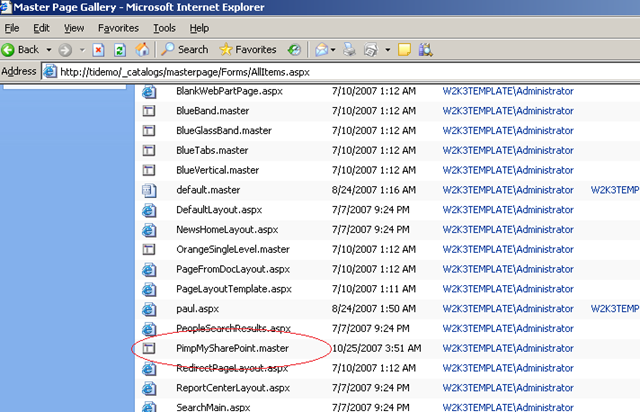
Now let’s look at the site collection (root) level. Whoa! The publishing feature puts a lot in there!
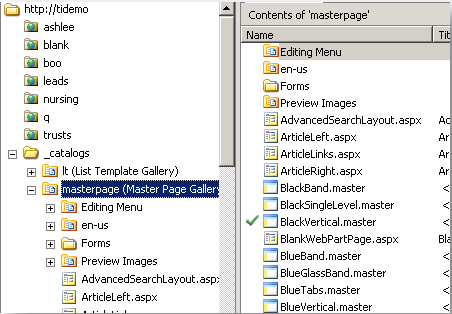
Okay, so we now know that we have two choices in relation to master page galleries. Which do we use? Fortunately, the answer is pretty much determined for us. Recall how by activating the publishing feature for a site collection, enables you the ability to choose a master page via the SharePoint “Site Settings” GUI interface. Guess what? When you have the publishing feature enabled and you choose a master page from “Look and Feel” of Site Settings, it always refers to the master page gallery for the site collection, not the site.
So the short answer is: put your master page in the master page gallery for the site collection. That way it is selectable via the GUI. It also means it is available to all sub sites. If you roll out an update to a master page in the site collection master page gallery, then sites in the site collection will reflect the change.
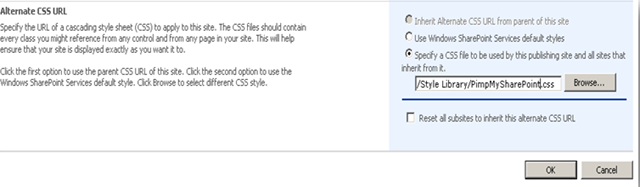
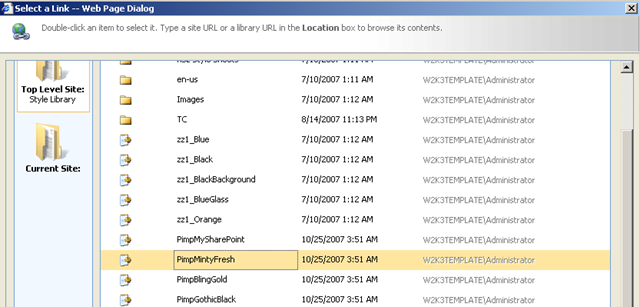
Now if you are clever and use something similar to the hybrid method for branding as described in part 3, it is fine to put all of the files in at a site collection level. This is because any new branding that you want to experiment with is just a new CSS file that can be deployed to the farm, and then can be referred to from the “alternate CSS URL” screen under “master page settings” in site administration. E.g.
But, I suppose there are valid circumstances where this central approach is not flexible enough. Let’s say, you have a particular site that you do not want to change at all when site collection updates are made to master pages and CSS files. In this case, you could copy the master page from the site collection master page gallery to the site master page gallery and edit the page layouts and default.aspx to refer to the site level master page gallery.
How? Well you would have to modify your layout and existing content pages and change the ~masterurl token that is used by default, to something else. (I spoke about tokens in the “master page theory” section of part 1 and won’t rehash it here). But changing ~masterurl/default.master to ~site/_catalogs/masterpages/< your master page file> will do the trick. It does hard-code the name of the master page. It will reference the master page from the master page gallery of the site and not the site collection.
I haven’t had the need to actually change the token as described above, so I’ll reserve judgement on its CleverWorkaround rating for now..
For the record.. I’d recommend Stramit’s page for a more detailed explanation of the tokens.
Ok, so where do the CSS and supporting files go?
This next bit can be tricky. Why? Because it all depends on how you set up your master page in the first place. We spent article 2 and 3 looking at methods to have a master page reference a CSS file. You can hard-code a reference to a CSS link into a master page directly or using methods like CssRegistration. Either way, if you do not use tokens here, you will get yourself into trouble. Consider the following master page source code:
<head runat=”server”>
[snip]
<Sharepoint:CssLink runat=”server” /
<!–Styles used for positioning, font and spacing definitions–>
<SharePoint:CssRegistration name=”</Style Library/pimpmysharepoint.css>” runat=”server”/>
[snip]
</head>
As you can see where I have marked in bold, it expects a document library to exist called “Style Library and looks inside it for a file called pimpmysharepoint.css”. This will result in the following browser HTML
<head>
[snip]
<link rel=”stylesheet” type=”text/css” href=”/Style%20Library/pimpmysharepoint.css” mce_href=”/Style%20Library/pimpmysharepoint.css”/>
<link rel=”stylesheet” type=”text/css” href=”/_layouts/1033/styles/core.css” mce_href=”/_layouts/1033/styles/core.css”/>
[snip]
</head>
Now if this is a single top level site collection, we are fine and dandy. The publishing feature does indeed create a document library called “Style Library” and it is the recommended place to put CSS files (more on this later).
But don’t forget, a single SharePoint web application can have many hundreds of site collections. Consider this example:
- http://tidemo
- http://tidemo/sites/collection1
- http://tidemo/sites/collection2
Above are 3 separate site collections running from a single web application. Now what if you as a user, only have permission to access http://tidemo/sites/collection1?
As shown above, the master page will render the CSS link as
<link rel=”stylesheet” type=”text/css” href=”/Style%20Library/pimpmysharepoint.css” mce_href=”/Style%20Library/pimpmysharepoint.css”/>
Can you see the issue with this? It will try and grab the CSS file from http://tidemo/style library, not http://tidemo/sites/collection1/style library. But your user account has no permission to http://tidemo at all. So the CSS is not found and the page is not styled.
Fortunately there are tokens that you can use to make sure there is a reference to the specific site collection. It is named, strangely enough, ~SiteCollection. So here is the amended master page source
<head runat=”server”>
[snip]
<Sharepoint:CssLink runat=”server” /
<!–Styles used for positioning, font and spacing definitions–>
<SharePoint:CssRegistration name=”<% $SPUrl:~SiteCollection/Style Library/pimpmysharepoint.css%>” runat=”server”/>
[snip]
</head>
Resulting in this output for our above example:
<head>
[snip]
<link rel=”stylesheet” type=”text/css” href=”/sites/collection1/Style%20Library/pimpmysharepoint.css” mce_href=”/sites/collection1/Style%20Library/pimpmysharepoint.css”/>
<link rel=”stylesheet” type=”text/css” href=”/_layouts/1033/styles/core.css” mce_href=”/_layouts/1033/styles/core.css”/>
[snip]
</head>
The problem is now solved. Note the path reflects the current site collection /sites/collection1.
So, now that we have tokens out of the way, we can quickly touch on the “Style Library” document library itself. As previously mentioned it is installed by the publishing feature and all CSS styles and associated files are stored here. Unlike the master page gallery, it only exists at the site collection level (because publishing is a site collection scoped feature). It is version enabled like the master page gallery but by default, does not have content approval enabled. It has been structured to handle multilingual sites via the use of subfolders for a given language and a language related token that is usable within master pages.
So, unless you have a really good reason, the CleverWorkarounds recommendation is to stick the style library created by the publishing feature. Add your custom styles to it using a naming convention that will ensure that future branding features by Microsoft or 3rd parties will not inadvertently overwrite your own stuff.
As mentioned above, a key reason to stick with the default style library is the multilingual framework it provides, which we will touch on next.
Multilingual CSS considerations
Multilingual support is very important in the enterprise. It is common to have some unique CSS styling requirements for particular languages so the style library structure, in combination with some tokens enables you to achieve this in a clever way.
Let’s look at a snippet of the structure of Style library as it is created by the publishing feature. Below is a directory listing of the style library.
- \Style Library\zz1_Blue.css
[snip]
- \Style Library\Forms\Document
- \Style Library\en-us\Core Styles
- \Style Library\en-us\Core Styles\Tabs.css
- \Style Library\en-us\Core Styles\Controls.css
- \Style Library\en-us\Core Styles\rca.css
- \Style Library\en-us\Core Styles\PageLayouts.css
- \Style Library\en-us\Core Styles\zz2_EditMode.css
- \Style Library\en-us\Core Styles\Vertical.css
- \Style Library\en-us\Core Styles\SingleLevel.css
- \Style Library\en-us\Core Styles\Band.css
[snip]
- \Style Library\Images\blk_PageBackground.jpg
- \Style Library\Images\blk_logo.jpg
Note, there is a folder called “en-us”, and within that are some additional styles. If you examine the sample master pages, you will see references to these styles in this format:
<SharePoint:CssRegistration name=”<% $SPUrl:~SiteCollection/Style Library/~language/Core Styles/Band.css%>” runat=”server”/>
<SharePoint:CssRegistration name=”<% $SPUrl:~sitecollection/Style Library/~language/Core Styles/controls.css %>” runat=”server”/>
We now see two new tokens. ~SiteCollection which we have already seen and ~language. ~language is pretty obvious I think. It substitutes the current locale to create the path. Therefore, if you had to support an additional language in your branding, all you need do is create a folder in the Style library, named the same as the locale/language being used. SharePoint will create the path on the fly and render the language specific CSS file.
CleverWorkaround rating: Too easy!
Enough theory already! Let’s package up our branding.
Well.. as it turns out, I wrote an article on creating a feature some time back. I’ll regurgitate some of it here, but using the PIMPMYSHAREPOINT.MASTER example above.
All features live in a folder on the web front end server.
C:\Program Files\Common Files\Microsoft Shared\web server extensions\12\TEMPLATE\FEATURES
To create a new feature, all you need to do is create a new folder under here. Until you activate the feature, this folder will have no effect on the system. Let’s call this feature folder “PimpMySharePoint”
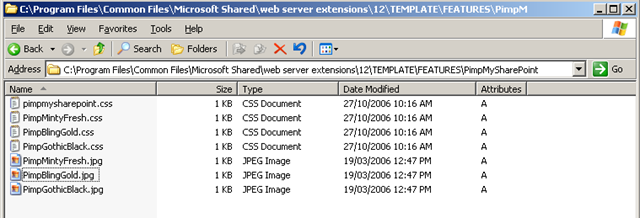
C:\Program Files\Common Files\Microsoft Shared\web server extensions\12\TEMPLATE\FEATURES\PimpMySharePoint
Inside this folder we place our master page, 3 CSS files and 3 images as shown below
So, now we need to do the glue that when the feature is activated after being installed, will copy these files into their correct locations in the site collection . We have to create 2 XML files that do this work.
The first XML file is always called FEATURE.XML.
Feature.XML
Now in real life, you will copy a FEATURE.XML from one of the many other features here and work off that. But in our case, we will just type it in. The content of FEATURE.XML is below:
<Feature Id=”01c34560-6561-11dc-8314-0800200c9a66″
Title=”Pimp my SharePoint”
Description=”This is a feature that adds a new sexy CSS”
Version=”1.0.0.0″
Scope=”Site”
xmlns=”http://schemas.microsoft.com/sharepoint/”>
<ElementManifests>
<ElementManifest Location=”ProvisionedFiles.xml”/>
</ElementManifests>
</Feature>
So inside this XML file, we have a <feature> element and inside that an <elementmanifests> element. SharePoint examines this XML file when installing the feature.
The required parameters for the <feature> element are below (lifted straight from MSDN)
|
Attribute |
Description |
|
Description |
Optional String. Returns a longer representation of what the Feature does. |
|
Id |
Required Text. Contains the globally unique identifier (GUID) for the Feature. |
|
Scope |
Required Text. Can contain one of the following values: Farm (farm), WebApplication (Web application), Site (site collection), Web (Web site). |
|
Title |
Optional Text. Returns the title of the Feature. Limited to 255 characters. |
|
Version |
Optional Text. Specifies a System.Version-compliant representation of the version of a Feature. This can be up to four numbers delimited by decimals that represent a version. |
So, the first thing to do is generate a GUID. You can do this a number of ways, but I typically use an online generator like the one here to do it. My GUID from the online generator is: 01c34560-6561-11dc-8314-0800200c9a66. Feel free to use it for this example but you should substitute with your own.
The “Title” and “description” parameters should be plainly obvious and “version” is optional, but whack it in anyway. “Scope” is important, a feature can be activated at various points in the farm. “Site” means it is activated once per site collection. All sub-sites under this site collection can make use of the feature without having to activate it. This will become clear later.
Next we refer to an <element manifest>. This is a reference to another XML file that actually tells SharePoint what to do when this feature is activated on a site collection. (I have called the XML file PROVISIONEDFILES.XML but you can call it anything you like.
The Element Manifest File
Let’s take a closer look at the element manifest file called ProvisionedFiles.XML since it does all the grunt work of copying the files into the right locations on the site collection.
<Elements xmlns=”http://schemas.microsoft.com/sharepoint/”>
<Module Name=”MyPimpedMasterPage” Url=”_catalogs/masterpage” RootWebOnly=”TRUE”>
<File Url=”PimpMySharePoint.master” Type=”GhostableInLibrary” />
</Module>
<Module Name=”MyPimpedStyles” Url=”Style Library” RootWebOnly=”TRUE”>
<File Url=”PimpMySharePoint.css” Type=”GhostableInLibrary” />
<File Url=”PimpMintyFresh.css” Type=”GhostableInLibrary” />
<File Url=”PimpBlingGold.css” Type=”GhostableInLibrary” />
<File Url=”PimpGothicBlack.css” Type=”GhostableInLibrary” />
<File Url=”PimpMintyFresh.jpg” Type=”GhostableInLibrary” />
<File Url=”PimpBlingGold.jpg” Type=”GhostableInLibrary” />
<File Url=”PimpGothicBlack.jpg” Type=”GhostableInLibrary” />
</Module>
</Elements>
So as you can see in the above XML file, we have used an XML element called MODULE twice. One contains 1 FILE element – the master page. The other contains 7 FILE elements – one for each CSS and image file in the branding.
So what the heck is MODULE anyway? Well, it is one of several elements that you can use in an element manifest file to perform particular administrative installation actions. Here is list of the common things that a feature may install/create:
- Content Types: Contains a definition of a SharePoint content type.
- Content Type Binding: Actually applies a content type to a document library.
- Control: Allows you to replace existing controls on the page, such as the search or navigation with your own custom control.
- Custom Action: You can define custom actions such as add a new menu item in “Site Actions”.
- Feature/Site Template Association: This allows you to bind a feature to a site template so that the feature is included in new sites based on that template.
- Field: Contains a field, or column definition that can be reused in multiple lists.
- Hide Custom Action: Opposite to “Custom Action”, where you want to hide menu items.
- List Instance: Provisions a SharePoint site with a list which includes specific data.
- List Template: A list definition or template, which defines a list that can be provisioned to a SharePoint site.
- Module: Deploys files which are included when provisioning sites.
- Receiver: Defines an event handler for a list, or document library
- Workflow: Defines a workflow for a list, or document library.
So what do we have third from the bottom? Why it’s a “MODULE” element! What does it do? “Deploys files which are included when provisioning sites”. Eureka!
Now let’s examine the <MODULE> and its child element <FILE> element in more detail.
<Module Name=”MyPimpedStyles” Url=”Style Library” RootWebOnly=”TRUE”>
|
Module Element |
Description |
|
Name |
Required Text. Contains the name of the file set. |
|
RootWebOnly |
Optional Boolean. TRUE if the files specified in the module are installed only in the top-level Web site of the site collection. |
|
Url |
Optional Text. Specifies the virtual path of the folder in which to place the files when a site is instantiated. If Path is not specified, the value of Url is used for the physical path. Use the Url attribute to provision a folder through the Feature. |
<File Url=”PimpMySharePoint.master” Type=”GhostableInLibrary” />
|
File |
Description |
|
IgnoreIfAlreadyExists |
Optional Boolean. TRUE to provision the view even if the file already exists at the specified URL; otherwise, FALSE. |
|
Type |
Optional Text. Specifies that the file be cached in memory on the front-end Web server. Possible values include Ghostable and GhostableInLibrary. Both values specify that the file be cached, but GhostableInLibrary specifies that the file be cached as part of a list whose base type is Document Library.When changes are made, for example, to the home page through the UI, only the differences from the original page definition are stored in the database, while default.aspx is cached in memory along with the schema files. The HTML page that is displayed in the browser is constructed through the combined definition resulting from the original definition cached in memory and from changes stored in the database. |
So, in CleverWorkarounds english, the <module> section is specifying the location that any <file> elements be copied to. For each file to be copied, there is a corresponding <file> element. We discussed in the previous section on file locations, that master pages will reside in the _catalogs/masterpage library (the master page gallery). Styles will reside in the “Style Library” document library,
Since we have two locations, we have two <module> entries for the master page gallery and style library.
<Module Name=”MyPimpedMasterPage” Url=”_catalogs/masterpage” RootWebOnly=”TRUE”>
<Module Name=”MyPimpedStyles” Url=”Style Library” RootWebOnly=”TRUE”>
So, according to the element manifest for our custom feature, we will copy the files:
- PimpMySharePoint.CSS
- PimpMintyFresh.CSS
- PimpBlingGold.CSS
- PimpGothicBlack.CSS
- PimpMintyFreshBack.JPG
- PimpBlingGold.JPG
- PimpGothicBlack.JPG
To the Style Library and we will copy:
- PimpMySharePoint.Master
To the master page gallery.
That’s it for the feature file. Let’s test that it works!
Installing the Feature
So here is our feature folder again with the 2 XML files described in the previous sections.

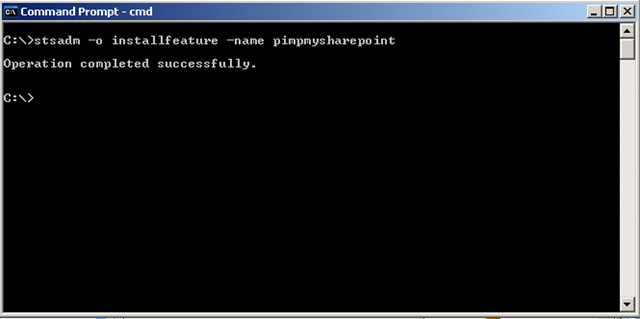
Installing the feature now is pretty easy. It is best done via opening up a command prompt on each SharePoint web front end server on the farm. Then we use the STSADM command to do the deed via the “STSADM –o installfeature” command. This command takes a couple of parameters.
Use either the -name or the -filename argument to select a feature.
Use -force to install the feature even if it is already installed and activated somewhere in the farm
When the -name parameter is specified, SharePoint knows to look in the TEMPLTE\FEATUIRES folder already, so you do not have to specify a full path. For example:
Testing the installation
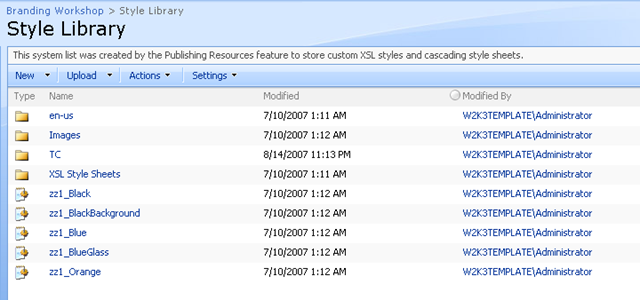
Okay, so the feature is installed. Now what? Now we need to activate this feature on a site collection. Here is the “Style Library” of my test site. (Remember that this library will not exist unless the SharePoint Publishing Infrastructure feature has been installed). Note that at this time, there is no CSS files called PIMP*.CSS
So now let’s Activate the feature. Browse to Site Actions>Site Settings and from the Site Collection Administration menu, choose “Site Collection Features”. Lo’ and behold! We have our feature listed! Note the title and description is as per our FEATURE.XML file.
![]()
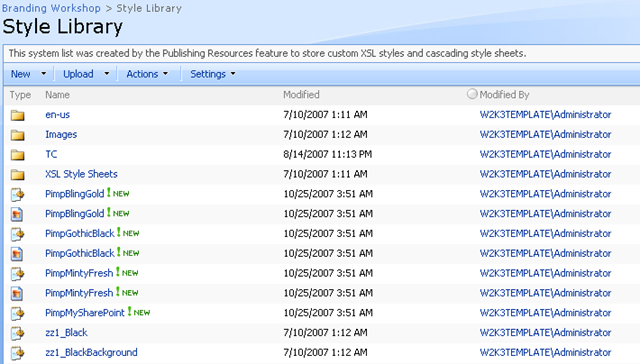
Click “Activate” to activate the feature (you can also do this on the command line via STSADM -o activatefeature command). Once it is marked as active, re-examine the style library. Woo freakin’ hoo! There are our CSS files!
And the master page gallery? YES! It’s there (amongst all the other stuff the publishing feature puts there).
Testing the Feature
In our example here, we can test this feature by choosing the new master page from the look and feel section of site settings.
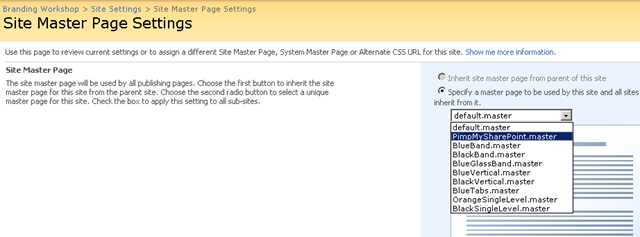
Then, once we have chosen PIMPMYSHAREPOINT.MASTER, we can choose one of the theme CSS files to use with it in the same page as above, just further down.
 .
.
Are we done then?
So if you have gotten this far, thanks (no really… thanks) for sticking with me. I know this is a hard slog, but trust me, it will save you some heartache.
Now if you are working on a single server farm, or a smallish farm, then you may well be done. Unfortunately, for many however, we are not done yet! (aw crap – you think after 4 really long winded articles I’d finally be finished but noooo.. SharePoint is a complex beast and there is still more to go in this area.)
So in the next article, I will delve into how you can improve this feature by having the master page automatically selected when it is activated, then how to go about upgrading a feature, some of the quirks and dare I say it, bugs, that currently exist around branding and packaging, as well as when and why a feature should be incorporated into a SharePoint solution.
Cheers


November 12th, 2007 at 9:52 pm |
[…] SharePoint Branding Part 4 – Packaging up your masterpiece into a Feature […]
March 21st, 2008 at 9:28 am |
[…] Links: [Part 1, Part 2, Part 3, Part 4, Part 5, Part 6, Part […]
May 29th, 2008 at 1:07 am |
First of all, love the series.
Question for you: Why are you placing the supporting images in the Style Library? I would think they should go in \Style Library\Images.
May 29th, 2008 at 9:42 am |
Yes they should and to be honest can’t remember. It might have been something to do with relative paths in CSS or me wanting to keep it simple for the example.
Either way, you are dead right
June 5th, 2008 at 8:23 am |
[…] Links: [Part 1, Part 2, Part 3, Part 4, Part 5, Part 6, Part 7] Published Jun 04 2008, 11:23 PM by […]
June 5th, 2008 at 8:42 am |
[…] Links: [Part 1, Part 2, Part 3, Part 4, Part 5, Part 6, Part 7] Pulicado por Hector Insua a la hora 3:21 […]
December 5th, 2008 at 3:55 pm |
Hi,
I require to deploy the pages into Share Point subsite,
Here,i am only able to deploy the pages using sharepoint module only into original site.
can you please guide me how to include subsite url into sharepoint module?
Thanks
November 4th, 2010 at 12:57 am |
[…] Sharepoint Branding http://www.cleverworkarounds.com/2007/10/25/sharepoint-branding-part-4-packaging-up-your-masterpiece… […]
December 30th, 2010 at 4:51 pm |
Congratulations and lot of thanks for these articles series: pretty much helpfull for all of us beginners.
Have just a question: Shouldn’t the ‘PimpMySharePoint.master’ file being included in the list of files at ‘C:\Program Files\Common Files\Microsoft Shared\web server extensions\12\TEMPLATE\FEATURES\PimpMySharePoint’ ?
Thank you again !