SharePoint Branding – How CSS works with master pages – Part 1
This is version 2 of this article, after I went and accidentally blew away my first masterpiece that took literally days to write. If this has ever happened to you, don’t you hate it, that your second version is never as good as your first?
Quick Links: [Part 1, Part 2, Part 3, Part 4, Part 5, Part 6, Part 7]
|
Anyway, this is (attempt 2 of) part 1 of a series of articles that cover SharePoint branding in some detail. Kudos has to be given Heather Solomon especially for her wonderful site and articles on this subject (and author of the book to your left :). In Addition, Andrew Connell and Mike have done some great work that helped me in this area. So, SharePoint branding was the catalyst behind my deciding to make a blog and call it cleverworkarounds. The whole experience at times made me want to change careers, but I ultimately got there. I would go down one path, only to be stumped by a problem, and think I have the solution, only to find another quirk that needed another workaround. So the aim of cleverworkarounds is to determine the least dodgy way to implement branding of a SharePoint installation. No doubt people will disagree with the conclusions I’ve reached, but that’s expected since the cleverness of a workaround really depends on your needs.
|
So this series of articles will cover a few issues. First some basic master page theory, then I will talk about the difference between branding in WSS3 (the freebie version) and MOSS07 (the pricey one). I will then take you through the quirks of CSS and master pages. Subsequent articles will get into the details of branding techniques and finally finish off by covering the governance issues surrounding branding.
Master Page theory
This is a large topic in itself, but I will try and cover it quickly. Heather has written the definitive explanation for master pages so I’m trying here to cover the bits I want to cover without rehashing her great work. Suffice to say that the technology is actually part of ASP.NET and SharePoint simply leverages this (no point reinventing the wheel after all). Generally, most aspx pages in a SharePoint site will be derived from a Page Layout (content) page that itself, refers to a master page. Below is the MSDN diagram illustrating the concept.
MSDN has a good definition: "A master page contains references to elements that you can share across multiple pages in an Office SharePoint Server 2007 site, such as navigation, search controls, logon controls, and banner images. A master page can also contain the cascading style sheet (CSS) and ECMAScript (JScript, JavaScript) references that define the overall look and feel of your site. Commonly, every site—and therefore every page—in your site collection uses the same master page to present a consistent user experience across the entire site collection. Depending on your needs, you can use a different master page for one or for all of the sites in your site hierarchy to distinguish the various areas of your portal."
To illustrate this idea, below I have pasted the very top line in a resulting page "DEFAULT.ASPX" from a basic SharePoint site.
<%@ Page language="C#" MasterPageFile="~masterurl/default.master"

Inherits="Microsoft.SharePoint.WebPartPages.WebPartPage,Microsoft.SharePoint,Version=12.0.0.0,

Culture=neutral,PublicKeyToken=71e9bce111e9429c" meta:webpartpageexpansion="full"

meta:progid="SharePoint.WebPartPage.Document" %>
Note the reference to the token ~masterurl/default.master in the first line. This is a special token that represents the currently used master page. (I will drill down further on this in a few moments).
A master page, like DEFAULT.MASTER, will almost always refer to one or more CSS files to style the site. Below I have pasted some of the HTML browser output from the very same DEFAULT.ASPX that I referred to above.
<link rel="stylesheet" type="text/css" href="/_layouts/1033/styles/core.css?

rev=5msmprmeONfN6lJ3wtbAlA%3D%3D"/>
So in the example above, any ASPX page that uses DEFAULT.MASTER, refers to a CSS file called CORE.CSS.
Thus, SharePoint branding usually means either:
- Using the default master page and simply overriding the built in CSS styles with your own
- Creating a new master page and then overriding the built in CSS styles with your own.
So let’s drill down a little further, by looking at another master page and compare it with DEFAULT.MASTER. MOSS does come with some other master pages we can examine, but depending on your site template, you may have to activate the publishing feature. If you wondering what a feature is, check this post, and then come back 😉
So let’s activate the publishing feature and see what happens.
WSS, MOSS and the Publishing Feature
This article is primarily written around MOSS07 and not WSS3, but WSS3 is worth a quick discussion. WSS can be branded using the techniques I outline here, but if you are being paid to brand a SharePoint site/farm, it is very likely you are using MOSS.
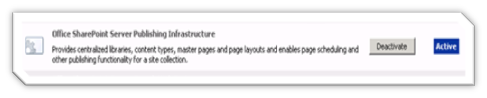
The reason for this, is that WSS3 does not have available a site collection feature called "Office SharePoint Server Publishing Infrastructure". It is this feature that gives you all the tools you need to manage branding easily from just the web browser, as well as provide some sample master pages and different styles to learn from.
Almost all branding articles I have read assume this feature is installed and activated, but it is not always active for a site collection, depending on the site template used to create the site collection. You will find it under "Site Collection Features" in the "Site Actions" -> "Site Settings" screen.
So if you cannot find this feature listed, you are probably using WSS3. Sorry, but you are going to have a more fiddly time because you have to change your master page using SharePoint Designer (Kathy has written a nice overview here). But to get a quick sense of the idea, re-examine the reference to the master page token below..
<%@ Page language="C#" MasterPageFile="~masterurl/default.master"
In WSS, this refers to what SharePoint designer calls the "Default master page". Below, I show where I have taken a copy of DEFAULT.MASTER and called it PIMPMYSHAREPOINT.MASTER and set it as the default master page. Note that when I right click on PIMPMYSHAREPOINT.MASTER I have an option to set this as the default master page.
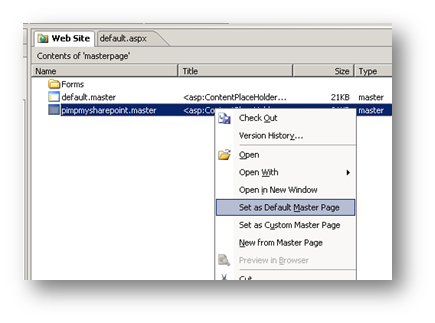
So now, when SharePoint loads pages on this site, the token "~masterurl/default.master" is replaced at run time by the default master page set above – "pimpmysharepoint.master".
Of course, if you have MOSS2007 and enable the publishing feature, you have a much easier method to change the master page for a site that does not involve SharePoint designer. So let’s enable this site collection feature and see what happens.
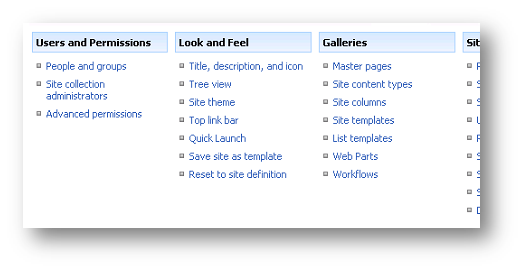
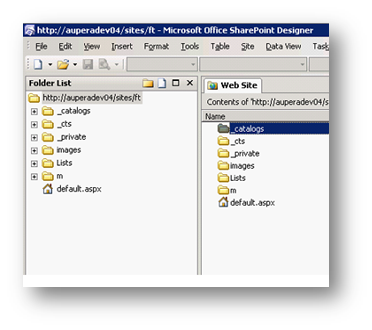
First up, (note below what a site collection looks like without this publishing infrastructure feature activated), you have a master page gallery link, but under "look and feel", there are no options related to choosing any other master pages.
If you open the site up in SharePoint designer, you will also see a basic SharePoint structure. Below shows a SharePoint site collection created using the blank SharePoint site template.
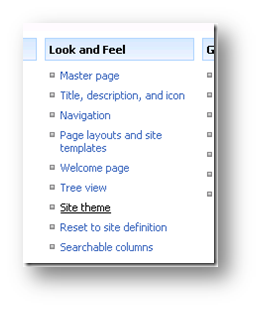
So now let’s activate the site collection feature "Office SharePoint Server Publishing Infrastructure" and re-examine the above site. Note the change in options, particularly in relation to "Look and Feel". We now have a link for choosing which master page to use. That saves you having to fiddle with SharePoint Designer, doesn’t it? 🙂
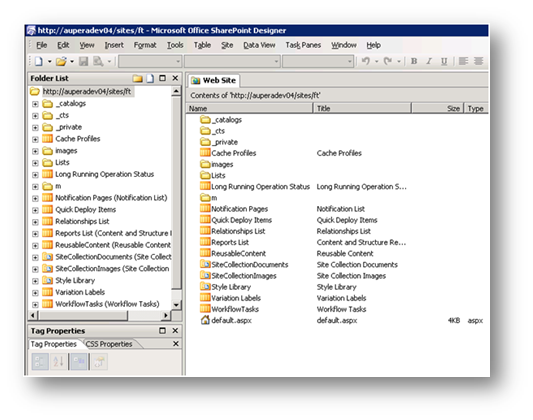
It is when you look at the site collection in SharePoint Designer though, that you see the significant changes which have been made. There are a lot more goodies there now in the form of Lists, Document Libraries and Workflows. Thus, the publishing feature does a lot more than simply add a link to choose a master page. Penny has a great, detailed description of the additional resources installed by enabling this feature
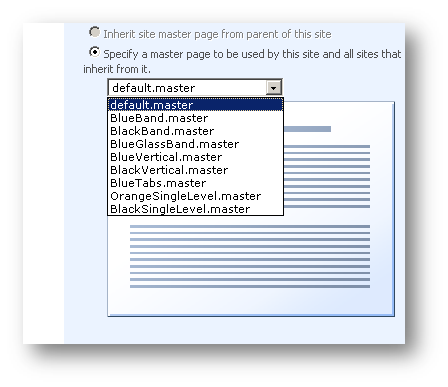
So, now let’s choose a different master page. Under "Master Page Settings" in the "Look and Feel" section of site administration, you will see a selection of example master pages that come with the feature.
Now, at this point, I will throw you a little theory. With WSS, I explained how you can use SharePoint designer to change the master page to set the default master page. But MOSS gives you the nice method of being able to do this via the administration pages for a site collection. Both methods look in the same place – The master page gallery.
When you provision a site collection the system creates a master page gallery that contains all the master pages and page layouts for that site collection. The master page gallery is stored at the location /_catalogs/masterpages. It is a standard document library and as a result has version history, recycle bin support, approval workflow and all of the other document management goodies you get with SharePoint. This is great, since it makes it easy to roll back if an update to a master page file goes horribly wrong. No matter how many sub sites you make in the site collection, they will all be able to access the master page library via the link to /_catalogs/masterpages.
Below is the content of the master page gallery when the publishing feature has been enabled.
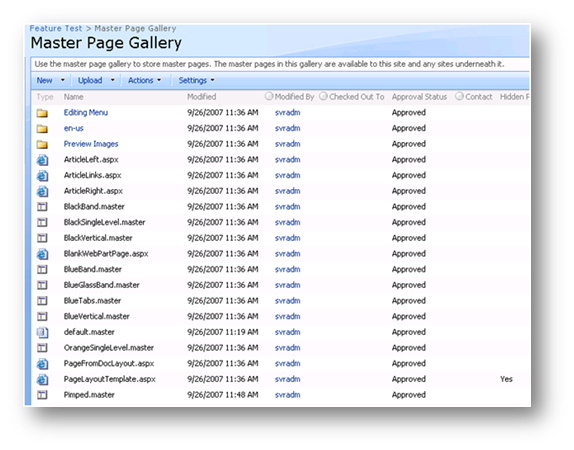
So, too easy then. Any web designer should be able to crank out their design app of choice, drop it into the master page gallery and shoot out a master page in minutes right? … Riiiiggghht? 🙂
Well…yes, they can, but there are two major issues that cause a lot of grief with branding, CORE.CSS and APPLICATION.MASTER. The next section describes this.
CORE.CSS
So a quick recap. When you create a SharePoint site collection, even if using the blank site template, a document library is created to store master pages. It is referred by the path of _catalogs/masterpage and is called the "master page gallery". The actual master page used, is a site based property set either via Sharepoint Designer (WSS3) or site administration (MOSS07). The master page almost always defaults to DEFAULT.MASTER (although site templates can actually specify another). DEFAULT.MASTER refers to a file called CORE.CSS. Thus, any web pages that use this template will always use CORE.CSS when processing styles.
Recap over: Now lets dig a bit more into CSS files in SharePoint!
The best way to understand how CSS is handled actually is to look at one of the sample master pages, for example blackglass.master that comes with the publishing feature. Since it significantly changes the look and feel of a site when applied, we know that CSS modifications have been made. If you go to the master page gallery of your publishing enabled site (http://<mysiteurl>/catalogs/masterpage), you will be able to download this master page and check out the source code in notepad or any other HTML designer. I have pasted the important bit below:
<head runat="server">

[snip]

    <Sharepoint:CssLink runat="server" />

    <!--Styles used for positioning, font and spacing definitions-->

    <SharePoint:CssRegistration name="<% $SPUrl:~SiteCollection/Style Library/~language/Core Styles/Band.css%>" runat="server"/>

    <SharePoint:CssRegistration name="<% $SPUrl:~sitecollection/Style Library/~language/Core Styles/controls.css %>" runat="server"/>

    <SharePoint:CssRegistration name="<% $SPUrl:~SiteCollection/Style Library/zz1_black.css%>" runat="server"/>

[snip]

</head>
Allow me to introduce you to two webcontrols. SharePoint:CssLink and SharePoint:CssRegistration
SharePoint:CssLink and SharePoint:CssRegistration
SharePoint:CssRegistration defines a CSS file – simple as that. If you look closely at the example however, you will notice that like the reference to a master page, there are tokens here that the system replaces at runtime. Let’s examine one further, looking at the source code and then what is rendered in the browser for an example site:
<SharePoint:CssRegistration name="<% $SPUrl:~SiteCollection/Style Library/~language/Core Styles/Band.css%>" runat="server"/>
Rendered as:
<link rel="stylesheet" type="text/css" href="/sites/nopub/Style%20Library/en-US/Core%20Styles/Band.css">
Sharepoint:CssLink is the control that actually renders the styles. So, for every style defined by a SharePoint:CssRegistration, SharePoint:CssLink will process all of the runtime tokens like ~language and render the CSS files. Let’s now look at the input again for blackband.master and the output
<head runat="server">

[snip]

<Sharepoint:CssLink runat="server" /

<!--Styles used for positioning, font and spacing definitions-->

<SharePoint:CssRegistration name="<% $SPUrl:~SiteCollection/Style Library/~language/Core Styles/Band.css%>" runat="server"/>

<SharePoint:CssRegistration name="<% $SPUrl:~sitecollection/Style Library/~language/Core Styles/controls.css %>" runat="server"/>

<SharePoint:CssRegistration name="<% $SPUrl:~SiteCollection/Style Library/zz1_black.css%>" runat="server"/>

[snip]

</head>
And the result is…
<head>

[snip]

<link rel="stylesheet" type="text/css" href="/sites/nopub/Style%20Library/en-US/Core%20Styles/Band.css"/>

<link rel="stylesheet" type="text/css" href="/sites/nopub/Style%20Library/en-US/Core%20Styles/controls.css"/>

<link rel="stylesheet" type="text/css" href="/sites/nopub/Style%20Library/zz1_black.css"/>

<link rel="stylesheet" type="text/css" href="/_layouts/1033/styles/core.css?rev=5msmprmeONfN6lJ3wtbAlA%3D%3D"/>

[snip]

</head>
What do you notice here? There were only 3 registered CSS files in the master page. However, 4 CSS files were rendered to the browser. CORE.CSS, you will notice, has been rendered, despite the fact that it is not explicitly defined. What’s more, (and this is the important bit), CORE.CSS is always listed last.
This behaviour is not always a problem, but in many circumstances it can be. Imagine that you have your own overridden styles for example, pimpmysharepoint.master, refers to a style called pimpmysharepoint.css. The source code would look like this.
<Sharepoint:CssLink runat="server" /

<!--Styles used for positioning, font and spacing definitions-->

<SharePoint:CssRegistration name="<% $SPUrl:~SiteCollection/Style Library/pimpmysharepoint.css%>" runat="server"/>
And the output is..
<head>

[snip]

<link rel="stylesheet" type="text/css" href="/sites/nopub/Style%20Library/pimpmysharepoint.css"/>

<link rel="stylesheet" type="text/css" href="/_layouts/1033/styles/core.css?rev=5msmprmeONfN6lJ3wtbAlA%3D%3D"/>

[snip]

</head>
So CORE.CSS (which is a rather large file with a LOT of styles in it), will override my custom styles.
Here is another quirk with SharePoint:CssRegistration. Not only does it render CORE.CSS last, but it renders the other styles in alphabetical order. So even if I changed the order of the SharePoint:CssRegistration entries in the source, they will always render in alphabetical order. (I assume this is why Microsoft chose to name a style as zz1_black.css to ensure it rendered second last).
For example, with the CssRegistration order changed in the source..
<head runat="server">

[snip]

<Sharepoint:CssLink runat="server" /

<!--Styles used for positioning, font and spacing definitions-->

<SharePoint:CssRegistration name="<% $SPUrl:~SiteCollection/Style Library/zz1_black.css%>" runat="server"/>

<SharePoint:CssRegistration name="<% $SPUrl:~sitecollection/Style Library/~language/Core Styles/controls.css %>" runat="server"/>

<SharePoint:CssRegistration name="<% $SPUrl:~SiteCollection/Style Library/~language/Core Styles/Band.css%>" runat="server"/>

[snip]

</head>
And the result is still rendered the same way..
<head>

[snip]

<link rel="stylesheet" type="text/css" href="/sites/nopub/Style%20Library/en-US/Core%20Styles/Band.css"/>

<link rel="stylesheet" type="text/css" href="/sites/nopub/Style%20Library/en-US/Core%20Styles/controls.css"/>

<link rel="stylesheet" type="text/css" href="/sites/nopub/Style%20Library/zz1_black.css"/>

<link rel="stylesheet" type="text/css" href="/_layouts/1033/styles/core.css?rev=5msmprmeONfN6lJ3wtbAlA%3D%3D"/>

[snip]

</head>
So, the gist of the issue here, is that you do not always necessarily want CORE.CSS to be rendered last.
The last thing to say here, is to credit Heather Solomon for actually sitting down and producing a CSS reference chart for CORE.CSS, so you can easily see just how much of the look and feel of SharePoint it controls. Often you will want to override some of the styles in CORE.CSS, but clearly, the SharePoint:CssLink webcontrol will not allow you to.
APPLICATION.MASTER
So far, we have talked about DEFAULT.MASTER, as well as the master pages that are installed by the "Office SharePoint Server Publishing Infrastructure" feature. They all reside in the document library called the master page gallery at /_catalogs/masterpage.
But guess what? There is another master page used in SharePoint sites and this one does not live in the master page gallery. Some of the pages use another master page called APPLICATION.MASTER. All affected pages are references by the _layout entry in the URL. Some of the more visible components of a SharePoint site that are affected includes:
- View all site content
- Version History or a document or list
- Workflow settings of a document library
- Recycle Bin
- Search results
You will notice that if you try all of the above options, you will be referred to a URL that has a path of _layouts.
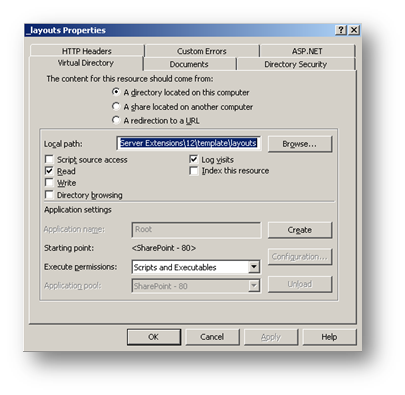
_layouts is a directory that is common to all sites and site collections of a SharePoint web application. This is because _layouts is an IIS virtual directory that points to a location on the server.
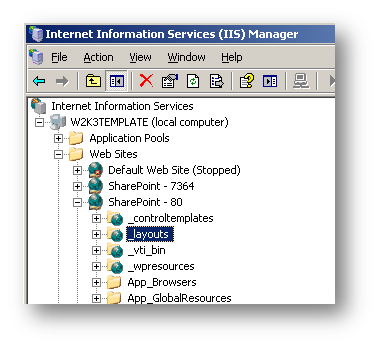
The physical location on the server that _layouts refers to is generally C:\Program Files\Common Files\Microsoft Shared\Web Server Extensions\12\template\layouts
Now you may have realized the issue with APPLICATION.MASTER. It will not have a reference to any custom CSS files. Let’s check the source code of APPLICATION.MASTER
<HEAD runat="server">
[snip]
<SharePoint:CssLink runat="server"/>
[snip]
</HEAD>
So, based on what we have learned about SharePoint:CssLink, we know that APPLICATION.MASTER is only ever going to render CORE.CSS. Therefore, any custom CSS files used in custom master pages will never be referenced for _layout pages that use APPLICATION.MASTER. This can easily be demonstrated. Below is a blank site collection with the publishing feature enabled. I have changed the master page to blackband.master in "Site Actions" -> "Site Settings".
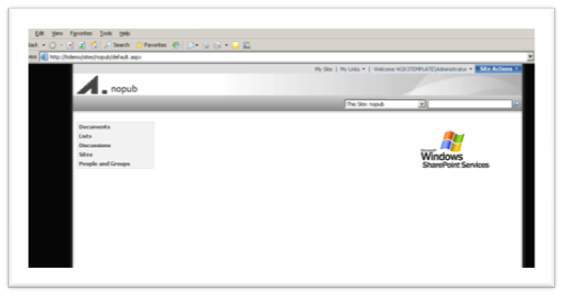
But now when we click on the "documents" link, which is basically "view all site content" you will see we no longer have the blankband branding. Instead it looks like the default branding again.
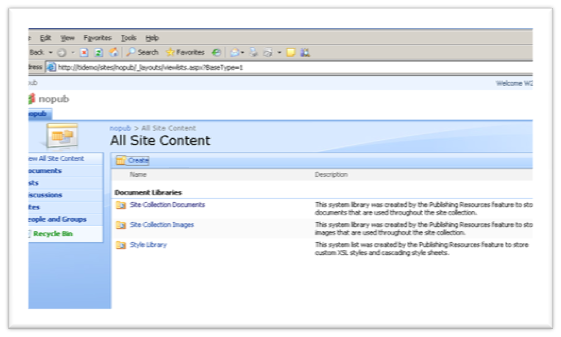
You will also notice above, the telltale "_layout" reference in the URL which tells you that this page has been rendered from APPLICATION.MASTER.
So these two issues alone can be an annoyance, when you combine them, it can really be a pain in the butt. In Part 2 of this set of articles, we will examine the branding scenario that started me on this journey, and then examine various approaches to SharePoint branding, to work around these two issues.
Thanks for reading!


November 15th, 2007 at 7:27 am |
[…] efforts. It also made a silly decision to link to any other CSS files in ALPHABETICAL order. Ugh. Cleverworkarounds.com talks about this issue. And don’t even think of making wonderfully semantic, valid CSS-P based layouts. You can try. […]
November 28th, 2007 at 11:11 am |
[…] risk. But at the same time, SharePoint is well suited to this sort of solution if you follow my branding and document management […]
December 19th, 2007 at 11:55 pm |
[…] blogged on SharePoint branding, which requires me to know all about HTML and CSS, I’ve learnt how to code against SOAP web […]
January 14th, 2008 at 6:22 pm |
[…] 1, 2 og 3 – Cleverworkarounds.com har en glimrende række af artikler om Sharepoint Branding, […]
January 18th, 2008 at 3:21 am |
[…] http://www.cleverworkarounds.com/2007/10/08/sharepoint-branding-how-css-works-with-master-pages-part… […]
April 19th, 2008 at 10:19 pm |
[…] I’ll recommend you visit my all time favourite blog called CleverWorkArounds and read the branding series. It should answer all of your questions. In relation to mobile devices, content can be displayed on […]
May 3rd, 2008 at 5:50 am |
Thanks for the info on the core.css being rendered last. Didn’t know that.
Not sure if this is the best way to go about overriding core.css. All i did was to link a seperate style sheet manually, and seems to work for me.
Throw this in after all your other stylesheets
May 24th, 2008 at 3:53 pm |
Hi!
I don’t know whether this is the right place for asking. But, I am still doing it.
We have a bilingual website created in MOSS. It is a corporate website. We have 2 logos one in French and the other in English. How can we get the logos to swap to it respective language when we move from English to French website and vice-versa. Similarly, how can I change the text of “Print Friendly” to French? I hope my question is clear. Any help will be of great help.
Thanks
Denny
June 3rd, 2008 at 2:56 pm |
OH, This is what I have been looking for ages!
Thanks for it.
June 4th, 2008 at 8:01 pm |
For keeping the design consistent the new master page aswell as application.master, I take it you have all dimensioning in the css aswell? Does your master page consist only of css references and placeholders? What exactly can the branding css hold. Could you maybe post a small sample snippet for a (a) masterpage, (b) branding css and a (c) core.css overriding css for clarification as to what holds what and how they work together??
Thanks!
June 21st, 2008 at 12:45 am |
[…] http://www.cleverworkarounds.com/2007/10/08/sharepoint-branding-how-css-works-with-master-pages-part… […]
June 27th, 2008 at 8:45 am |
You might find this post helpful with regard to the exact mechanism that controls CSS link order and prevent core.css from rendering last. http://www.elumenotion.com/Blog/Lists/Posts/Post.aspx?ID=48
June 29th, 2008 at 11:53 am |
[…] it is important that you understand the mechanism of how Core.css works with SharePoint. Here is a blog give a detailed explanation of how CSS works with master […]
July 20th, 2008 at 12:58 am |
[…] the timer jobs have already been created, and all of the other goodies that the publishing feature gives you, are scoped at the *site collection* level. Therefore no more "access denied" […]
July 21st, 2008 at 4:01 pm |
[…] CleverWorkArounds CSS Branding Articles […]
July 29th, 2008 at 12:58 am |
[…] reasons that I could go into about why branding is a minefield, but luckily for you I have written extensively about this already if you are technically or design inclined. What this essentially boils down to […]
August 22nd, 2008 at 12:07 am |
[…] in itself looks like a useful place for all things SharePointy. http://www.cleverworkarounds.com/2007/10/08/sharepoint-branding-how-css-works-with-master-pages-part… Remember to visit the other parts of the article. Turns out that getting the CSS heirarchy […]
August 30th, 2008 at 4:37 am |
Thanks for such a great post – this has been extremely helpful in working through an issue that I’ve been struggling with for months! Looking forward to checking out the rest of the site to see what other gems you’ve got hidden around.
November 23rd, 2008 at 10:03 pm |
[…] fact, my first series on branding, ROI and disk planning were inspired from that particular project. Other articles such as my […]
January 22nd, 2009 at 7:10 pm |
[…] time on the pages. The following link explains the branding very good and shows additinal links. http://www.cleverworkarounds.com/200…-pages-part-1/ Greetings jpuls schrieb: > As I understand it, in MOSS 2007 the recommended approach to […]
March 10th, 2009 at 10:19 pm |
Even being an old article for many, for me it was a good very good, helpful and new article. Cheers for sharing
May 12th, 2009 at 1:06 am |
Hi – has anyone used blackBand.master (or derived from it)_ and then had a view displayed as a Gantt Chart? For me the Gantt chart breaks the .master defined layer and in IE the chart sticks out of the containing layer. In other browser the whole page is made wider.
Any ideas anyone?
July 7th, 2009 at 7:41 am |
[…] Part 1 dealt with the publishing feature, and some general masterpage/CSS concepts and some quirks (core.css and application.master) that have to be worked around. […]
July 20th, 2009 at 7:14 pm |
[…] example) and you can still output it in the <head> of your page. There’s a good post about this on […]
August 12th, 2009 at 11:06 pm |
Hey — thanks so much for the article! Heather Solomon and others are great, but I REALLY like the way you have brought it all together! Very useful!
September 2nd, 2009 at 3:00 pm |
[…] this time, the developer had come to grips with the publishing pages and layouts, implications of unghosting, delegatecontrol, and the ways that ASP.NET controls could be […]
October 22nd, 2009 at 10:07 pm |
This article has been a real help in getting an understanding of what goes on with css in SP. Many thanks,
G
November 6th, 2009 at 4:46 pm |
[…] you have read fellow SharePoint Magazine author Paul Culmsee’s series on SharePoint Branding you will know the difficulty facing designers looking to get their CSS added at the right time. Oh, […]
January 8th, 2010 at 8:01 pm |
Hi,
This artical is very useful for me. I am a Share Point developer and always looking to learn something new. I would like to introduce another good SharePoint blog, Have a look.
http://SharePointBank.com
lazy
January 24th, 2010 at 7:56 pm |
Thank you for your informations about css, it is really great article, i like it because we can see all coding and it is clear written.
February 21st, 2010 at 2:38 pm |
[…] Paul Culmsee – SharePoint Branding – How CSS works with Master Pages – Part 1 – A 7 part series on branding SharePoint and how CSS works with SharePoint master pages. If you’re serious about doing this then Pauls article is a must read. […]
March 6th, 2010 at 1:42 pm |
[…] Paul Culmsee – SharePoint Branding – How CSS works with Master Pages – Part 1 – A 7 part series on branding SharePoint and how CSS works with SharePoint master pages. If you’re serious about doing this then Pauls article is a must read. […]
March 23rd, 2010 at 12:16 am |
good article…thanks for sharing
June 16th, 2010 at 1:32 pm |
thanks for the post…..I have a big problem. I’ve created a site collection of Team site type and customized the default.master page by placing our logo in it.After this i’ve created the .STP file using save site as template option and created a site using this template.I’m able to see the logo in it.After this i came back to the site collection& activated the publishing feature and deactivated it after some time.now i’ve created the .STP file again and created a site using this STP file.Now i’m unable to see the logo in the site created. How can i get back the logo.Please help me out
October 1st, 2010 at 12:01 pm |
Great article. Clear and well written. And I’ve read more than my share, or, more than I should have had to anyway. 😉
February 27th, 2011 at 6:03 pm |
Nice article ,
Best artice about css and master pages
Thanks for sharing
July 7th, 2011 at 1:16 pm |
[…] http://www.cleverworkarounds.com/2007/10/08/sharepoint-branding-how-css-works-with-master-pages-part… […]
July 27th, 2011 at 3:23 am |
Custom HTML Tags in SharePoint
To add custom HTML tags such as meta description, keywords, and titles, you will want to edit the page in SharePoint Designer. We first need to start be verifying the existing page and template are in good form and readable by SharePoint. Skipping this step can lead to erroneous error.
1) Open SharePoint Designer
2) Edit in Advanced Mode
3) Goto Design View — This will test the pages and all problems denoted need corrected.
4) Go to code view and add the custom Title in “asp:Content “ named “PlaceHolderPageTitle”. This should be the TITLE Content /TITLE, omit the title tags.
5) META Description goes in the “asp:Content” named “PlaceHolderAdditionalPageHead”. This will be the actual HTML code.
When I followed the directions provided by others, I had a small problem in the ASP which provided an accurate error by following steps 1-3.
Shawn Zernik
Internetwork Consulting
August 24th, 2011 at 7:26 pm |
… another way for SharePoint Branding. Use the new SharePoint 2010 Branding Tool for creating easy and quick great looking SharePoint Websites:
SharePoint 2010 Branding Tool
September 7th, 2011 at 6:03 am |
the master page gallery should include a better search function!
September 14th, 2011 at 2:28 pm |
The page that I’ve been looking for! I’m a bit off when it comes to css and scripts but this page gives me more knowledge on the said stuff. Thanks for sharing!
October 26th, 2011 at 12:54 pm |
[…] CleverWorkarounds » SharePoint Branding – How CSS works with …Oct 8, 2007 … CSS. Thus, SharePoint branding usually means either: Using the default master page and simply overriding the built in CSS styles with your … […]
December 7th, 2011 at 11:04 pm |
Thanks for the post, great content!
June 12th, 2012 at 11:57 am |
Hello! Nice article! Thanks!
If somebody wants to create his own custom master page you can follow the steps described in the article – SharePoint: How to create a custom master page – to create a ghostable copy of a built-in master page and get a full access to the Controls-collection due to subclassing.
June 12th, 2012 at 8:37 pm |
Another great and very easy to use SharePoint Branding Tool:
http://www.sharepoint-branding-tool.com/eng/pages/home.aspx
Try it!!
Jerno
December 23rd, 2019 at 11:57 am |
herbal antihistamines https://nianow.com/drnes thyroid herbal remedies