More SharePoint Branding – Customisation using JavaScript – Part 1
Hi all
I thought with my last post that involved XSL/XSLT, I’d escape from horrid programming languages and write about more interesting topics but it wasn’t meant to be. This time round I had to delve back into the world of JavaScript – something I swore that I would never do again after a painful encounter back in 2000. (Yep, it’s taken me 8 years to face it again!)
But like everything else with SharePoint, by being a ‘specialist‘, you seem to have to use more technologies and IT disciplines than you would think possible.
As I progressed writing this article, I realised that I was delving back into branding again and toyed with the idea of making this part 8 of the branding series. But the governance topic in part 7 for me rounded off that series of posts nicely, so I will deal with this separately for now and perhaps refresh that series in the future.
Like a vast majority of my posts, this will also be a mini series.
CleverWorkArounds Coffee requirement rating (for Metrosexual web developers): ![]()
CleverWorkArounds Coffee requirement rating (for the rest of us ): ![]()
![]()
![]()
[Quick Navigation: Part 2, Part 3, Part 4, Part 5 and Part 6]
The problem in a nutshell
We have a list, but we want to hide some of the fields from being displayed in the edit or new item screens. By default when you create a list and add columns, you can hide columns via custom views, but when you create or edit an item you get the lot, whether you like it or not.
*Sigh…If only columns could have permissions as well as items, I wouldn’t have to document this workaround.*
The Workaround
As it happens, Microsoft’s SharePoint designer team indirectly provided a workaround for this in their post on using a javascript technique to manipulate form field such as set default values. Then Edin Kapić described a modified version where he used the javascript technique for hiding columns.
Both methods make use of some javascript function called “getTagFromIdentifierAndTitle”. The function is below.
function getTagFromIdentifierAndTitle(tagName, identifier, title)
{
   var len = identifier.length;
   var tags = document.getElementsByTagName(tagName);
   for (var i=0; i < tags.length; i++)
   {
      var tempString = tags[i].id;
      if (tags[i].title == title && (identifier == "" || tempString.indexOf(identifier) == tempString.length - len))
        {
         return tags[i];
         }
    }
   return null;
}
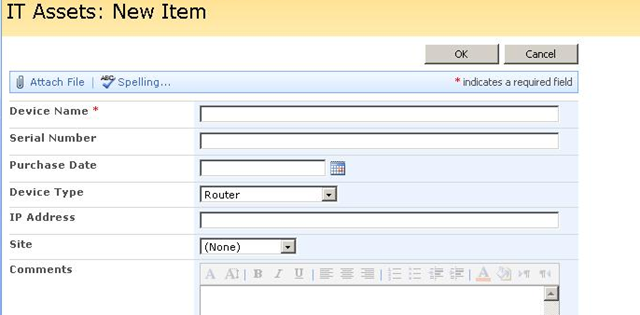
This function works, because *most* SharePoint form controls include the *type* of element in their id. Here are some examples of SharePoint form element names in HTML. The first two are text boxes and the last is a drop down list. (Warning: The HTML code behind is pretty feral, but the end of the control names are consistent 🙂

<input name=”ctl00$m$g_d7c61fb0_74de_42f1_938f_a2aa0d9d3212$ctl00$ctl04$ctl00$ctl00$ctl00$ctl04$ctl00$ctl00$TextField” type=”text” maxlength=”255″ id=”ctl00_m_g_d7c61fb0_74de_42f1_938f_a2aa0d9d3212_ctl00_ctl04_ctl00_ctl00_ctl00_ctl04_ctl00_ctl00_TextField” title=”Device Name” class=”ms-long” />
<input name=”ctl00$m$g_d7c61fb0_74de_42f1_938f_a2aa0d9d3212$ctl00$ctl04$ctl01$ctl00$ctl00$ctl04$ctl00$ctl00$TextField” type=”text” value=”5777334″ maxlength=”255″ id=”ctl00_m_g_d7c61fb0_74de_42f1_938f_a2aa0d9d3212_ctl00_ctl04_ctl01_ctl00_ctl00_ctl04_ctl00_ctl00_TextField” title=”Serial Number” class=”ms-long” />
<select name=”ctl00$m$g_d7c61fb0_74de_42f1_938f_a2aa0d9d3212$ctl00$ctl04$ctl03$ctl00$ctl00$ctl04$ctl00$DropDownChoice” id=”ctl00_m_g_d7c61fb0_74de_42f1_938f_a2aa0d9d3212_ctl00_ctl04_ctl03_ctl00_ctl00_ctl04_ctl00_DropDownChoice” title=”Device Type” class=”ms-RadioText”>
<option selected=”selected” value=”Router”>Router</option>
<option value=”Switch”>Switch</option>
<option value=”Wireless Access Point”>Wireless Access Point</option>
</select>
Inside the function there is a call to the javascript built-in method getElementsByTagName. This will return all matching HTML elements of a given type. So, for example, if you wanted to return all table cells (such as <td>this is a cell</td>) then you would make a call like:
tablecells = document.getElementsByTagName("td");
So let’s walk through the getTagFromIdentifierAndTitle function, using the example of passing in the parameters of “select”, “textfield” and “Serial Number”.
var control = getTagFromIdentifierAndTitle("Input","TextField","Serial Number");
This function gets all of the “Input” tags from the rendered document via getElementsByTagName(). It then loops through each matched tag and matches the ones that have “TextField” in the id and have a title of “Serial Number”. It then returns the referenced control, so you can manipulate it.
Once you have a reference to the control, you can hide it, or its parent control/container via styles. Below is a hideFields() function that calls getTagFromIdentifierAndTitle and then uses styles to hide the table row that the control resides in.
<script language="javascript" type="text/javascript">

_spBodyOnLoadFunctionNames.push("hideFields");

function hideFields() {
   var control = getTagFromIdentifierAndTitle("Input","TextField","Serial Number");
   control.parentNode.parentNode.parentNode.style.display="none";
}
</script>
So, what is this parentNode.parentNode.parentNode stuff? Well, we want to hide the entire row, not just the control. Each time you reference a parent node, you are referring to the HTML element that this control is inside. Below is a simplified HTML illustration of the “Device Name” field where I removed the horrible control ID and name for the sake of readability. You can see that it is a table row with a cell for the title and a cell for the “device name” textbox.
<TR>
   <TD nowrap="true" valign="top" width="190px" class="ms-formlabel">
      <H3 class="ms-standardheader"><nobr>Device Name<span class="ms-formvalidation">*</span></nobr>
      </H3>
   </TD>
   <TD valign="top" class="ms-formbody" width="400px">
      <span dir="none">
--------><input name="" type="text" maxlength="255" id="" title="Device Name" class="ms-long" /><br>
      </span>
  </TD>
</TR>
Working outwards from our <input> tag noted above we can see that it is inside a <SPAN> tag, then a <TD> tag and finally the <TR>.
- control.parentNode refers to <SPAN dir=”none”>
- control.parentNode.parentNode refers to <TD valign=”top” class=”ms-formbody” width=”400px”>
- control.parentNode.parentNode.parentNode refers to <TR> and it is this element that we hide.
This works a treat and can be applied to both NewForm.aspx and EditForm.aspx. In the example below I passed the title of “Device Name” to the function as follows:
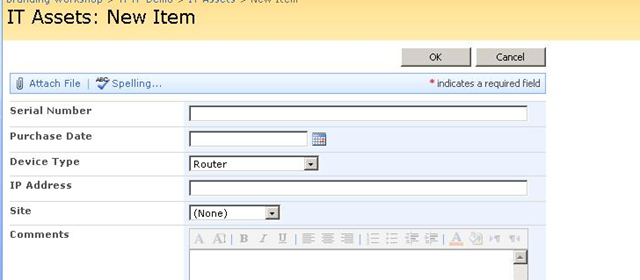
function hideFields() {

   var control = getTagFromIdentifierAndTitle("Input","TextField","Device Name");
   control.parentNode.parentNode.parentNode.style.display="none";

}
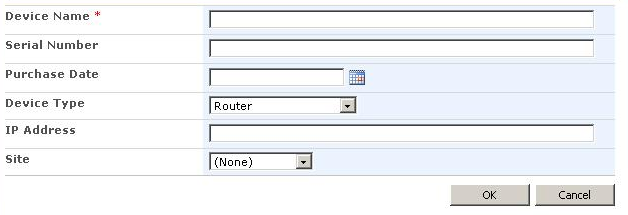
Before:
After: (No device name!)
The catch(es)!
If you have taken away anything from reading my articles, it is never a workaround without a caveat or two! This technique relies on four assumptions:
- HTML form controls consistently include their type in their ugly, long ID and name attributes
- HTML form controls consistently supply a “title” property
- The node that we want to hide is always 3 parent nodes from the control.
- Microsoft’s table of SharePoint column types and their tag names and identifiers is correct 🙂
On all counts, these assumptions are not consistent and you will have to modify your code.
Catch 1 – Incorrect information
First, let’s look at the tag names and identifiers for controls as per Microsoft’s own blog post.
| SharePoint Field Type | identifier | tagName |
| Single Line of Text | TextField | input |
| Multiple Lines of Text | TextField | input |
| Number | TextField | input |
| Currency | TextField | input |
| Choice (dropdown) | DropDownChoice | select |
| Lookup (single) | Lookup | select |
| Lookup (multiple) | SelectCandidate; SelectResult | select |
| Yes/No | BooleanField | input |
My examples thus far have been based around a single line of text. Let’s try hiding a multiple line of text column then shall we? As it turns out the list I am using do demonstrate concepts in this blog post conveniently has a column called “comments” that is set to the type “Multiple Lines of Text”. According to everything we have done so far, the code should simply be:
function hideFields() {

   var control = getTagFromIdentifierAndTitle("Input","TextField","Comments");
   control.parentNode.parentNode.parentNode.style.display="none";

}
…and the result? Not a damn thing! The Comments field is still determined to be visible.
Damn, what went wrong?? It worked for Device Name!
If we look in the source code for the reference to this column, we see the following:
<textarea name=”ctl00$m$g_242eacf0_89de_4c80_a74d_ec7ef12f2083$ctl00$ctl04$ctl06$ctl00$ctl00$ctl04$ctl00$ctl00$TextField” rows=”6″ cols=”20″ id=”ctl00_m_g_242eacf0_89de_4c80_a74d_ec7ef12f2083_ctl00_ctl04_ctl06_ctl00_ctl00_ctl04_ctl00_ctl00_TextField” title=”Comments” class=”ms-long” dir=”none”></textarea>
Well, well, well!
This is a “textarea”, not an “input” at all. Therefore the tagName is wrong. Microsoft’s table should in fact read…
| SharePoint Field Type | identifier | tagName |
| Multiple Lines of Text | TextField | textarea |
So the revised code is:
function hideFields() {

   var control = getTagFromIdentifierAndTitle("Textarea","TextField","Comments");
   control.parentNode.parentNode.parentNode.style.display="none";

}
And when we refresh? (drumroll)

Well. it sorta worked 🙂 We have hidden the control but not the label.
… and with that we come to catch 2.
Catch 2 – Varying parentNodes
We’ve already learned in the previous section that we want to hide the entire row, so we need to work out how many parentNodes away the surrounding <TR> tag is. Below is the simplified HTML code containing the ‘Comments’ control above.
<TR>
  <TD nowrap="true" valign="top" width="190px" class="ms-formlabel">
    <H3 class="ms-standardheader">
      <nobr>Comments</nobr>
    </H3>
  </TD>
  <TD valign="top" class="ms-formbody" width="400px">
    <span dir="none">
      <span dir="ltr">
        <textarea name="" rows="6" cols="20" id="" title="Comments" class="ms-long" dir="none">
        </textarea>
      </span>
    </span>
  </TD>
</TR>
Working outwards from out <textarea> tag noted above we can see that is inside a <SPAN> tag, another <SPAN> tag, then a <TD> tag and finally the <TR>.
- control.parentNode refers to <SPAN dir=”ltr”>
- control.parentNode.parentNode refers to <SPAN dir=”none”>
- control.parentNode.parentNode.parentNode refers to <TD valign=”top” class=”ms-formbody” width=”400px”>
- control.parentNode.parentNode.parentNode.parentNode refers to <TR> and it is this element that we hide.
So we now know our second issue. The hidefields() function needs to add an extra parent node when hiding a column that is a “multiple lines of text” type.
function hideFields() {

   var control = getTagFromIdentifierAndTitle("Input","TextField","Comments");
   control.parentNode.parentNode.parentNode.parentNode.style.display="none";

}
Now, we try again and all is well 🙂
I haven’t tried every combination of column type to see how each render, but it is likely that there are other variations. If someone has the time, a table of this info would be handy! (Hint, hint, readers:-) )
Catch 3 – Not all controls are the same…
Now let’s create a new column called “Options” and make it a choice type type with 4 option values values of A, B, C or D.
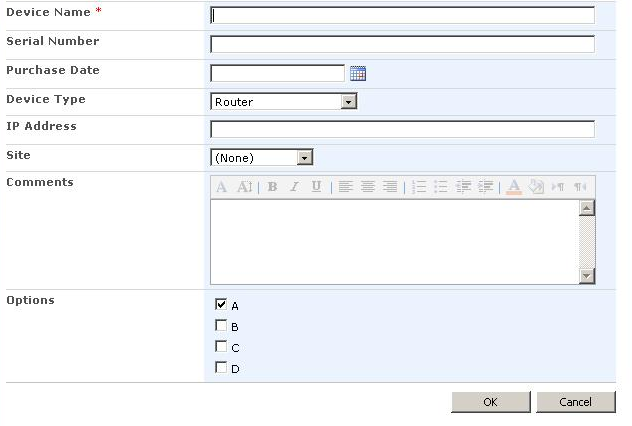
Now let’s examine the above options picker in HTML (warts and all) and see if we can hide using the previous method. The key difference here is this uses multiple form elements and for some reason, the tagName is not appended to the ID attribute.
<TR>
  <TD nowrap="true" valign="top" width="190px" class="ms-formlabel">
    <H3 class="ms-standardheader"><nobr>Options</nobr></H3>
  </TD>
  <TD valign="top" class="ms-formbody" width="400px">
    <span dir="none">
    <table cellpadding="0" cellspacing="1">
      <tr>
        <td>
          <span class="ms-RadioText" title="A">
          <input id="ctl00_m_g_242eacf0_89de_4c80_a74d_ec7ef12f2083_ctl00_ctl04_ctl07_ctl00_ctl00_ctl04_ctl00_ctl00" type="checkbox" name="ctl00$m$g_242eacf0_89de_4c80_a74d_ec7ef12f2083$ctl00$ctl04$ctl07$ctl00$ctl00$ctl04$ctl00$ctl00" checked="checked" />
          <label for="ctl00_m_g_242eacf0_89de_4c80_a74d_ec7ef12f2083_ctl00_ctl04_ctl07_ctl00_ctl00_ctl04_ctl00_ctl00">A</label>
          </span>
        </td>
      </tr>
      <tr>
        <td>
          <span class="ms-RadioText" title="B">
          <input id="ctl00_m_g_242eacf0_89de_4c80_a74d_ec7ef12f2083_ctl00_ctl04_ctl07_ctl00_ctl00_ctl04_ctl00_ctl01" type="checkbox" name="ctl00$m$g_242eacf0_89de_4c80_a74d_ec7ef12f2083$ctl00$ctl04$ctl07$ctl00$ctl00$ctl04$ctl00$ctl01" />
          <label for="ctl00_m_g_242eacf0_89de_4c80_a74d_ec7ef12f2083_ctl00_ctl04_ctl07_ctl00_ctl00_ctl04_ctl00_ctl01">B</label>
          </span>
        </td>
      </tr>
      <tr>
        <td>
          <span class="ms-RadioText" title="C">
          <input id="ctl00_m_g_242eacf0_89de_4c80_a74d_ec7ef12f2083_ctl00_ctl04_ctl07_ctl00_ctl00_ctl04_ctl00_ctl02" type="checkbox" name="ctl00$m$g_242eacf0_89de_4c80_a74d_ec7ef12f2083$ctl00$ctl04$ctl07$ctl00$ctl00$ctl04$ctl00$ctl02" />
          <label for="ctl00_m_g_242eacf0_89de_4c80_a74d_ec7ef12f2083_ctl00_ctl04_ctl07_ctl00_ctl00_ctl04_ctl00_ctl02">C</label>
          </span>
        </td>
      </tr>
      <tr>
        <td>
          <span class="ms-RadioText" title="D">
          <input id="ctl00_m_g_242eacf0_89de_4c80_a74d_ec7ef12f2083_ctl00_ctl04_ctl07_ctl00_ctl00_ctl04_ctl00_ctl03" type="checkbox" name="ctl00$m$g_242eacf0_89de_4c80_a74d_ec7ef12f2083$ctl00$ctl04$ctl07$ctl00$ctl00$ctl04$ctl00$ctl03" />
          <label for="ctl00_m_g_242eacf0_89de_4c80_a74d_ec7ef12f2083_ctl00_ctl04_ctl07_ctl00_ctl00_ctl04_ctl00_ctl03">D</label>
          </span>
        </td>
      </tr>
    </table>
    </span>
  </TD>
</TR>
So in this form control example, there are multiple <input> tags. That’s okay, because so long as we find one that matches our criteria, we are hiding the <TR> that these controls are inside of. But as mentioned if you look at the ID and Name attributes of each control, there is no form element type appended to them.
Therefore given that a key parameter that Microsoft’s getTagFromIdentifierAndTitle() function relies on is missing, it will never find this form element and is not usable as a mechanism to hide it.
Thus the method I have described thus far has its uses, but it will not work for all controls.
What about DispForm.aspx?
Well, wouldn’t it be nice to also apply this JavaScript method to dispform.aspx. Since you have a need to hide fields from data entry fields of NewForm.aspx and EditForm.aspx, it stands to reason that you might prefer to hide the display of certain columns when a list item is displayed. Unfortunately, it is not as easy, because we are no longer dealing with form controls. There are no ID fields that have a tagName and thus this page suffers from the same problem that option buttons do. 🙁
CleverWorkAround Rating: Meh
A different JavaScript approach
This begs the question as to whether there is a better way to identify the content areas that we wish to hide. Just remember that we are trying to hide the entire row of a given name. So what we need to do is find something more consistent than Microsoft’s method.
I did some investigation into this and uncovered the answer at the KWizCom team blog. All field controls (as well as data displayed in DispForm.aspx) have a HTML comment that describes the field’s name and its internal name. Below is an example with the comment formatted in green text.
<TR>
  <TD nowrap="true" valign="top" width="190px" class="ms-formlabel">
   <H3 class="ms-standardheader"><nobr>Device Name<span class="ms-formvalidation">*</span></nobr>
   </H3>
  </TD>
  <TD valign="top" class="ms-formbody" width="400px">
    <!-- FieldName="Device Name"
          FieldInternalName="Title"
          FieldType="SPFieldText"
       -->
    <span dir="none">
      <input name="" type="text" maxlength="255" id="" title="Device Name" class="ms-long" /><br>
    </span>
  </TD>
</TR>
So how about we find all HTML elements with comments. (The code below was modified from the KWizCom post).
function findacontrol(FieldName) {

   var arr = document.getElementsByTagName("!");
   // get all comments
   for (var i=0;i < arr.length; i++ )
   {
      // now match the field name
      if (arr[i].innerHTML.indexOf(FieldName) > 0)
      {         return arr[i];      }
   }
}
So stepping through this code, you can see that we are grabbing all HTML elements that are comments. I then look for my required field name from the innerHTML property which shows the content of the selected comment element. In other words, everything up to the closing comment tag (–>).
Note also that by matching the command, the <TR> is now “closer” then it was when we were matching the form element itself. We are only 2 parentNode steps away from the surrounding <TR> tag.
So as a basic test, let’s attempt to hide the “device name”, the multi line “Comments” and the troublesome “options” field.
function hideFields() {

   var control = findacontrol("Device Name");

   control.parentNode.parentNode.style.display="none";
   control = findacontrol("Comments");
   control.parentNode.parentNode.style.display="none";
   control = findacontrol("Options");
   control.parentNode.parentNode.style.display="none";
}
Wohoo! All 3 fields hidden, baby!
Let’s also paste the complete JavaScript code into DispForm.aspx and see if it works there too.
Woo – freakin’ – hoo!!! Yeah, baby! Now we are rockin’! We now have a consistent code base that can be used to address the issues of hiding any of the controls, including DispForm.aspx!

CleverWorkArounds Rating: Sweet but not uber clever yet…
Conclusion
What the… I just demonstrated a much improved JavaScript method for hiding information presented on view and edit forms and my CleverWorkAround rating is not “pure genius”?
The answer my friends, is that this offers up some interesting possibilities for other clever things, but that will require a custom asp.net control to leverage and also a bit of a tidy up and optimisation of the code presented in this post. I lamented at the start of my post that it’s a pity that permissions cannot be applied to columns. Well, now they can… however I will leave that until my next exciting instalment 🙂
Bye for now


April 6th, 2010 at 7:55 pm |
You are a “Zeaaanioussss”
thanks for your effort and research saved time and the second approach is a very good thought.
Thanks for everything
April 19th, 2010 at 11:21 pm |
I’m surprised that no one has answered Derek and others about where to put the code. Add a Content Editor Web Part to the page and paste the javascript in it. Just don’t forget the _spBodyOnLoadFunctionNames.push(“hideFields”); so that your function loads. I have edit & display forms that use this, some have four separate CEWP with different controls hidden depending upon what role a users has for the list (audiences). Of course we are using MOSS 2007, don’t know how it would work in earlier versions.
_
April 30th, 2010 at 1:57 am |
What if I want to only display a field if it’s value is not equal to a certain value?
For example, I have a dropdown choice for “PE Status”, and I only want to display that field in the form when it’s value is not equal to “Not Applicable”.
May 9th, 2010 at 8:34 pm |
Is there a specific trick to hiding number fields? The text fields hide just fine but the number field I’ve got just won’t go away. 🙂 Any help would be appreciated.
August 4th, 2010 at 9:40 pm |
Greate post! You just solved a mystery that had me very frustrated – thanks!
August 10th, 2010 at 2:58 am |
Thanks for the gr88 post..
I have a question,
I want to hide content types..any idea what are the tag names and identifiers to be used for content type control?
Thanks
September 3rd, 2010 at 4:29 am |
A non-code solution. Edit list settings –> Advanced –> Enabled Management of Content Types. Open the “Item”, content type, click the column name you want to hide, select Hidden at the bottom of the page, click OK. Works on most field types.
September 3rd, 2010 at 3:10 pm |
This cannot be done on a per audience basis though. Check the rest of the series for the detailed requirements
regards
paul
October 27th, 2010 at 11:20 pm |
[…] in SharePoint 2007 as useful as I did. Thanks to the guys at CleverWorkarounds for writing an article on […]
December 15th, 2010 at 6:15 pm |
This doesn’t seem to work for me, no errors just doesn’t hide, i’m using spd2007 code i’m using:
_spBodyOnLoadFunctionNames.push(“hideFields”);
function findacontrol(FieldName)
{
var arr = document.getElementsByTagName(“!”);
// get all comments
for (var i=0;i 0)
{
return arr[i];
}
}
}
function hideFields()
{
var control = findacontrol(“Complete necessary checks in accordance with Category loading”);
control.parentNode.parentNode.style.display=”none”;
}
December 15th, 2010 at 6:15 pm |
_spBodyOnLoadFunctionNames.push(“hideFields”);
function findacontrol(FieldName)
{
var arr = document.getElementsByTagName(“!”);
// get all comments
for (var i=0;i 0)
{
return arr[i];
}
}
function hideFields()
{
var control = findacontrol(“Complete necessary checks in accordance with Category loading”);
control.parentNode.parentNode.style.display=”none”;
}
December 29th, 2010 at 12:31 am |
Good Job Mr Cleverworkarounds !
July 21st, 2011 at 1:41 am |
I have a question,
I want to hide the content types control from the Edit Form. I need to have content types disabled and they must be visible on my list for my SP Workflow to see them.
Any idea what are the tag names and identifiers to be used for content type control?
var control = getTagFromIdentifierAndTitle(“select”,”ContentTypeChoice”,”Content Type”);
but it hid all the fields on the editform.
thanks for your help.
July 21st, 2011 at 1:43 am |
nevermind. I’m a goof.
I figured it out and it works. my parent nodes were messed up.
function hideFields() {
var control = getTagFromIdentifierAndTitle(“select”,”ContentTypeChoice”,”Content Type”);
control.parentNode.parentNode.style.display=”none”;
}
September 22nd, 2011 at 2:18 am |
I have used this solution many times to hide fields. However, I now have this issue of wanting to make fields DISPLAY only, not editable. The only Edit Form function I want to retain is the ability to add attachments. Can this script be altered to produce that result? I tried things like changing display=”none” to display=”read” or display=”display” but nothing works. Is this possible?
October 1st, 2011 at 1:04 am |
Hi. This stuff is a great learning document. I’m still scratching my head on how to retrieve the ‘Title’ field. I created a custom form for the Tasks list and I’ve been able to read all the values except for Title. This element is renderred as follows:
However, none of these work:
1) getTagFromIdentifierAndTitle(“input”,”text”,”ff1_1″);
2) getTagFromIdentifierAndTitle(“input”,”text”,”Title”);
3) getTagFromIdentifierAndTitle(“input”,”TextField”,”ff1_1″);
4) getTagFromIdentifierAndTitle(“input”,”TextField”,”Title”);
Help! Thanks
October 1st, 2011 at 1:08 am |
Sorry, The Title element is rederred as follows:
input name=”ctl00$PlaceHolderMain$g_4860838c_0c1a_440a_a113_1a0fcf83d9b5$ff1_1″ type=”text” value=”TestTitle” id=”ctl00_PlaceHolderMain_g_4860838c_0c1a_440a_a113_1a0fcf83d9b5_ff1_1″ style=”width:244px;”
October 20th, 2011 at 6:14 pm |
This code works fine for hiding the entire line (Question & Answer) – How would you hide just the answer part?
October 22nd, 2011 at 12:01 am |
Also, how would you get it to hide multiple lines? It only seems to work with one line!
_spBodyOnLoadFunctionNames.push(“hideFields”);
function findacontrol(FieldName) {
var arr = document.getElementsByTagName(“!”);
// get all comments
for (var i=0;i 0)
{ return arr[i]; }
}
}
function hideFields() {
var control1 = findacontrol(“Title”);
control1.parentNode.parentNode.style.display=”none”;
control1 = findacontrol(“Document Link”);
control1.parentNode.parentNode.style.display=”none”;
control1 = findacontrol(“PublishDate”);
control1.parentNode.parentNode.style.display=”none”;
var control2 = findacontrol(“Divider”);
control2.parentNode.parentNode.style.display=”none”;
control2 = findacontrol(“Document Link”);
control2.parentNode.parentNode.style.display=”none”;
control2 = findacontrol(“PublishDate”);
control2.parentNode.parentNode.style.display=”none”
}
November 3rd, 2011 at 9:11 pm |
Awesome 3 part series. This has helped me a great deal. For those of you wanting to make this Javascript compatible with Firefox as well, you’ll have to make a couple tweeks. Here’s my modified findacontrol function:
function findacontrol(content,where)
{
var result
if (!where) where=document
for (var i=0,l=where.childNodes.length;i0)
return where.childNodes[i]
if (result=findacontrol(content,where.childNodes[i]))
return result
}
}
April 11th, 2012 at 8:01 am |
Great technique to show/hide fields.
I have a choice option “Good” or “Bad” radio buttons
How can i show selected feilds (using youir technique) if option “Bad” is true, otherwise hide selected fields.
Your help would be apprectiated.
October 19th, 2013 at 12:34 am |
Great tutorial, very useful. Thanks!
May 20th, 2015 at 4:22 am |
Thanks for sharing! I was having trouble with multi-line identifier and tag name. Microsoft! eeeehhh!