More SharePoint Branding – Customisation using JavaScript – Part 4
Hi there. As I write this post, the media are telling me that the stock market is stuffed, the US economy is going to the dogs and banks are writing down billions from sub-prime excess. I dare not check my online broker, road traffic this morning was abysmal, I was late, brought in the wrong laptop and left an important DVD at home.
Could it get any worse? Who knows, but it sounds like the sort of day to re-visit JavaScript and get frustrated with writing a web part for the first time.
So to recap on our journey thus far..
- Part 1 of this series looked at how we can use JavaScript to deal with the common request of hiding form elements from the user in lists and document libraries. It looked at a Microsoft documented method, then a better, more flexible method.
- Part 2 wrapped this JavaScript code into a web part which has been loaded into the SharePoint web part gallery.
- Part 3 then examined the trials and tribulations of getting this new web part added to certain SharePoint pages (NewForm.aspx, EditForm.aspx and DispForm.aspx), and then with a few simple edits, use this web part to hide form fields as desired. Finally, I demonstrated the power of combining this with SharePoint Audiences targeting functionality to make the hiding/unhiding of form elements personalised to particular groups of users.
All in all a pretty clever workaround so far if I say so myself. 🙂
My original goals for this JavaScript was to find an effective, easily repeatable way to customise SharePoint form pages by hiding fields or form elements when we need to. Specifically:
- Allow hidden fields based on identity/audience
- Avoid use of SharePoint Designer
- Avoid customisations to the form pages that unghosted the pages from the site definition
We achieved these goals in part three, but was I satisfied? No. The quest for more clever workarounds always goes on!
[Quick Navigation: Part 1, Part 2, Part 3, Part 5 and Part 6]
So the way I am going to structure this post is to pitch it to part-time or junior developers. If you are an experienced software engineer, this article is not going to trouble you.
Coffee rating: ![]()
Remaining Issues
One thing I was unhappy about with the web part in part three was that JavaScript still had to be edited when using the web part on a page. I wanted to take the programming completely out of the equation. Additionally, it was about time I got off my butt and learned to code a web part anyway. I’d previously blogged about the wonderful STSDEV, and decided I’d better put my money where my mouth and actually use it before I start mandating that others do.
So the first part of this post is examining STSDEV, and the joyous fun I had with my first ever web part with it, then I will get onto the first part of the coding.
The Web Part Requirements
So what are we planning to do here? Basically it is pretty simple. The JavaScript code that hides the columns from a page looks like this.
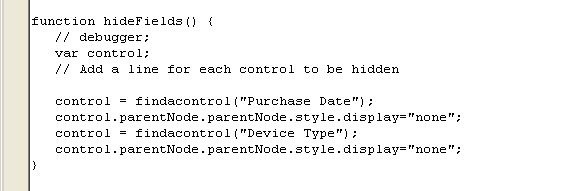
If you look closely at the above example, you will see that we have two lines that are repeated for every field we wish to hide.
control = findacontrol(“Device Type”);
control.parentNode.parentNode.style.display=“none”;
So, how about we make a web part that accepts a custom property that allows the user to list all of the fields to be hidden, and the web part can generate the complete JavaScript code for each of them to be hidden from view. This screen-shot shows the basic idea.
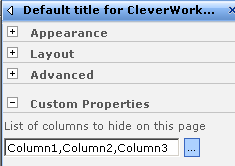
Note that we have listed three columns in the web part properties separated by a comma. Thus the page containing this web part would hide the existence of any of these columns.
Enter STSDEV (Take 1)
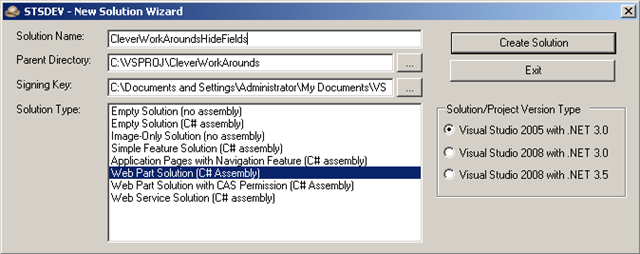
So first up, I grabbed STSDEV from its codeplex home. I installed it and ran the EXE to receive the initial screen.
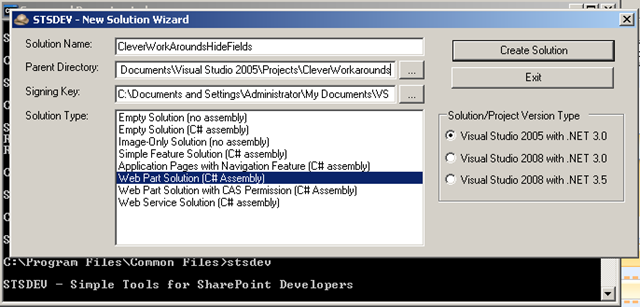
On my first attempt, I created the solution in my default visual studio projects folder (C:\Documents and Settings\Paul\My Documents\Visual Studio 2005\Projects\CleverWorkarounds)
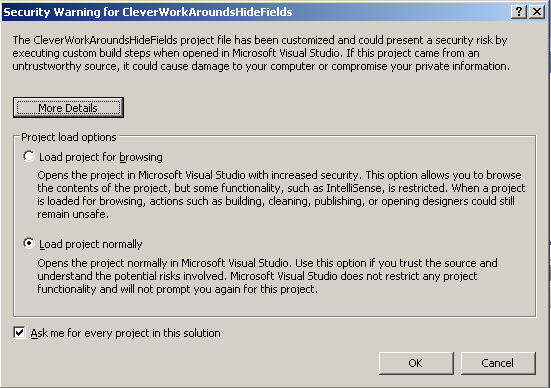
STSDEV happily accepted this and created my solution, which I opened with Visual Studio 2005 and accepted the obligatory warning as shown. But that’s cool – we trust those nice STSDEV guys! 🙂
I won’t spend too much time going into the solution created for the web part project because you can watch the videos that explain it much better anyway. But I will draw your attention to the fact that two sample web parts are included in the solution, CustomWebpart1.cs and CustomWebpart2.cs. We will rename and modify these later but first I need you to be aware of one ‘gotcha’ that I encountered.
In Visual Studio try and compile this project as it is. Make sure that the build type is set to DebugBuild and press F6 or choose “Build Solution” from the “Build” menu. Uh-oh, I got a runtime error with STSDEV… Bummer
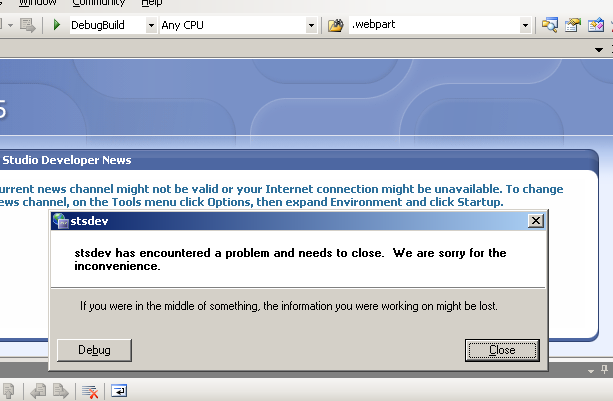
This had me going for a while, because at first I had made changes to the solution before I attempted a build. So I spent some time thinking it was my changes that were the root of the issue. All it turned out to be was the spaces in the path to my project.
C:\Documents^ ^and^ ^Settings\Paul\My^ ^Documents\Visual^ ^Studio^ ^2005\Projects\CleverWorkarounds
Enter STSDEV (Take 2)
This time, I’ve created the project with the parent directory parameter being a path with no spaces…
C:\VSPROJ\CleverWorkarounds
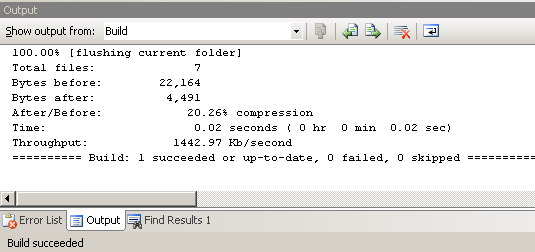
Follow all the steps as per take 1 and try and compile the solution. Good – no nasty runtime burps this time.
Customising the Solution
So we have to now take this generic visual studio solution and make our changes. This consists of deleting stuff that we don’t need, renaming our class and updating references to the class name. Later we will customise the build/deploy process too. If you have experience with STSDEV or this seems too straightforward for me to blog about, then skip to the next section, otherwise read on for more detail of my specific example.
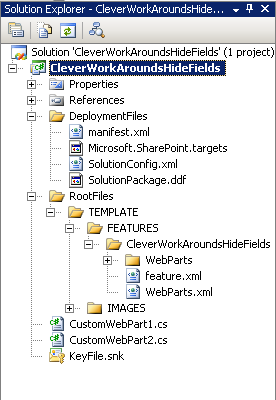
The first step is to customise our generic web part solution to our needs. We will delete CustomWebPart2.cs and rename CustomWebPart1.cs to CleverWorkaroundsHideFields.cs. When you perform the rename, you will ask if you want all project references to be renamed also. Makes sense doesn’t it?

This dialog box should not be interpreted as modifying any hardcoded references to the old file name of CustomWebPart1.cs. You will still have to do some search/replace work.
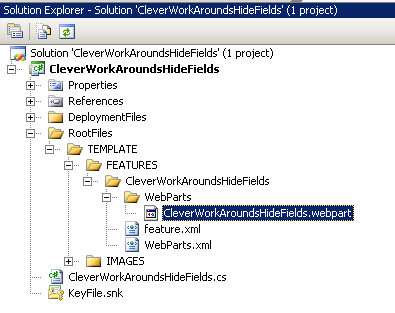
Additionally, there are two .webpart files that go with the two default class files and you have to rename/delete these as well. They can be found in the solution under RootFiles\TEMPLATE\FEATURES\CleverWorkAroundsHideFields\WebParts.
Delete CustomWebPart2.webpart and rename CustomWebpart1.webpart to CleverWorkAroundsHideFields.webpart.
Below is the result of both changes (.cs files and .webpart files)
Okay, so now this solution comes with xml files, solution files and all the other paraphernalia associated with getting a web part bundled up and installed to a farm. Now we have to delete all references to the deleted web part called CustomWebPart2 and update the references to CustomWebPart1 to CleverWorkAroundsHideFields.
Using the FIND/REPLACE tool, the entire project can be adjusted very quickly
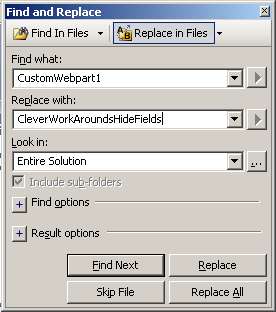
The above operation takes care of the renaming of CustomWebPart1 in one single operation. But with CustomWebPart2 we are deleting references, so it takes a little finer surgery.
Here are the results of the *find* for CustomWebPart2.webpart
Find all "CustomWebpart2", Subfolders, Find Results 1, "Entire Solution"
DeploymentFiles\SolutionPackage.ddf(25):RootFiles\TEMPLATE\FEATURES\CleverWorkAroundsHideFields\WebParts\CustomWebPart2.webpart
RootFiles\TEMPLATE\FEATURES\CleverWorkAroundsHideFields\feature.xml(17):      Location="WebParts\CustomWebPart2.webpart" />
RootFiles\TEMPLATE\FEATURES\CleverWorkAroundsHideFields\WebParts.xml(8):    <File Url="CustomWebPart2.webpart" Type="GhostableInLibrary">
Matching lines: 3    Matching files: 3    Total files searched: 9
You will find references to CustomWebPart2 in
- SolutionPackage.ddf under DeploymentFiles
- feature.xml under RootFiles\TEMPLATE\FEATUTES\CleverWorkAroundsHideFields
- WebParts.xml under RootFiles\TEMPLATE\FEATUTES\CleverWorkAroundsHideFields
Using visual studio, open up each of these files and adjust the references. So for example in SolutionPackage.ddf I changed from:
;*** add files for CleverWorkAroundsHideFields\WebParts feature
.Set DestinationDir=CleverWorkAroundsHideFields\WebParts
RootFiles\TEMPLATE\FEATURES\CleverWorkAroundsHideFields\WebParts\CleverWorkAroundsHideFields.webpart
RootFiles\TEMPLATE\FEATURES\CleverWorkAroundsHideFields\WebParts\CustomWebPart2.webpart
to
;*** add files for CleverWorkAroundsHideFields\WebParts feature
.Set DestinationDir=CleverWorkAroundsHideFields\WebParts
RootFiles\TEMPLATE\FEATURES\CleverWorkAroundsHideFields\WebParts\CleverWorkAroundsHideFields.webpart
Now if you are thinking to yourself, what is FEATURE.XML and Solutionpackage.DDF anyway? Then I am afraid that you have some homework to do! If you are going to code anything for SharePoint, you need to understand the concepts of features and how they are used with the solution framework. Seriously, if you are blindly editing the files using this post as a guide, then you are only going to get yourself into trouble later.
For the rest of you, finish off the renames and removals of the default class names and then try and rebuild the solution. If it all builds, you can move onto the next step of actual coding the thing.Once we finish coding, you will see pretty quickly how useful and time saving STSDEV really is.
Coding the Web Part – Part 1
So, now we open up CleverWorkAroundsHideFields.cs and add our code. The first step is to add references to additional libraries that this web part will use.
using System.ComponentModel;
using System.Xml.Serialization;
What are these and what do they do? Without going into loving detail, these namespaces allow you to use XML serialisation. I had not previously coded much ASP.NET stuff, so XML serialisation took me a little getting used to. But the basic idea is this.
XML Serialisation Interlude
If you have an object instantiated from a class, with a bunch of properties set to different values, how to you send those properties to another remote object of the same class? What if it is two separate web server or web applications?
XML serialisation allows you to set properties for the object that are then stored behind the scenes as XML (this is the serialisation part). The other end gets the XML (over HTTP) and deserialises it back to the native properties for the destination object. Lo and behold, we have copied the state of one object to another object.
Now think of the code that this saves when the other end simply has to call a deserialise method and all of the properties of the object are auto-magically filled in.
Now in SharePoint, web part properties have to be persisted. When you visit a page, the look and feel of the web part is determined partly by web part properties set by the site designer. Those settings are retrieved from the SharePoint database. So when those properties are first set by the administrator (i.e change the title or appearance of a web part), SharePoint serialises all of those properties to XML and that XML is stored into the database. When the page is then later loaded by a user, a web part object is created, and then the XML properties are deserialised back to the object properties so it can appear how it is supposed to.
Make sense? 🙂 I hope so because that’s all I’m saying about it! If you are still cofused, try this article.
Coding the Web Part – Part 2
So having added the two references to the XML Serialaisation and System.ComponentModel namespace, you should have the following code.
using System;
using System.Web;
using System.Web.UI;
using System.Web.UI.WebControls;
using System.Web.UI.WebControls.WebParts;
using System.Xml.Serialization;
using System.ComponentModel;
Make sure that there is no reference to a namespace called Microsoft.SharePoint.WebPartPages. There are actually two different web part classes available, one designed for SharePoint 2003 and the more recent one being part of ASP.NET version 2. (System.Web.UI.WebControls.Webparts).
MSDN and Microsoft code samples have a lot to answer for here! Most code samples for web parts with custom properties are based on the legacy web part class, and things have changed between old and new, especially when it comes to XML serialised properties. I wasted a lot of time here because of this!
The next step is to delete the default code in the web part class. Find the following code and delete it.
protected override void CreateChildControls() {
  Label lblHello = new Label();
  lblHello.Text = "Hello";
  Controls.Add(lblHello);
}
Serialsed XML parameters are in square brackets around sections of c# code. These are .NET attributes and tell the XML serializer where the various members of this object will appear in the XML and what they will be named. Without these, serialization cannot take place.
So the first serialised parameter is defined in between the namespace and the class itself.
namespace CleverWorkAroundsHideFields {
   [XmlRoot(Namespace = "CleverWorkAroundsHideFields")]
   public class CleverWorkAroundsHideFields : WebPart {
   }
}
Now if we serialised the code into XML now it would look like this
<CleverWorkAroundsHideFields>
</CleverWorkAroundsHideFields>
Exciting eh? So let’s now add some web part properties and serialise them as well. First up the properties of this class. If you check the section of this post titled “Web part Requirements”, I stated that the web part should accept a custom property that allows the user to list all of the fields to be hidden. So below is the property that will store this list of fields. It is about as simple as a class property can be (just store a string with a get and set method).
private string _HideFieldList;

public string HideFieldList
{
   get
   {
      return _HideFieldList;
   }
   set
   {
      _HideFieldList = value;
   }
}
Now I need to add the parameters for XML serialsation. The above raw C# code above now changes to:
public class CleverWorkAroundsHideFields : WebPart {

   private string _HideFieldList;

   // Create a custom category in the property sheet.
   [Category("Custom Properties")]
   [Personalizable(PersonalizationScope.Shared)]
   [WebDisplayName("List of columns to hide on this page")]
   [WebDescription("Comma delimited list of columns to hide on this page")]
   [WebBrowsable(true)]
   [XmlElement(ElementName = "HideFieldList")]

   public string HideFieldList
   {
      get
      {
         return _HideFieldList;
      }
      set
      {
         _HideFieldList = value;
      }
   }
}
I haven’t serialised this into XML, but you can see how all of the properties in square brackets would form an XML document describing the properties. if I did, it would look something akin to:
<CleverWorkAroundsHideFields>
<Category>Custom Properties</Category>
<WebDisplayName>List of columns to hide on this page</WebDisplayName>
<WebDescription>Comma delimited list of columns to hide on this page</WebDescription>
<WebBrowsable>True</WebBrowsable>
<XmlElement ElementName="HideFieldList">
</CleverWorkAroundsHideFields>
So now SharePoint has this in its database. When this webpart is rendered, the XML similar to above is retrieved and deserialised back to our WebPart class.
At this point it is a good idea to build the solution to ensure that you have no syntax errors or namespace issues. If you have trouble getting to this point, its best you not go any further until the project builds correctly.
Now where did I get these XML parameter values from? Go to the MSDN documentation for the System.Web.UI.WebControls.WebParts namespace and you will find all of the available properties buried there. (Either that or cheat like me and find out via here)
Coding the Web Part – Part 3
So now let’s write the code to render the JavaScript output. This is basically C# code to create the JavaScript that will render in the browser. The code is simple enough, we have looked at it in the last posts. But creating the JavaScript inside C# code makes it look worse than it really is.
First up, we need a new array variable called _fieldlist to store the individual fields (remember they come as a comma delimited list so we will split them to their individual names).
private string[] _fieldlist;
protected override void Render(HtmlTextWriter output)
{   // Now lets extract the list of fields from the web part properties
   if (HideFieldList != null)
   {
      _fieldlist = HideFieldList.Split(',');
      // javascript inside C# - ugh
      // I know this looks ugly on account of the escaped quotes.
      // First section is the findacontrol function
      output.WriteLine();
      output.WriteLine(@"<script language=""javascript"" type=""text/javascript"">  ");
      output.WriteLine();
      output.WriteLine(@"_spBodyOnLoadFunctionNames.push(""hideFields"")  ");
      output.WriteLine(@"function findacontrol(FieldName) {  ");
      output.WriteLine(@"var arr = document.getElementsByTagName(""!"");  //get all comments ");
      output.WriteLine(@"for (var i=0;i < arr.length; i++ ) {   ");
      output.WriteLine(@"   // now match the field name  ");
      output.WriteLine(@"   if (arr[i].innerHTML.indexOf(FieldName) > 0) { ");
      output.WriteLine(@"      return arr[i]; ");
      output.WriteLine(@"   } ");
      output.WriteLine(@"  } ");
      output.WriteLine(@"}");
      output.WriteLine();
      output.WriteLine();
      // Now the hidefields function, which loops for each field to be hidden
      output.WriteLine("function hideFields() { ");
      output.WriteLine("   var control; ");
      if (_fieldlist != null)
      {
         for (int i = 0; i < _fieldlist.Length; i++)
         {
            output.Write("    control = findacontrol(\"");
            output.Write(_fieldlist[i]);
            output.WriteLine("\" ); ");
            output.WriteLine("   control.parentNode.parentNode.style.display=\"none\"");
         }
      }
      output.WriteLine(" }");         output.WriteLine("</script>");
   } // if
} // method
The only section of code above that is of real interest is in the JavaScript hideFields() function. Here we loop for each field supplied in the list, and construct the code. So for example, if HideFieldList contained “Column A,Column B”, the generated JavaScript code would be:
control = findacontrol("Column A");
control.parentNode.parentNode.style.display="none"
control = findacontrol("Column B");
control.parentNode.parentNode.style.display="none"
Please be careful cutting and pasting this code! Quotes seem to get screwed up sometimes.
Conclusion (let’s have a break)
Once again, this post is starting to get a little long. So I’ll stop now and let you have a breather. In part 5 of this series, we will do an initial build of this solution, which will demonstrate how useful STSDEV is at speedy packaging and deployment. I’ll show you how to package up a nice, re-usable solution, and be able to test and debug quickly and painlessly.
Until then, bye for now
Paul


March 11th, 2008 at 4:06 am |
[…] More SharePoint Branding – Customisation using JavaScript – Part 4 […]
March 14th, 2008 at 2:27 am |
[…] More SharePoint Branding – Customisation using JavaScript Part 4 […]
March 15th, 2008 at 7:32 am |
[…] full series can be found here: Part 1, Part 2, Part 3, Part 4, Part 5 and Part […]
March 21st, 2008 at 8:13 pm |
[…] Pour information, il existe des solutions plus ou moins élégantes comme par exemple : More SharePoint Branding – Customisation using Javascript – Part 5, Part 1, Part 2, Part 3, Part 4SPListDisplaySetting […]
April 15th, 2008 at 3:28 pm |
[…] CleverWorkarounds: More SharePoint Branding – Customisation using… …are telling me that the stock market is stuffed, the US economy is going to the dogs and banks are writing down billions from sub-prime excess. […]
June 9th, 2009 at 9:23 pm |
[…] More SharePoint Branding – Customisation using JavaScript Part 4 […]
February 17th, 2010 at 1:26 am |
Unfortunately, it looks like you cannot use this if you have no rights to the server.