More SharePoint Branding – Customisation using JavaScript Part 3
Hey there. Welcome to part 3 of my series on SharePoint customisation using JavaScript and web parts.
So here is the lowdown so far. We are trying to find an effective, repeatable way to easily customise SharePoint form pages, so that we can hide fields or form elements when we need to. The goals were to:
- Allow hidden fields based on identity
- Avoid use of SharePoint Designer
- Avoid customisations to the form pages that unghosted the pages from the site definition
So how have we progressed thus far?.
- Part 1 of this series looked at how we can use JavaScript to deal with the common request of hiding form elements from the user in lists and document libraries.
- Part 2 wrapped this JavaScript code into a web part which has been loaded into the SharePoint web part gallery.
So let’s knock the rest of this over and pick up right from we left off…
CleverWorkArounds Coffee requirement of this post depends on how much you hate JavaScript.
Metrosexual web developer ![]()
Socially inept technical guy ![]()
![]()
![]()
[Quick Navigation: Part 1, Part 2, Part 4, Part 5 and Part 6]
Looking for step 1 and 2? Go to the previous post
Step 3. Adding the web part to content pages
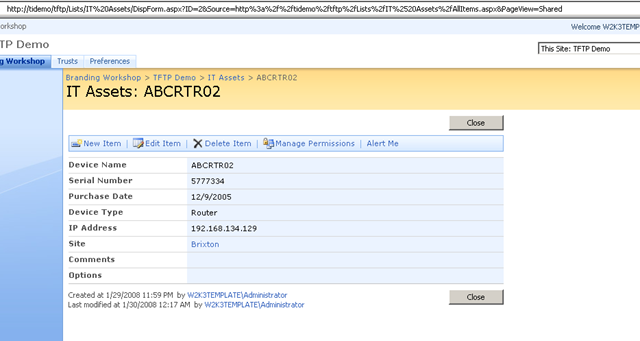
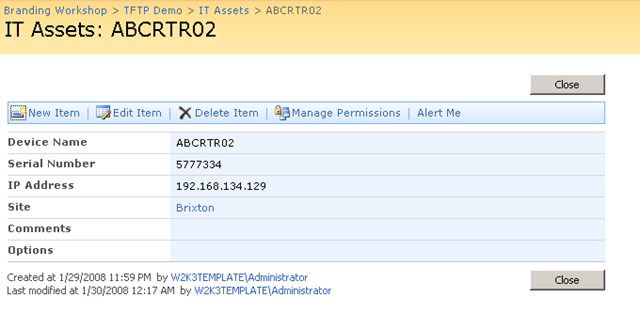
So now we hit the supposedly simple step of adding our new web part to our display and edit forms for a list. The image below shows the page that I want to modify. In this example, it is DispForm.aspx
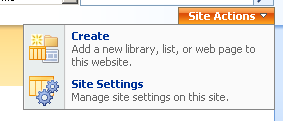
So it should be easy right? Just go to Site Actions menu and choose “Edit Page”.
Uh… hang on what’s going on here then. Where’s my damn “Edit Page” option?
Your first reaction is to probably say something like “okay so that sucks, how are we supposed drop a web part onto this page?”. To be honest with you, I’m still not sure why they did it in MOSS 2007, but when you think it through, I can sort of see the SharePoint team’s reasoning. These pages are auto generated and each time you add a column to a list or library, the NewForm.aspx, Editform.Aspx and Dispform.aspx are modified. The more you customise these pages, the more you risk breaking something important. Plenty of people have posted on how much of a problem this can be.
But by the same token, most of the posts I have read on customising pages like NewForm.aspx and EditForm.aspx involve making changes that requires an unghosted page, that is now different to the original site definition. Thus, why bother removing the ability to add a web part via the SharePoint browser based editor? At least doing it via the browser and web parts does not modify the page from the site definition. Seems silly not to allow browser based editing and then force people do make modifications in SharePoint Designer, likely as an unghosted page anyway.
Well, I can speculate all day, but lets get on with getting around this problem.
Workaround 1: Hacking the menu item code
The first technique that I first used to my “Edit Page” back involved using SharePoint Designer to customise the page. By default, the code to generate the “Site Actions” menu is actually defined on the master page, not the current page. However, you can override this behaviour in SharePoint designer by opening the page, clicking on the Site Actions menu and choosing “Create Custom Content” as shown below.

This will copy the code from the master page to this page, allowing you to customise it. The entire top navigation bar is now modifiable, but we are only interested in the code that controls the Site Actions Menu and specifically the menu that handles the “Edit Page” option.
You will find it easily enough in code view.
<SharePoint:MenuItemTemplate
   runat="server"
   id="MenuItem_EditPage"
   Text="<%$Resources:wss,siteactions_editpage%>"
   Description="<%$Resources:wss,siteactions_editpagedescription%>"
   ImageUrl="/_layouts/images/ActionsEditPage.gif"
   MenuGroupId="100"
   Sequence="200"
   ClientOnClickNavigateUrl="javascript:MSOLayout_ChangeLayoutMode(false);"
/>
All you have to do for this hack is to change the ID attribute of the SharePoint:MenuItemTemplate control to a different name. (Line 3 below).
1: <SharePoint:MenuItemTemplate
2: runat="server"
3: id="MenuItem_EditPage1"
4: Text="<%$Resources:wss,siteactions_editpage%>"
5:
6: />
Save this page and refresh the page in your browser. You find the “Edit Page” menu back again! Now we can add the web part in (as described in the following section entitled “Final configuration of our web part”). Once the web part has been added in, we can happily undo/remove this hack.
So, is this a good workaround? I actually don’t think so. The main problem I have with this method is the customisation of the page from the site definition. If you recall at the start of this post I talked about not wanting to use SharePoint Designer and more importantly, not wanting to modify pages from the site definition wherever possible.
CleverWorkAround Rating: Okay, but not that clever
Workaround 2: The ToolPaneView hack
This next workaround is great, because it can be done in the web browser and requires no SharePoint designer. It is exceedingly simple. For any web part page, simply append the following text to the URL:
&ToolPaneView=2
Thus, if my original URL was:
http://tidemo/tftp/Lists/IT%20Assets/DispForm.aspx?ID=2&Source=http%3a%2f%2ftidemo%2ftftp%2fLists%2fIT%2520Assets%2fAllItems.aspx&PageView=Shared
Then my new URL is:
http://tidemo/tftp/Lists/IT%20Assets/DispForm.aspx?ID=2&Source=http%3a%2f%2ftidemo%2ftftp%2fLists%2fIT%2520Assets%2fAllItems.aspx&PageView=Shared&ToolPaneView=2
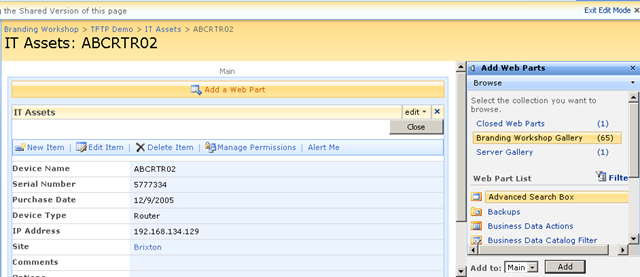
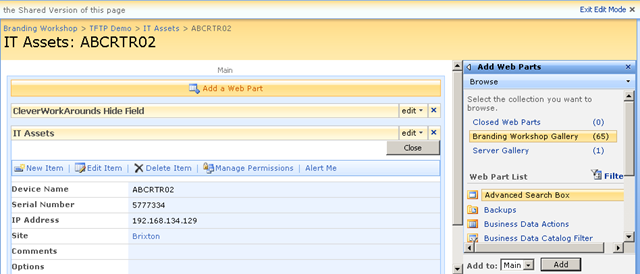
Below is a screen capture of the effect. If you look carefully you see two things have happened. The page is now in Edit Mode and the “Add Web parts” window is displayed. Since we are in edit mode, we can click any web part zone and add our web part!
This time around, there is no SharePoint Designer used and no customisations to the page that require unghosting from the site definition.
CleverWorkAround Rating: My kind of hack!
Final configuration of our web part
So, we click to add a new web part to our form page (in this case DispForm.aspx). You see that the web part is listed in its own category below “CleverWorkArounds”. This is because when I uploaded the web part to the gallery, I specified the group. (I covered this back in the section “Step 2: Export the Web Part” )
Below is a screen capture showing DispForm.aspx page with our custom web part.
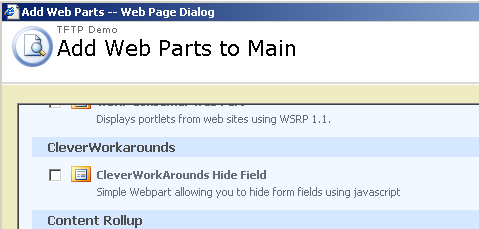
Now although the JavaScript is loaded, we commented out some code to make the web part re-usable. Now it’s time to uncomment the code and modify it slightly. Click on the edit drop down menu on the “CleverWorkArounds Hide Field” web part and choose “Modify Shared Web part”
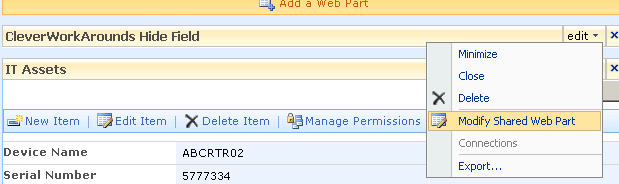
Choose “Source Editor” from the web part properties and find the commented code.
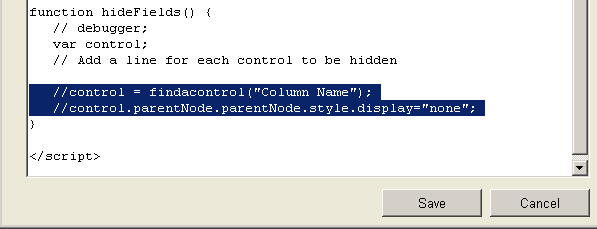
Note I have now uncommented the some code from the hideFields function and specified the column to hide. So the code has changed from:
function hideFields() {
   // debugger;
   var control;
   // Add a line for each control to be hidden
   //control = findacontrol("Column Name");
   //control.parentNode.parentNode.style.display="none";
}
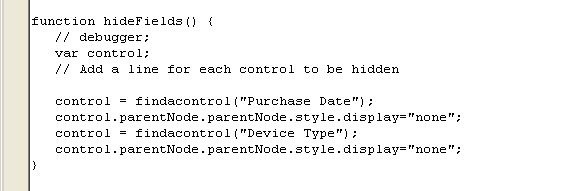
to
function hideFields() {
   // debugger;
   var control;
   // Add a line for each control to be hidden
   control = findacontrol("Device Type");
   control.parentNode.parentNode.style.display="none";
}
Click Save and OK and the effect is immediate, because the page refreshes and the JavaScript will be executed even in page edit mode. (Thus testing and debugging is also easy too).
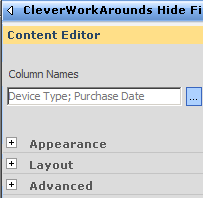
Below is a version of code that hides two fields.
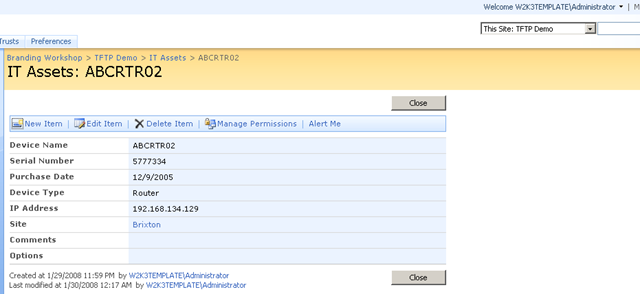
Below is the result. Now if you look carefully you can see I have hidden both the “Purchase Date” and “Device Type” fields and they are accordingly not displayed.
WOHOO! Is this clever yet? It has achieved the goal of re-use, as well as eliminating the need for SharePoint Designer, as well as any page customisation that requires unghosting – all a good thing. But what about personalisation?
This time its personal!
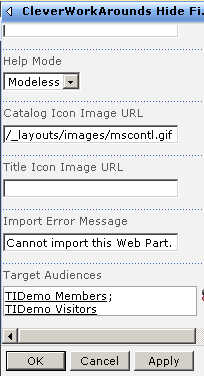
Back in part 2 I mentioned that a key requirement is to be able to conditionally hide fields from display. Well, now that this is a web part we can via audiences! Back in the properties of our web part, we have the ability to control when this web part is displayed. In the example below, I have configured this web part to only display when a member of “TIDEMO VISITORS” or “TIDEMO MEMBERS” is visiting the site.
So now when we refresh the page as the site owner, we can see that the JavaScript has not been rendered. “Purchase Date” and “Device Type” columns are now visible.
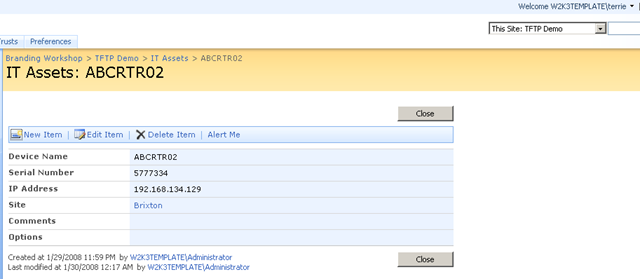
However if I log on as a site member, “Terrie”, the situation is different and the columns are hidden from view. How good is that!
So, re-examining our original goals, we have met all of them except the issue of security. As mentioned at the start of part 2, this technique is useful and effective for internal collaboration, but most definitely not recommended for external collaboration.
CleverWorkAround Rating – Pretty darn clever if you discount security
Summing Up
There are two things still bugging me about this whole thing. The first one is that code still has to be edited. Each time you drop this web part onto the form, you need to open its properties and modify the base code to specify the columns to hide. So I am thinking that part 4 of this series will be a first for me. I’ll code a custom web part that accepts the list of fields to hide as a comma delimited string, supplied via a web part property.
Below is a mockup of the idea
Now I haven’t actually done this yet, so I might be setting myself up for a big fall, but I figure that I will give STSDEV a go and see what happens.
The other annoyance is the whole reliance on client-side processing. Ideally an ASP.NET server side control could hide fields before they are rendered to the client. I’ve spoken to some ASP.NET developer friends of mine about that, and it seems doable. I’ll report about this in part 4 too.
regards
Paul


March 12th, 2008 at 11:10 pm |
[…] Part 3 then examined the various issues of adding this new web part to certain SharePoint pages (NewForm.aspx, EditForm.aspx and DispForm.aspx). I also covered using SharePoint Audience targeting to make the hiding/unhiding of form elements personalised to particular groups of users. […]
March 13th, 2008 at 11:09 pm |
[…] being done here, I suggest you read my series of articles on the use of JavaScript in SharePoint. Part 3 in particular will show you how to safely add this web part to pages with editing disabled […]
March 14th, 2008 at 1:22 am |
[…] More SharePoint Branding – Customisation using JavaScript Part 3 […]
March 21st, 2008 at 9:51 pm |
Place a favourite in your browser with: javascript:MSOTlPn_ShowToolPane(‘2’)
This does the same as ToolPaneView=2
Originally by Todd Bleeker: http://mindsharpblogs.com/todd/archive/2005/02/11/285.aspx
April 29th, 2008 at 12:20 am |
I like the concept. How can I add record navigation in tool bar like top/previous/next/last record in toolbar rather than new/edit/delete or any other options?
August 5th, 2008 at 11:47 pm |
This rocks man.
It also worked well for the Calendar columns that everyone wants to hide, and worked nice and clean.
Thanks!!
August 6th, 2008 at 12:37 am |
[…] courtesy of: http://www.cleverworkarounds.com/2008/02/28/more-sharepoint-branding-customisation-using-javascript-… […]
August 9th, 2008 at 2:46 am |
What can I say. Brilliant! However, you might want to improve it in a few ways. For example, if I have two fields: “Field A” and “Field AB” and I enter “Field A” as the field to be replaced, it will match both of those and hide whichever one comes first on the page. You may want to change this line of the code:
if (arr[i].innerHTML.indexOf(FieldName) > 0) {
To something like:
if (arr[i].innerHTML.indexOf(‘FieldName=”‘ + FieldName + ‘”‘) > 0) {
so that the name must match exactly. Also, you should make sure you are doing a good job of matching fields that contain dangerous punctuation, like single and double quotes, ampersands, greater than and less than, etc.
Sometimes the fieldname and FieldInternalName
are different, so you may want to try to distinguish b/w those, or provide 2 methods: findacontrol() and findacontrolinternal().
Finally, it can be nice to try to group together fields, like if GroupA is resp for a set of fields and GroupB for another set of fields. In that case, you might name all GroupA fields with a prefix: “A:Name”, “A:DOB” and for GroupB: “B:Date Due”, “B:Supervisor”. Then you could add a findcontrolsbygroup() method that would search for any field that starts with a given prefix:
if (arr[i].innerHTML.indexOf(‘FieldName=”‘ + FieldNamePrefix) > 0) {
That way, you can take care of a group of fields at once. If you don’t like to make the titles of each field “ugly” by adding a prefix, then you could use content types/site columns and there use the prefix for each field/column, but in your list you change the name of each column to something “prettier”. Then in the code above you search by FieldInternalNameinstead:
if (arr[i].innerHTML.indexOf(‘FieldInternalName=”‘ + FieldNameInternalPrefix) > 0) {
August 9th, 2008 at 4:06 pm |
[…] talked about making modifications to system pages in detail in part 3 of my branding using Javascript series. Essentially, a system page is an automatically generates ASPX page that SharePoint creates. Think […]
August 12th, 2008 at 5:47 am |
I have played around more with the techniques you described. One problem I have long had with SP lists is that calculated fields that create url always end up with UGLY links. It has to be “http://www.yahoo.com” and not Yahoo. also, all links open in the same window. I used a Content Editor web part to look for UGLY links, modify them and open them in new windows, if applicable.
But then I create a list that grouped by a given field with the items collapsed. When I open the items of the group, none of my changes to links were made by the group by/collapsed uses ajax-like functionality. the content/links are not there when the page loads. any way to apply your techniques to both the data that is there on page load AND content that is added dynamically when you expand a group?
August 13th, 2008 at 12:05 pm |
Thanks for your work which will be useful once I get it working. I have followed your instructions but nothing I do to the JS code on the webpart seems to invoke a result, error or otherwise. Have created an alert in hideFields() to test but it does not fire. Running MOSS 2007 with IE7. Any hints?
September 3rd, 2008 at 3:03 am |
Hi Paul,
Just a few weeks since I started working with SP; your site in general and this post in particular
has being of TERRIFIC help in my learning. THANKS A LOT for your hard work and for sharing it
with others!
October 17th, 2008 at 8:26 am |
Dennis-
The code above uses “Fancy Quotes” and is rendered differently in the browser.
Try installing the webpart from the Freebies tab, configuring the Feature, and extracting the source.
Or, just replace all double quotes with shift+’ key (“).
Heres the code (Hopefully this wont print fancy quotes)
// Hide Fields web part by http://www.cleverworkarounds.com
_spBodyOnLoadFunctionNames.push(“hideFields”)
function findacontrol(FieldName) {
var arr = document.getElementsByTagName(“!”); //get all comments
for (var i=0;i 0) {
return arr[i];
}
}
}
function hideFields() {
var control;
control = findacontrol(“Title” );
control.parentNode.parentNode.style.display=”none”
}
November 14th, 2008 at 12:54 am |
Hi,
Thanks a lot for this tutorial, this was just what I was looking for.
Now i have a doubt, I was trying to filter, by user, the part where you hide the fields to be edited.
I made this function:
function GetUserId()
{
name = document.getElementById(“zz8_Menu”).children[0].innerText;
var username = name.substr(12);
return username;
}
I tried to use it like this:
var control;
var user = GetUserId();
if(user==”someusername”)
{
control = findacontrol(””);
control.parentNode.parentNode.style.display=”none”;
}
After following your steps and changing this as i have explained, the script didn’t wok.
Can you pinpoint me where did I made the wrong turn.
Thanks in advance
Zacarias Benta
November 20th, 2008 at 2:38 am |
Great work, thank you for your time. How did you get the target Audience proerties field to display? Was this done through an additional script?
November 20th, 2008 at 4:14 am |
Nevermind, I did more research and found this feature is only available on MOSS. I like post 14, is there a way to do it by groups, reading groups, or if permission are not “Full Control”
December 9th, 2008 at 11:27 am |
Awesome work, these are some of the best tutorials I have come across.
I have a question, I have applied everything you have mentioned above and it works. The only part that is not working for me is when you give access to those who you specify. I have giving access to a group that includes myself but I am not able to see the field that is hidden. Would you know what the problem is?
Thank you for your time.
January 21st, 2009 at 4:28 pm |
This works wonderfully. Can this also be used to hide the Content Type field in the EditForm.aspx?
February 1st, 2009 at 1:23 pm |
I tried to use this on EditForm.aspx but the problem is it ends up with the publishing toolbar on top of the page which shows up for whoever goes to the page. (I can’t remove it even though I click on save and publish) Any workarounds or reasons why this is happening. It works fine on the NewForm.aspx. tx
February 2nd, 2009 at 12:48 am |
Another thing I noticed is that this works only on IE and does not hide the fields on Firefox (Mozilla). Has anyone encountered the same problem?
February 26th, 2009 at 1:45 am |
ISSUE: There is one major problem with adding Web Parts to any SharePoint form using the «&ToolPaneView=2 ».
If the Publishig feature is enabled on the site, you won’t be able to publish your modified form. SharePoint will be caught in a never ending loop. I don’t know if it’s a bug or if this usecase should simply not be!
March 30th, 2009 at 4:00 pm |
Excellent Solution! .. and without using SP Designer. Just wanted to know if I try to hide a field of type “People and Groups” in the same way .. it doesnt work. Anything I can append to this code to get that hidden too in Newform.aspx Thanks!
April 16th, 2009 at 3:09 pm |
Look at how many times in this article you began a sentence with “So,…”! How much more of a socially conformist dork can you be?! Tacking on “So,…” and “Okay, so,…” to the front end of a sentence is asinine in the first place, but it’s also as unimaginatively passé as Seattle grunge/pussy/van Dyke beards and army boots + pant-load shorts and “I was just kind of like…”, and “Gag me with a spoon!” – not to mention those ugly little narrow-black-plastic-frame specs that twerps and their little twerpette chicks must think are cool. Get your iPhone outta your ass and your iPod outta your ear, stop linking up to the herd-mind and write something original (in English, that is!)! (This isn’t a flame – it’s a WAKE-UP CALL!)
April 16th, 2009 at 3:32 pm |
Hehe, sorry but Mrs Cleverworkarounds already told me off about excessive use of “so” like…a year ago (deliberate passe pun there) and you will find all my more recent writings have eliminated that habit. 🙂
Count the number of “so’s” in the “One best practice” series 🙂
regards
paul
April 21st, 2009 at 1:22 pm |
[…] under SharePoint, Web Part | Tags: List Forms, SharePoint | No Comments This is the coolest post I’ve read in a long time! Paul Culmsee, you are my MOSS hero right now. This post is pretty […]
May 25th, 2009 at 11:15 am |
Hi
I have been using the code in a manually created WSS web part (dont have access to SPD or server) up to the point where I introduced calculated fields.
in each case the field name displays the same while the innerfield name is correct.
debugging using alert the table structure for control.parentNode.parentNode.innerHTML is IDENTICAL for the table elements where inner and field name
are the same but the style.display = ‘none’ just does not get applied.
any help would be greatly appreciated.
May 25th, 2009 at 11:16 am |
sorry – correction: works perfectly where field and inner field names are the same
wont work where they are different.
thanks
June 13th, 2009 at 12:25 am |
I don’t see a way to edit the source either in the browser or SPD. I am running moss. any suggestions
August 14th, 2009 at 10:57 pm |
Great articles. Thanks so much!! These have been a HUGE help to me. I already
know JavaScript and am learning Sharepoint….this information was the BIG push
that I needed.
September 23rd, 2009 at 10:05 pm |
[…] More SharePoint Branding – Customisation using JavaScript Part 3 Categories: Work Tags: SharePoint Comments (0) Trackbacks (0) Leave a comment Trackback […]
September 30th, 2009 at 9:00 pm |
I loved the &ToolPaneView=2 hack and have used it in this example showing how add javascript to a CEWP to set the default duration for new Calender events.
http://blog.pentalogic.net/2009/09/setting-default-duration-for-new-calender-events/
December 3rd, 2009 at 11:43 pm |
[…] Cleaver workaround http://www.cleverworkarounds.com/2008/02/28/more-sharepoint-branding-customisation-using-javascript-… […]
February 20th, 2010 at 7:36 am |
[…] with stsadm commands. However I also found this little interesting approach I’d like to share http://www.cleverworkarounds.com/2008/02/28/more-sharepoint-branding-customisation-using-javascript-… which allows you to make changes but still keep the pages […]
April 27th, 2010 at 4:16 am |
[…] http://www.cleverworkarounds.com/2008/02/28/more-sharepoint-branding-customisation-using-javascript-… […]
September 3rd, 2010 at 5:54 am |
Hi – LOVE this approach. I’d like to see the ‘flip’ side of this regarding audiences. That is, to hide columns for everyone but show them for a particular audience. Like hide for Staff, Visitors, Contribuitors, but show for Managers and Owners.
November 3rd, 2010 at 10:21 am |
The best and neatest solution is here using SPD:
http://www.sharepoint911.com/blogs/laura/Lists/Posts/Post.aspx?ID=3
January 2nd, 2011 at 3:43 pm |
Working properly in MOSS 2007.
Please tell me the steps how we can implement this same in SP 2010
April 26th, 2011 at 8:27 pm |
Hi!
This is great info! Thanks! But…
Do you how I can do the exact opposite of this?
In your tutorial, the “hidden” fields will only be hidden to the members of the group you specified. I wanted to do the exact opposite: hide the fields to everyone, except to those specified. Is it possible? Thanks.
April 27th, 2011 at 5:47 pm |
Thanks! Very helpful
May 20th, 2011 at 9:20 pm |
[…] Pour cela affichez la page NewForm.aspx de votre enquête où se trouve le DFWP. Ajoutez alors à l’URL le paramètre “ToolpaneView” avec une valeur de 2. Ce qui donne http://[urldel’application]/%5Bsite%5D/%5Benquete%5D/NewForm.aspx?Source=%5BURLderetour%5D&ToolpaneView=2. C’est ce qu’on appelle le ToolpaneView Hack. […]
November 3rd, 2011 at 4:48 pm |
How about changing the redirect page after clicking the OK button and CANCEL button.. I want it to be redirected to a specific page
November 12th, 2011 at 12:15 am |
I’m looking for a similar solution to JC DLS. I can get a redirect to happen on a form load, but have no idea how to tie into the submit.
April 17th, 2012 at 2:09 pm |
How about changing the redirect page after clicking the OK button and CANCEL button.. I want it to be redirected to a specific page
November 20th, 2012 at 11:02 am |
I noticed that if I had multiple fields that had the same root word, then the script would not find the exact row to hide. I modified your script to this:
_spBodyOnLoadFunctionNames.push(“hideFields”);
function findacontrol(FieldName) {
var arr = document.getElementsByTagName(“!”);//get all comments
for (var i=0;i 0) {
return arr[i];
}
}
}
function hideFields() {
// uncomment the next line if you are troubleshooting
// debugger;
var control;
// Add the two lines below for each control to be hidden
control = findacontrol(“”);
control.parentNode.parentNode.style.display=”none”;
}
This forces the getElementsByTagName to find the line that says FieldName=””, so the whole string is matched.
November 20th, 2012 at 11:04 am |
none of the code uploaded correctly
_spBodyOnLoadFunctionNames.push("hideFields");
function findacontrol(FieldName) {
var arr = document.getElementsByTagName("!");//get all comments
for (var i=0;i 0) {
return arr[i];
}
}
}
function hideFields() {
// uncomment the next line if you are troubleshooting
// debugger;
var control;
// Add the two lines below for each control to be hidden
control = findacontrol("");
control.parentNode.parentNode.style.display="none";
}