More SharePoint Branding – Customisation using Javascript – Part 5
Hello and welcome to part 5 of another epic CleverWorkArounds blog post.
If you think I write a lot on my blog, you should see my documentation and training material! I seem to be rare insofar as I actually like to write documentation and can churn out reasonable quality pretty fast. So if you need your scary SharePoint farm/infrastructure audited and fully documented, you know who to call! 🙂
Anyhow, here is the current state of play.
- Part 1 of this series looked at how we can use JavaScript to deal with the common request of hiding form elements from the user in lists and document libraries. We looked at a Microsoft documented method, then a better, more flexible method.
- Part 2 wrapped this JavaScript code into a web part which has been loaded into the SharePoint web part gallery.
- Part 3 then examined the trials and tribulations of getting this new web part added to certain SharePoint pages (NewForm.aspx, EditForm.aspx and DispForm.aspx), and then with a few simple edits, use this web part to hide form fields as desired. Finally, I demonstrated the power of combining this with SharePoint Audiences targeting functionality to make the hiding/unhiding of form elements personalised to particular groups of users.
- Part 4 introduced Visual Studio and STSDEV. I created a project to perform the same functionality in part 3, but not requiring any JavaScript knowledge or experience. By the end of part 4 I had a STSDEV project that compiled with no errors.
And now we are onto Part 5 where we turn our attention to the packaging and deployment of our web part. As you are about to see, STSDEV makes this a very quick and painless experience. If you aren’t convinced of the merits of STSDEV and the SharePoint solution framework by the time you finish this article, then I don’t know what will convince you.
[Quick Navigation: Part 1, Part 2, Part 3, Part 4 and Part 6]
So, for those of you that want to see the complete source code for an easy cut and paste into your own project, I have listed it below.
using System;
using System.Web;
using System.Web.UI;
using System.Web.UI.WebControls;
using System.Web.UI.WebControls.WebParts;

using System.Xml.Serialization;
using System.ComponentModel;

namespace CleverWorkAroundsHideFields {

  [XmlRoot(Namespace = "CleverWorkAroundsHideFields")]
  public class CleverWorkAroundsHideFields : WebPart {

      private string _HideFieldList;
      private string[] _fieldlist;

      // Create a custom category in the property sheet.
      [Category("Custom Properties")]
      [Personalizable(PersonalizationScope.Shared)]
      [WebDisplayName("List of columns to hide on this page")]
      [WebDescription("Comma delimited list of columns to hide on this page")]
      [WebBrowsable(true)]
      [XmlElement(ElementName = "HideFieldList")]
      public string HideFieldList
      {
          get
          {
              return _HideFieldList;
          }
          set
          {
              _HideFieldList = value;
          }
      }

      protected override void Render(HtmlTextWriter output)
      {

          // Now lets extract the list of fields from the web part properties
          if (HideFieldList != null)
          {
              _fieldlist = HideFieldList.Split(',');

              // javascript inside C# - ugh
              // I know this looks ugly on account of the escaped quotes.
              // First section is the findacontrol function

              output.WriteLine();
              output.WriteLine(@"<script language=""javascript"" type=""text/javascript"">  ");
              output.WriteLine();
              output.WriteLine(@"_spBodyOnLoadFunctionNames.push(""hideFields"")  ");
              output.WriteLine(@"function findacontrol(FieldName) {  ");
              output.WriteLine(@"var arr = document.getElementsByTagName(""!"");  //get all comments ");
              output.WriteLine(@"for (var i=0;i < arr.length; i++ ) {   ");
              output.WriteLine(@"   // now match the field name  ");
              output.WriteLine(@"   if (arr[i].innerHTML.indexOf(FieldName) > 0) { ");
              output.WriteLine(@"      return arr[i]; ");
              output.WriteLine(@"   } ");
              output.WriteLine(@"  } ");
              output.WriteLine(@"}");
              output.WriteLine();
              output.WriteLine();

              // Now the hidefields function, which loops for each field to be hidden

              output.WriteLine("function hideFields() { ");
              output.WriteLine("   var control; ");

              if (_fieldlist != null)
              {
                  for (int i = 0; i < _fieldlist.Length; i++)
                  {
                      output.Write("    control = findacontrol(\"");
                      output.Write(_fieldlist[i]);
                      output.WriteLine("\" ); ");
                      output.WriteLine("   control.parentNode.parentNode.style.display=\"none\"");
                  }
              }
              output.WriteLine(" }");

              output.WriteLine("</script>");
          } // if
      } // method

   }
}
Now, let’s focus back on our STSDEV generated Visual Studio solution and make a couple of changes, to properly package up our code.
Edit 1: Feature.XML
You will find Feature.XML under RootFiles\TEMPLATE\Features\CleverWorkAroundsHideFields
In this example, I have modified the Title, Description and ImageUrl attributes of the <Feature> element of Feature.xml to give more meaningful, friendly descriptive text. The default image has been renamed to macgyver.jpg and you will soon see why 🙂
<Feature
  Id="8C39BCDB-9361-4412-950C-5ADE30AFF14E"
  Title="CleverWorkArounds: JavaScript Hidden Column Manager"
  Description="This SharePoint solution can be used to hide columns from DispForm.apsx, EditFormaspx, NewForm.aspx as well as custom web part pages. (http://www.cleverworkarounds.com/
  Version="1.0.0.0"
  Scope="Site"
  Hidden="false"
  ImageUrl="CleverWorkAroundsHideFields\macgyver.jpg" xmlns="http://schemas.microsoft.com/sharepoint/">
  <ElementManifests>
    <ElementManifest
      Location="WebParts.xml" />
    <ElementFile
      Location="WebParts\CleverWorkAroundsHideFields.webpart" />
      </ElementManifests>
</Feature>
Edit 2. Custom Icon Image
I decided that if I am going to create a SharePoint Feature with an icon, I’d have to use something that captures the very essence of the “clever workaround”. When you think about it, can it be anybody but MacGyver?
[if you see a broken image above then your IT staff are being anal and blocking YouTube – sorry]
Ahhh- the memories.. *ahem*, focus Paul – back to the post.
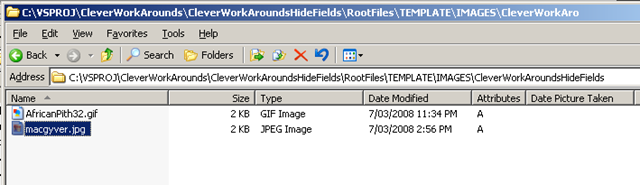
So, I have a small picture of MacGyver called oddly enough, MacGyver.jpg. I have placed this file into the RootFiles\TEMPLATE\IMAGES folder in my STSDEV project as shown below.
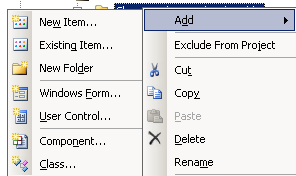
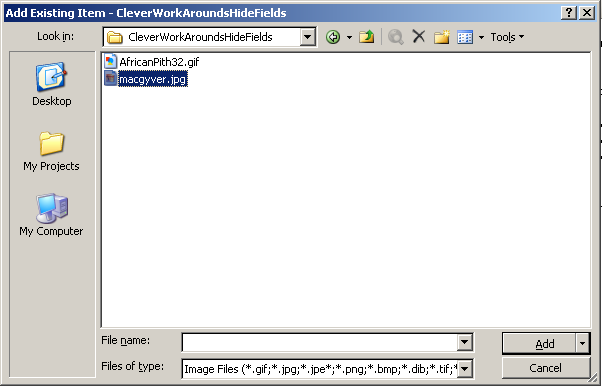
Now in Visual Studio, I have added this image to the project.
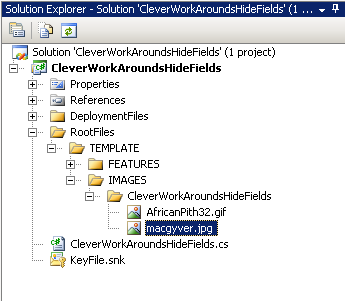
As you can see below, now macgyver.jpg is listed along with the default STSDEV image. You can delete the default image AfricanPith32.gif as we will not be needing it.
Edit 3. WebParts.XML
You will find WebParts.XML under RootFiles\TEMPLATE\Features\CleverWorkAroundsHideFields
In this example, I have modified the <File> element of WebParts.XML, modified the property element named “Group”, as well as added in a Description and Title property also. This XML file uses the <File> directive to put our web part into the web part gallery for any site collection where the feature is activated.
<Elements xmlns="http://schemas.microsoft.com/sharepoint/">
  <Module Name="CleverWorkAroundsHideFields" List="113" Url="_catalogs/wp" Path="WebParts" RootWebOnly="True">
    <File Url="CleverWorkAroundsHideFields.webpart" Type="GhostableInLibrary">
      <Property Name="Group" Value="CleverWorkArounds" />
      <Property Name="Description" Value="Web part to selectively hide columns via JavaScript"/>
      <Property Name="Title" Value="CleverWorkArounds Hide Column Web Part"/>
    </File>
  </Module>
</Elements>
Let’s build it!
Right! If you have made it this far, then let’s do a final build using “DebugBuild” configuration. If it all compiles, we are ready to test a deployment to our development server.
Now you will get to see why STSDEV is such a damn useful tool. In the drop down window shown below, choose “DebugDeploy” as the build option, and then press F6 or build the solution via the “Build” menu.
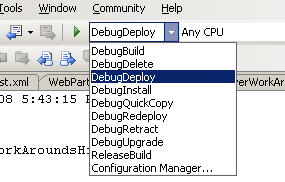
Below is the output of the build. Look closely at the annotated output below. The web part has been packaged up into a SharePoint solution, the solution has been added to the SharePoint solution store and then activated for all web applications. (look mum, no hands!)
—— Build started: Project: CleverWorkAroundsHideFields, Configuration: DebugDeploy Any CPU ——
c:\WINDOWS\Microsoft.NET\Framework\v2.0.50727\Csc.exe /noconfig /nowarn:1701,1702 /reference:”C:\Program Files\Common Files\Microsoft Shared\Web Server Extensions\12\ISAPI\Microsoft.SharePoint.dll” /reference:c:\WINDOWS\Microsoft.NET\Framework\v2.0.50727\System.dll /reference:c:\WINDOWS\Microsoft.NET\Framework\v2.0.50727\System.Web.dll /reference:c:\WINDOWS\Microsoft.NET\Framework\v2.0.50727\System.Xml.dll /keyfile:KeyFile.snk /out:obj\DebugDeploy\CleverWorkAroundsHideFields.dll
*** The above output is the command used by Visual Studio to compile the web part DLL.
Compile complete — 0 errors, 0 warnings
CleverWorkAroundsHideFields -> C:\VSPROJ\CleverWorkArounds\CleverWorkAroundsHideFields\bin\Debug\CleverWorkAroundsHideFields.dll
Refreshing Deployment Files…
“C:\Program Files\Common Files\stsdev.exe” /refresh CleverWorkAroundsHideFields C:\VSPROJ\CleverWorkArounds\CleverWorkAroundsHideFields\
*** STSDEV now runs and updates some of the other files in the solution required to deploy this web part (completely hands off for the developer which is great)
STSDEV – Simple Tools for SharePoint Developers
Refreshing Solution Package Files
Current Solution Name:
Current Solution Directory:
Refreshing deployment files…
Rebuilding DeploymentFiles\manifest.xml
Rebuilding DeploymentFiles\SolutionPackage.ddf
Deleting Solution Package File…
Building Solution Package (Debug Version)
“C:\Windows\System32\makecab.exe” /F DeploymentFiles\SolutionPackage.ddf /D CabinetNameTemplate=CleverWorkAroundsHideFields.wsp
Microsoft (R) Cabinet Maker – Version 5.2.3790.0
Copyright (c) Microsoft Corporation. All rights reserved..
Parsing directives
Parsing directives (DeploymentFiles\SolutionPackage.ddf: 1 lines)
20,812 bytes in 6 files
Executing directives
0.00% – manifest.xml (1 of 6)
0.00% – CleverWorkAroundsHideFields.dll (2 of 6)
0.00% – CleverWorkAroundsHideFields\feature.xml (3 of 6)
0.00% – CleverWorkAroundsHideFields\WebParts.xml (4 of 6)
0.00% – CleverWorkAroundsHideFields\WebParts\CleverWorkAroundsHideFields.webpart (5 of 6)
0.00% – IMAGES\CleverWorkAroundsHideFields\macgyver.jpg (6 of 6)
100.00% [flushing current folder]
Total files: 6
Bytes before: 20,812
Bytes after: 4,955
After/Before: 23.81% compression
Time: 0.02 seconds ( 0 hr 0 min 0.02 sec)
Throughput: 1354.95 Kb/second
*** STSDEV now builds the web part and supporting files into a SharePoint solution (WSP) file called CleverWorkAroundsHideFields.wsp
Installing Solution…
“C:\Program Files\Common Files\Microsoft Shared\web server extensions\12\bin\stsadm.exe” -o addsolution -filename DeploymentFiles\CleverWorkAroundsHideFields.wsp
Operation completed successfully.
*** Now we use the SharePoint Admin tool STSADM to add the solution file CleverWorkAroundsHideFields.wsp to the SharePoint solution store. This creates a SharePoint timer job to actually perform this task.
“C:\Program Files\Common Files\Microsoft Shared\web server extensions\12\bin\stsadm.exe” -o execadmsvcjobs
Executing .
Operation completed successfully.
*** Now we have forced SharePoint to execute all outstanding timer jobs, thereby forcing the solution to be added to the store
Deploying Solution…
“C:\Program Files\Common Files\Microsoft Shared\web server extensions\12\bin\stsadm.exe” -o deploysolution -name CleverWorkAroundsHideFields.wsp -immediate -allowgacdeployment -allcontenturls
Timer job successfully created.
“C:\Program Files\Common Files\Microsoft Shared\web server extensions\12\bin\stsadm.exe” -o execadmsvcjobs
Executing .
Executing solution-deployment-cleverworkaroundshidefields.wsp-0.
The solution-deployment-cleverworkaroundshidefields.wsp-0 job completed successfully, but could not be properly cleaned up. This job may execute again on this server.
Operation completed successfully.
*** These last two steps activated the uploaded solution using STSADM and then once again, executed all outstanding timer jobs. Note that in our example here, the final timer jobs had an error.
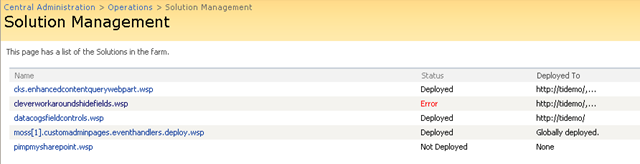
Verifying Successful Deployment
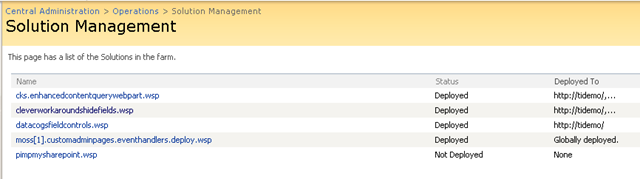
We can verify what the above log is telling us by navigating to Solution Management in SharePoint Central Administration. So let’s take a look! As reported in this log, there was an error. Note the cleverworkaroundshidefields.wsp status in in an “Error State”
Error? Oh no! What to do?
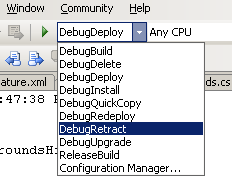
So for some reason, we have had a deployment error. So let’s retract this solution from SharePoint and perform an IISReset.
This action can be performed within Visual Studio thanks the the STSDEV functionality. Change the build type to a “DebugRetract” and press F6 or perform a build via the “Build” menu.
This time the log is much simpler, because we are not actually compiling our code this time. Instead, we are running the STSADM commands to retract this problematic solution.
—— Build started: Project: CleverWorkAroundsHideFields, Configuration: DebugRetract
“C:\Program Files\Common Files\Microsoft Shared\web server extensions\12\bin\stsadm.exe” -o retractsolution -name CleverWorkAroundsHideFields.wsp -immediate -allcontenturls
Timer job successfully created.
“C:\Program Files\Common Files\Microsoft Shared\web server extensions\12\bin\stsadm.exe” -o execadmsvcjobs
Executing .
Executing solution-deployment-cleverworkaroundshidefields.wsp-0.
Operation completed successfully.
========== Build: 1 succeeded or up-to-date, 0 failed, 0 skipped ==========
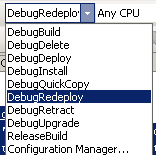
So now I perform an IISReset, and then attempt to redeploy the solution again.
For the sake of readability, I have omitted most of the build log this time.
—— Build started: Project: CleverWorkAroundsHideFields, Configuration: DebugDeploy
[snip lots of log output]
Executing .
Executing solution-deployment-cleverworkaroundshidefields.wsp-0.
Operation completed successfully.
Done building project “CleverWorkAroundsHideFields.csproj”.
========== Build: 1 succeeded or up-to-date, 0 failed, 0 skipped ==========
This time we do not have any warning messages in the Visual Studio build log. So let’s confirm via SharePoint Central Admin.
Great! So now we have successfully deployed the solution, the site collection administrator for this web application can activate the feature
Governance Interlude
I think at this time it is very important to reinforce why packaging up code into solutions is such a mandatory governance requirement. In the above example, we had a problem with the deployment of the web part. It may have been an issue with the DLL in the GAC, changes made to web.config files for each web application, or a variety of other reasons. The point is, I was able to roll back to a known good state and start over!
I’ve said it before, but any developer who rolls their eyes at me when I tell them that their work has to be packaged up as a solution, obviously is not serious about governance.
Activating the Feature
So, now that our solution has been installed and deployed to each web application, we now have a site collection feature to activate. This feature will copy our web part into the Web Part Gallery for the site collection and thereby make it available for use.
So as a site collection owner, we navigate to “Site Actions” and “Modify All Site Settings”. Choose the option “Site Collection Features”, and you will see the results of our work in all its glory! Wahoo!

So don’t just sit there! Activate the sucker!
Testing the new web part
For this example, I am going to use the same demo site and list that I used in part 1 of this series.
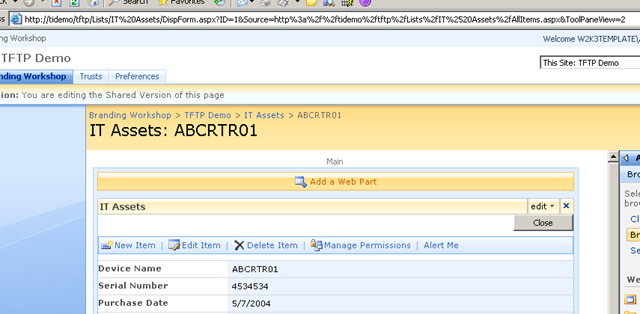
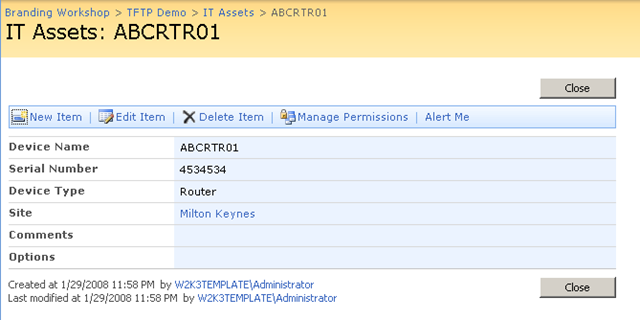
The site is http://tidemo/tftp and the list to try this on is the IT Assets list. I have navigated to the IT Assets list, and opened the entry for the first item in the list (ABCRTR01)
Using the ToolPaneView hack described in Part 3, open DispForm.aspx in page-edit mode as shown below.
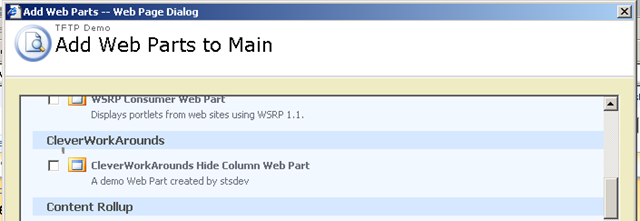
Click on the Main web part zone and add a new web part. You will see CleverWorkArounds as a web part group, listing our web part. (For reference, Feature.XML is the file where name and description information is set)
 ‘
‘
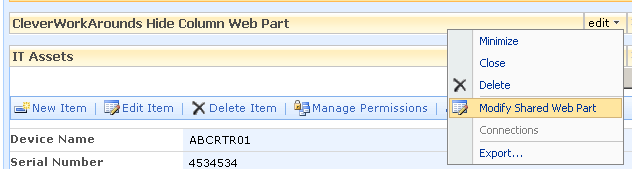
Add our web part to the page and then click on “Modify Shared Web Part” to being up the properties screen. This is where we get to see if you did all the XML serialisation code from Part 4 properly!!
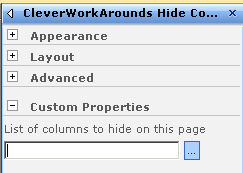
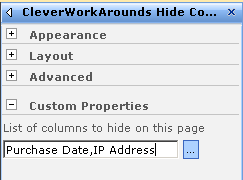
If you see the screen below, it has all worked a treat! You now have a custom web part property asking you to list the columns to hide. The below-right image shows this web part property filled in with the “Purchase Date” and “IP Address” columns listed.
Click OK and let’s see the result! Wohoo! Fields hidden!
Conclusion
So, after 5 long winded blog posts, what have we achieved? Going back over the goals they were:
- Allow hidden fields based on identity/audience
- Avoid use of SharePoint Designer
- Avoid customisations to the form pages that unghosted the pages from the site definition
- Avoid the need for site administrators/designers to have to dabble in javascript code
- Packaged up the web part into an easily deployable/retractable solution
CleverWorkAround Rating: Awesome!
Phew! Are we done yet? It seems like I have been typing these JavaScript articles for a freakin eternity! Alas no, I’m *still* not done!
I have an additional enhancement to make to this web part, and I also want to alert to you a couple of issues I had with this whole process.
So a Part 6 is in the works, but for now, I think its time for a well deserved beer! Your shout? 🙂
regards
Paul


March 11th, 2008 at 4:06 am |
[…] More SharePoint Branding – Customisation using Javascript – Part 5 […]
March 12th, 2008 at 11:10 pm |
[…] Part 5 then used STSDEV to create a solution package that allowed easy debugging, deployment and updating of the web part developed in part 4. […]
March 14th, 2008 at 1:22 am |
[…] More SharePoint Branding – Customisation using JavaScript Part 5 […]
March 21st, 2008 at 8:12 pm |
[…] information, il existe des solutions plus ou moins élégantes comme par exemple : More SharePoint Branding – Customisation using Javascript – Part 5, Part 1, Part 2, Part 3, Part […]
March 31st, 2008 at 8:19 pm |
Hi Paul,
Outstanding post but i do have one quick question if you would be so kind as to have a look?
I have a scenario where i would like certain fields to appear when a user makes a change to a drop down list box called Call Type.
When the user selects a choice from the list the hidefields script would run revealling the extra fields to be filled in.
I have tried to do this using an OnChange event and a Switch statement around the following piece of your code but am not getting anywhere?
_spBodyOnLoadFunctionNames.push(“hideFields”);
function findacontrol(FieldName) {
var arr = document.getElementsByTagName(“!”);//get all comments
for (var i=0;i 0) {
return arr[i];
}
}
}
function hideFields() {
// uncomment the next line if you are troubleshooting
// debugger;
var control;
// Add the two lines below for each control to be hidden
//control = findacontrol(“”);
//control.parentNode.parentNode.style.display=”none”;
}
Any help would be appreciated
Kind regards
Chris
June 24th, 2008 at 5:32 pm |
Hi Paul,
I have successfully used your WSP CleverWorkAroundsHideFields.wsp to hide fields in my Edit form. Thanks 🙂
There is (however) one issue that I am having.
I am trying to hide the ‘Content Type’ field in the Edit Form and it (clearly) doesn’t work because the ‘Content Type’ doesn’t have a comment field like below:
I’m sure that with the project source I could make the modifications I need to get this working (via the control.parentNode.parentNode.style.display=”none” as you have presented).
To get to the point – I’m keen for you to release this to codeplex so I can do that 🙂
Feel free to contact me to discuss.
Cheers!
Tod T.
June 24th, 2008 at 5:47 pm |
Update:
I have made it work via a kind of ‘javascript injection’.
i.e. I add the following to the ‘List of HTML element IDs to hide on this page’ I add the following:
ctl00_m_g_99e9305b_c9cd_4704_8a99_02850749f2d0_ctl00_ctl02_ctl00_ContentTypeChoice’).parentNode.parentNode.style.display=”none”; document.getElementById(‘ctl00_m_g_99e9305b_c9cd_4704_8a99_02850749f2d0_ctl00_ctl02_ctl00_ContentTypeChoice
You can see I close the first javascript statement and then start the second…
I would still encourage you to add this to codeplex – this would allow me to do this properly.
Cheers! (and thanks again),
Tod T.
July 12th, 2008 at 10:19 am |
[…] full series can be found here: Part 1, Part 2, Part 3, Part 4, Part 5 and Part […]
July 29th, 2008 at 10:42 pm |
July 29th, 2008 at 10:43 pm |
http://www.cleverworkarounds.com/2008/03/12/more-sharepoint-branding-customisation-using-javascript-part-6/
July 31st, 2008 at 10:46 pm |
Fine
I hide the fields but not and data.
View source …
Find “IP address” …
…..
Kind regards
Tyro